Monday, October 21, 2013

SCCM 2012 sp1 0xc000000f PXE Error

I was having an issue with SCCM 2012 SP1 with a PXE boot problem.  When workstations attempt to boot from my SCCM 2012 deployment point they receive the following error:

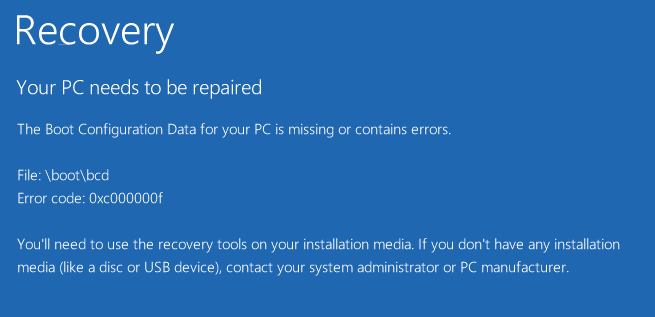
Recovery

Your PC needs to be repaired.
The Boot Configuration Data for your PC is missing or contains errors.


File: \boot\bcd
Error code: 0xc000000f


In the SMSPXE.log file on the SCCM Deployment point server the following error is being experienced which is spammed over and over.

&lt![LOG[Warning: Matching Processor Architecture Boot Image (0) not found]LOG]!&gt&lttime="16:59:32.682-660" date="10-21-2013" component="SMSPXE" context="" type="2" thread="2612" file="pxehandler.cpp:1542"&gt

Now I only have a x64 boot.wim file which I have deployed to my deployment point.  This boot.wim is the default x64 one taken of a Windows 8 DVD Media.  From my reading on the following forum thread, apparently this is a known problem with SCCM 2012 SP1.  What I have leant from the following forum thread is you MUST HAVE both a x64 and a x86 boot image deployed to your deployment point servers, even if your only using x64 like in my case.  This is also in alignment with the error which I am receiving in the SMSPXE.log file "Matching Processor Architecture Boot Image (0) not found" which would hint there is no x86 boot image deployed.

Please see this forum thread:

http://social.technet.microsoft.com/Forums/en-US/5b0db982-42fa-4ac3-b617-27d5b2ac24fa/sccm-2012-sp1-upgrade-pxe-boot-error-0xc000000f-bootbcd?forum=configmanagerosd

Now I went to upload a 32bit boot image from a Windows 8 32bit edition media however when ever I upload a 32bit media, I receive the following error:

"You can not import this boot image.  Only finalized boot images are supported.  For more information press F1."


It is important to note that 64bit Windows 8 boot media adds without a problem.
Also important, I received the following error when attempting to add a Windows 7 x64 boot media.  From my research I found that SCCM 2012 no longer supports the old WinPE 3.0 (which comes with Windows 7) and as a result you need to use a Windows 8 boot.wim file.  I blogged these findings here:

http://clintboessen.blogspot.com.au/2013/10/you-can-not-import-this-boot-image-only.html

The Resolution

To resolve this issue, the latest cumulative update must be installed on the SCCM 2012 SP1 server.  As of this writing the latest cumulative update is CU3 which is available from the following website:

http://support.microsoft.com/kb/2882125

This hotfix as of this writing must be requested from Microsoft in which they email you a link to download the hotfix.  Apply this update to SCCM servers in your central administration site, primary site, secondary site, providers and configuration manager consoles.

After installing this update rollup, I was able to successfully add the Windows 8 32bit boot image from a Windows 8 32bit media.


Sunday, October 20, 2013

You can not import this boot image. Only finalized boot images are supported. For more information press F1.

Using System Centre Configuration Manager with SP1 when attempting to add the Windows 7 with SP1 boot image "boot.wim" from the sources folder on a Windows 7 media which was copied to my SCCM server, I received the following error:

You can not import this boot image. Only finalized boot images are supported. For more information press F1.

When researching the error, this error is usually experienced when a custom boot image is made with custom drivers usually using third party tools other then the Windows Automated Installation Kit (WAIK) DISM.exe tool provided by Microsoft.  However this was not the case, I was just trying to upload the default boot.wim from a Windows 7 media.


After a good 10 minutes of digging I found a post on the Windows Noob forums by bennettjd which mentions System Centre Configuration Manager with SP1 does not support Windows 7 boot images - only Windows 8.

http://www.windows-noob.com/forums/index.php?/topic/7571-sccm-2012-boot-image/

After trying again with a Windows 8 boot image, it worked successfully.


 Hope this post helps you if you got caught out on this like me!

Monday, October 14, 2013

Where is the System Centre Configuration Manager Console on Windows Server 2012?

You have just installed SCCM 2012 on a new Windows Server 2012 computer having configured SQL, installed various components from the Assessment and Deployment Kit and a few other pre-requisites.  Now you wish to begin configuring SCCM using System Centre 2012 Configuration Manager console.

Problem is where is the console?  It does not get installed by default and there is little documentation online on how to install it.  I had to find the installer myself by manually browsing through program files.

The SCCM Configuration Manager console MSI installer can be found under:

C:\Program Files (x86)\ConfigMgr10\AdminconsoleSetup\{BCB4C126-7BEB-4938-B32F-FC73E17BD41E}\Adminconsole.msi

Note: In the SCCM 2012 Release Candidate the console was automatically installed which makes some online documentation even more confusing.


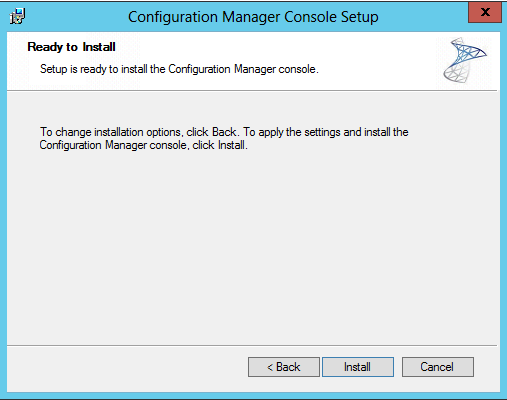
Simply launch this installer on the SCCM and follow the prompts.


Sunday, October 13, 2013

Limit the Amount of Memory used by an SQL Instance

By Default, an instance of SQL will attempt to use every free MB of memory it can get its hands on.  This is by design, the more database records available in memory, the lower the disk I/O activity.  However there are times when you may want to limit the amount of memory utilised by an SQL Instance.  For example you may have an SQL Clustered environment running AlwaysOn Availability which is responsible for hosting multiple SQL Instances.  In this case you may what to limit the memory utilisation of each instance.  Another scenarios may exist where you are monitoring your servers available memory using a monitoring product such as SCOM and configure the monitoring product to trigger an alert when 90% memory utilisation on a server is hit.  As SQL always utilises all available memory, this will cause many false alerts.

How do we do this?

First you need to connect to the SQL Instance you wish to configure using SQL Management Console, in my example it is SQL 2012.

Next right click the instance (in my example my SQL Instance is called SCCM) and click Properties.


On the left of the properties screen click Memory.  There will be a value by default under Maximum server memory (in MB) set to 2147483647 is equivalent to 2048TB of memory (no server has this!).


Set it to something more practical like 1024MB.  Please note if you  have a busy SQL application you will need to assign an appropriate amount of memory for the given application.


How to Change SQL Instance Collation

In this post I am going to show you how to change SQL 2012 database collation SQL_Latin1_General_CP1_CI_AS, the requirement for System Centre Configuration Manager (SCCM) 2012.  Changing database collation means all data in the database will be lost - make sure you know what your doing.

I needed to change the database collation for my SCCM instance in relation to an SCCM installation error:

Configuration Manager requires that you configure your SQL Server instance and Configuration Manager site database (if already present) to use the SQL_Latin1_General_CP1_CI_AS collation, unless you are using a Chinese operating system and require GB18030 support.

To change the database collation simply run the setup.exe from the SQL Installation media again but in quite mode.  The command you need to run is:

setup /q /action=rebuilddatabase /instancename=sccm /sapwd=P@ssw0rd /SQLCollation=SQL_Latin1_General_CP1_CI_AS /SQLSYSADMINACCOUNTS=domain\administrator


/q – perform silent installation

/Action – [RebuildDatabase ] Rebuilding the system databases to change the collation name

/INSTANCENAME – Name of the instance the collation has to change
- If Default Instance then “MSSQLSERVER”
- If Named Instance “Named Instance Name”

/SAPWD – Provide new password for SA login
 - Enable SA Account if it Disabled setup with Strong Password.

/SQLCollation – Provide the new collation name of SQL Server

/SQLSYSADMINACCOUNTS – Provide account name which has admin rights in sql server.

SQL 2012 Not Listening on TCP1433

Previous releases of Microsoft SQL such as 2008 R2 use to listen on TCP1433 for incoming SQL traffic.  Now in SQL Server 2012, TCP1433 is no longer utilised.  This can be shown using the netstat command as shown in the screenshot below.

SQL Server 2012 now uses dynamic ports for each SQL instance which is subject to change.  SQL client applications discover the which port the instance is now running on by querying UDP 1434, the SQL Browser Service which returns the correct port.  My SQL Server instance is currently running on TCP25463 and the Browser Service tells the client to connect to this port.

This is similar to the way the RPC Endpoint Mapper works for RPC based Microsoft applications.  In terms of network lockdown and ACL rules, the network engineers are usually unhappy about this approach as it means they need to keep the entire port range open.


Friday, October 11, 2013

How to view the NAT Translation Table on a Cisco Router

To view the NAT translation table on a Cisco router to ensure it is not overloaded, the command you want to use is:

"show ip nat translation"

Run this command from enable mode.  This command is useful especially when wanting to see if your  NAT tables are getting slammed by a large number of web connections from potential miscellaneous software on your network.


Another command which is useful when identifying if your router is overloaded from  NAT is to check the memory.  This can be viewed with the "show mem" command.


Thursday, October 10, 2013

How to determine number of users connected to CAS Server?

I received an email today from someone asking me how to determine the number of users logged onto a CAS server so I decided to blog the answer.  There is a Powershell command to identify the number of connections to an Exchange mailbox server, "Get-LogonStatistics" but none for viewing the number of connections to a client access server.

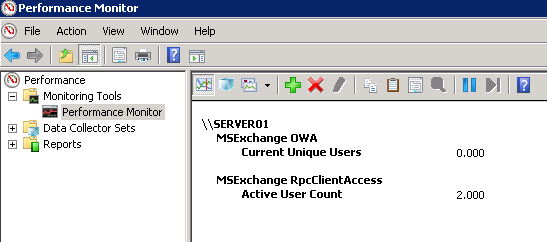
For Exchange client access servers you need to look elsewhere, Windows Performance monitor.  From here we can easily get a telly of the number of users connected to our Exchange client access server.  You can see in my lab environment I currently have 2 users connected through RpcClientAccess (Direct RPC or RPC over HTTPS) and no Exchange OWA users.

To get to performance monitor from a run prompt, type "perfmon" then add the counters as in the screenshot below.


Looking at the user count on each CAS server can be useful especially when you have a bunch of CAS servers in a farm with load balancers in place, you want to make sure the users are being distributed evenly across your CAS servers.

If you want to encorporate these performance monitors into PowerShell code, this is also achievable and has already been done.  For more information on this please refer to the following blog posts:

http://www.mikepfeiffer.net/2011/04/determine-the-number-of-active-users-on-exchange-2010-client-access-servers-with-powershell/

http://oxfordsbsguy.com/2013/06/20/powershell-identify-the-number-of-users-connected-to-a-exchange-2010-cas-server/

Tuesday, October 8, 2013

Changing a Forgotton Root Password in Linux

I built a Linux server a few months ago for monitoring purposes for a customer, however I failed to write the root password down - doh!  In this post I will be showing you how to change the root password for Linux systems using GRUB boot loader.  If your running LILO (LInux LOader), this how to will not work for you.

The Linux distribution used in this demonstration is CentOS release 5.9 which can be viewed using the "cat /etc/*-release" command, a quick way of finding the distribution of a unix/Linux operating system.

Now to recover a lost root password, you must enter a operating mode known as "single user mode".  This is an environment which does not require login details to logon to the system which hence enables us to change the password of the root account.

Now the first ting you need to do to enter single user mode is at the grub boot screen, press "a" to enter "append" mode.  The grub boot screen in later versions can be graphic interfaces, however on older distributions of Linux it is generally text based.  In my version of CentOS server, my grub screen is a GUI and has a pretty pattern in the background.

This is where you press "a" to get into that append mode.  Be quick as this screen moves pretty fast.


Next pick select the Kernel you wish to boot, there can be multiple here especially if you have done Kernel upgrades in the past.  If you are not sure, select the latest version by highlighting it using the up and down arrows.

Once you have selected the version you want, press "e" to enter "edit mode".


Now in edit mode, you want to select the entry that has "kernel" in front of it.

You will have ro root=something, depending on your Linux distribution/installation this can look different.  For example in another installation this reads:

ro root=/dev/sda1

In this installation it reads:

ro root=/dev/VolGroup00/LogVol00

What you need to do is append the word "single" at the end, all lowercase to instruct Grub to boot "single user mode".  I will type the entire thing out:

kernel /vmlinuz-2.6.18-348.1.1.e15 ro root=/dev/VolGroup00/LogVol00

needs to become

kernel /vmlinuz-2.6.18-348.1.1.e15 ro root=/dev/VolGroup00/LogVol00 single

To make the change to the kernel boot line hit "e" to "edit" the entry.


Now in the screenshot you see I have appended the word single a the end of the line.  Sorry you cant see the entire command, it has gone onto another screen due to my screen resolution being so small.  The full path looks like this:

kernel /vmlinuz-2.6.18-348.1.1.e15 ro root=/dev/VolGroup00/LogVol00 single

After making the change press ENTER.


In the screenshot below you can see that I have appended the word "single".  Again it cuts out due to the screen resolution being so small but you can see the "s".

To boot the new kernel boot command, press "b" for "boot".


The system will now boot straight to single user mode and you will be presented straight away with a command prompt.

To change the root password at the command prompt, type:

passwd root

Enter the new password for your system.  After you have changed the password type "reboot" and hit enter to reboot the system.


I hope this post has been helpful.

Thursday, October 3, 2013

What is the NTDS Quotas container in Active Directory?

In Active Directory there is a container called NTDS Quotas which is visible in the Active Directory Users and Computers.  In this blog post we are going to explore what it is and its use within Active Directory.


If you cannot see this NTDS Quotas container in Active Directory Users and Computers, you need to turn on Advanced Features which can be found in the view menu.

NTDS Quotas limit the amount of objects a security context (such as an Active Directory user object) can create within Active Directory.  Why would you want to do this?  Say you setup a Level 2 administrator on your network which has basic access to create users and similar objects on your domain.  Now if the credentials of this account escaped into the wrong hands, whilst it doesn't have any significant control over important components of Active Directory it could still be potentially used to take down the network.  What do you mean Clint?  The ability to create objects in Active Directory with no limit imposed is dangerous, an attacker could create billions of Active Directory objects in Active Directory until the database file NTDS.dit became so large it fills up the disk space on all available domain controllers making the domain completely unavailable.

When creating a user account in Active Directory which has been delegated the permissions to create objects within Active Directory it is best practice to set a quota to limit the number of objects that account can create.  This is done using the following command.

dsadd quota -part dc=at,dc=local -qlimit 10 -acct CN=L2admin,CN=Users,DC=at,DC=local


This has created my L2 Admin the ability to create a maximum of 10 objects within Active Directory, any more a senior administrator will need to up his quota limit.  It is also important to note that now the quota has been created, we can see that a quota object has been created for that user account in Active Directory under the NDSS Quotas container.


To verify how  many objects a user has created from their quota you can use the following command.

dsget user CN=L2admin,CN=Users,DC=at,DC=local -part DC=at,DC=local -qlimit -qused


As you see I have not yet created an account with the L2Admin account I created for this demonstration, so quota used remains at 0.

Important: Domain Admins and Enterprise Admins groups are exempt from quota limitations.  If you configure a quota for a Domain Admin or Enterprise Admin, it will not work!  All the more reason to limit the number of Domain Admins and always delegate permissions where possible.

Can I create a default quota for all non Domain Admin and Enterprise Admin accounts on my network which have the ability to create objects?

The answer to this is yes!  First navigate to the properties of the NTDS Quotas container within Active Directory.

 
Then on the Attribute Editor tab find msDS-DefaultQuota.  Whatever you set this to will apply to all users on the network and will limit the number of objects with Active Directory to which the user can create (of course provided they have been delegated rights to do so).  Remember this will not effect Domain Admins or Enterprise Admins!
 
 
I hope this post has been informative for you.

Tuesday, October 1, 2013

Can I rename an Exchange 2013 Server?

Just a quick post...

A question I have been asked a few times recently is "Can I rename an Exchange 2013 Server?".

The answer is no, Exchange 2013 does not support renaming server names after the installation of Exchange 2013.  In the event you rename an Exchange 2013 server, you are in for bad times!

ASUS RT-N66U Dark Knight Wireless Problems

I recently purchased a ASUS RT-N66U Dark Knight Wireless to replace an under performing all in one router/modem/wireless hotspot provided by Bigpond Internet here in Australia.  The ASUS RT-N66U was configured in Access Point mode to simply provide wireless access coverage for a residential house using the latest firmware as of this writing 3.0.0.4.374.720 downloaded from the ASUS website.

After the setup of the new wireless hotspot was configured, we tested the unit and it performed amazing.  After the unit was in use for a period of time however we noticed the following problems occur:
  • After 4 hours in production, latency pinging the wireless hotspot was fluxuating between 1ms to 400ms.  This was when standing only a couple of metres away from the wireless access point.  Performance of the unit was also sub standard providing less then 4mbps to LAN resources instead of the promised 450mbps as promised by ASUS.  Rebooting the wireless access point resolved the problem.
  • Later on a few hours later we then noticed the wireless access point started failing to pass DHCP discovery packets on to a nearby DHCP server and as a result wireless clients started getting 169. APIPA addresses.  Again rebooting the wireless access point.
After reverting to the whirlpool forums I was advised to rollback the firmware to 3.0.0.4.276.  Rolling back the firmware to a previous build stabilised the unit.  It has been a rock solid reliable unit since rolling back the firmware.

To obtain the 3.0.0.4.276 stable build of firmware please visit the following ASUS website:

http://support.asus.com/download.aspx?slanguage=en&m=RT-N66U+(VER.B1)&os=8

I hope these experiences help others who may have similar stability issues with the ASUS RT-N66U Dark Knight Wireless unit.

Right Clicking on Files and Folders makes Windows 7 Hang

I had a customer today in which whenever they right clicked on My Computer, Folders or Files on Windows 7 the entire explorer process would hang.  After diagnosing this issue it turned out that a bad User Shell Extension was to blame.

User Shell Extensions are the options which are presented in the drop down menu whenever a user right clicks on an item.  The User Shell Extension which was to blame in this case was the Symantec Endpoint Protection.cloud extension as shown in the following screenshot.


When users right click on objects, explorer hangs for approximately 10 seconds with the little blue Windows 7 thinking circle spinning around and around.

To disable this Shell Extension I used a tool called ShellExView v1.86 from NirSoft.  This tool can be downloaded from the following website:

http://www.nirsoft.net/utils/shexview.html

Simply right click on the bad shell extension and select Disabled in the ShellExView program.  The Symantec Shell Extension for Symantec Endpoint Protection.cloud was called IEContextMenu as shown in the following screenshot.


So Clint I have the same issue as you but I'm not using Symantec Endpoint Protection.cloud, how do I find out what is causing the problem?

To find out what User Shell Extension is causing the problem I recommend performing the following tasks.  In the ShellExView application, disable all non-Microsoft Shell Extensions and test.  This should resolve the problem as it is generally third party Shell Extensions which cause the problem.

Once you have done this reboot your computer.  Now slowly enable one extension at a time following by a reboot after each extension until you find the one which is problematic.

Please note whilst recommended, you do not need to use the ShellExView application.  Shell Extensions can be removed through manual editing of the registry.  If you would like to solve your issue through manual registry key changes, please view the following Microsoft article.

http://msdn.microsoft.com/en-us/library/windows/desktop/cc144110.aspx

Monday, September 23, 2013

Internet Explorer 9 Local HTML Files - Do you want to save this file?

A customer of mine just deployed Internet Explorer 9 to their workstations through WSUS.  After rolling out Internet Explorer 9 whenever html files were executed from the local computer users were prompted with:

"Do you want to save this file?"

For this particular customer, the logon script executed a html file locally to show live process of the various tasks the logon script needed to carry out.  Internet Explorer 9 caused major disruption as a result.


To allow HTML files to launch from the local computer without popping up as a download, ensure "Allow active content to run in files on My Computer" to be selected in Internet Options.


Wednesday, September 11, 2013

IE 10 Prompting for credentials - Windows Authentication

Today I responded to a customer who has an internal intranet.  The customer has no issues accessing the intranet page from IE7, IE8, or IE9 - However when upgrading to Internet Explorer 10, the users are now getting prompted for username and password using windows authentication even though the user account the user is logged in with has access to the website hosted on Internet Information Services (IIS).

The following screenshot shows the logon authentication prompt presented from Internet Explorer 10 when attempting to access the organisations internal intranet.


Internet Explorer 10 by default allows credentials to automatically pass through to all "intranet" pages, however "internet" pages do not pass through credentials for security reasons.  To see if Internet Explorer is treating the page as an "intranet" page or "internet" page, right click on the page error message (depending if you typed your credentials in or not) and click properties.


In the properties section of the page it will display what zone is currently configured.  As you see below, Internet Explorer is treating the "intranet" page for this customer as an "internet" page and hence the user is getting prompted.


Now one fix for this problem is to simply go to Internet Options, Internet, Custom Level and set the User Authentication --> Logon to "Automatically logon with current user name and password".  Whilst this will solve the problem it will lead to credentials of the current logged in user to pass over the Internet, not such a good idea!


A better fix is to configure your "intranet" page which is being treated as an "internet" page as an "intranet" page within Internet Explorer.  This can be done by going to Internet Options, Local Intranet, Sites, Advanced.


In the advanced page add your local intranet page.

 
Problem fixed - Internet Explorer will no longer prompt for Authentication when accessing the local Intranet.
 
Applying fix to all computers
 
Now you want to apply this configuration to all computers on your domain.  This can be done using Group Policy using the "Site to Zone Assignment List" group policy setting.  This setting is located under:
 
Administrative Templates\Windows Components\Internet Explorer\Internet Control Panel\Security Page\Site to Zone Assignment List
 
 
 In this policy setting enter the intranet address you want to add to the Local Intranet settings as we did manually above along with a value.  The values are represented as follows:

1 = Intranet zone
2 = Trusted Sites zone
3 = Internet zone
4 = Restricted Sites zone

As we want to add the site to the Intranet Zone we enter a value of 1.


Upon the next Group Policy refresh, all workstations will now no longer get prompted when attempting to access the Intranet page.

Hope this blog post has been helpful for people experiencing the same problem.

Wednesday, September 4, 2013

Windows Server 2012 WSUS Server Not Downloading Updates

I had just configured a brand new Windows Server 2012 WSUS Server however a problem was experienced where the server was not downloading updates.  It was a freshly deployed WSUS Server which was configured to synchronise against the Microsoft Update Servers.  The WSUS Server was performing synchronisations according to the preconfigured schedule, and the synchronisation log was showing that new updates were successfully synchronised.

Despite this, the WsusContent folder remained empty.

These symptoms are shown in the following screenshot.


The following errors were also experienced in the servers application logs:

Log Name:      Application
Source:        Windows Server Update Services
Date:          4/09/2013 6:28:44 AM
Event ID:      10032
Task Category: 7
Level:         Error
Keywords:      Classic
User:          N/A
Computer:      ADM-WSUS-01.domain.local
Description:
The server is failing to download some updates.


Log Name:      Application
Source:        Windows Server Update Services
Date:          4/09/2013 1:22:15 AM
Event ID:      364
Task Category: 2
Level:         Error
Keywords:      Classic
User:          N/A
Computer:      ADM-WSUS-01.domain.local

Description:
Content file download failed. Reason: Value does not fall within the expected range. Source File: /d/msdownload/update/software/defu/2013/08/am_base_patch1_160dc153e5db49297bd527404b2c03e540291cbd.exe Destination File: E:\WSUS\WsusContent\BD\160DC153E5DB49297BD527404B2C03E540291CBD.exe.


After leasing with members of the WSUS team it was discovered a bug existed in Windows Server 2012 when using proxy servers which requires authentication, as per my WSUS deployment.


Microsoft has developed a hotfix for this issue which can be downloaded from the following location.  Companies must request the hotfix and Microsoft will email the download link.

http://support.microsoft.com/kb/2838998

Only download this hotfix if you are experiencing the documented issue above.

After you install the hotfix a reboot of the WSUS server is required.

Once the hot fix is installed and the system has been rebooted, you must reset the WSUS content repository.  This is because WSUS "thinks" in the SQL database that all updates have been downloaded when in fact they failed.   To do this perform the following steps:

1) Close any open WSUS consoles.
2) Go to Administrative Tools – Services and STOP the Update Services service.
3) In Windows Explorer browse to the WSUSContent folder (typically D:\WSUS\WSUSContent or C:\WSUS\WSUSContent)
4) Delete ALL the files and folders in the WSUSContent folder.
5) Go to Administrative Tools – Services and START the Update Services service.
6) Open a command prompt and navigate to the folder: C:\Program Files\Update Services\Tools.
7) Run the command WSUSUtil.exe RESET


As soon as you run the WSUSUtil.exe reset command, this command takes a while to complete.  Unfortunately there is no progress bar or message which lets you know the reset has completed.  A handy trick is to monitor the Windows Internal Database SQL Instance for WSUS, this is busy with high CPU activity as it checks every update in the SQL database against the files in the WsusContent folder.  As soon as the SQL activity dies down you know the command has completed.


After this perform another sync.  You will then notice the WSUS Server begin to download the updates by verifying the WSUSContent directory growing.

 
Please not the WSUSContent takes a long time to download and will most likely pause consistently through the download process.  As soon as you verify the content size is growing, log off the server and leave it for 24 hours.

Tuesday, September 3, 2013

New Database Created - Couldn't mount the database that you specified

This is a common problem in Exchange 2010 which I have seen multiple times so I have decided to blog it.  When creating a new mailbox database, directly after mailbox creation you might receive the following error:

--------------------------------------------------------
Microsoft Exchange Error
--------------------------------------------------------
Failed to mount database 'Database2'.

Database2
Failed
Error:
Couldn't mount the database that you specified. Specified database: Database2; Error code: An Active Manager operation failed. Error The database action failed. Error: Operation failed with message: MapiExceptionNotFound: Unable to mount database. (hr=0x8004010f, ec=-2147221233)
. [Database: Database2, Server: ADM-EXCH-01.domain.local].

An Active Manager operation failed. Error The database action failed. Error: Operation failed with message: MapiExceptionNotFound: Unable to mount database. (hr=0x8004010f, ec=-2147221233)
. [Database: Database2, Server: ADM-EXCH-01.domain.local]

An Active Manager operation failed. Error Operation failed with message: MapiExceptionNotFound: Unable to mount database. (hr=0x8004010f, ec=-2147221233)
. [Server: ADM-EXCH-01.domain.local]

MapiExceptionNotFound: Unable to mount database. (hr=0x8004010f, ec=-2147221233)


This error can be caused when multiple domain controllers exist in the same Active Directory site.  Microsoft Exchange creates an object in the configuration partition to represent the mailbox database.  When Active Manager goes to mount the newly created database it may talk to a different domain controller in the same Active Directory site which does not yet contain the record for the mailbox database.

These databases objects in Active Directory are msExchPrivateMDB class objects and reside under:

Configuration Partition --> Services --> Microsoft Exchange --> Exchange Org Name --> Administrative Groups --> Exchange Administrative Group (FYDIBOHF23SPDLT) --> Databases

In the event you receive this error simply wait a few minutes for AD Replication to catch up and then attempt the database mount operation again. 

Exchange 2010/2013 - Get-MailboxStatistics TotalItemSize in Numeric Format

To get a list of all mailboxes and their sizes, the following command produces this information.

Get-Mailbox | Get-MailboxStatistics |  select-object DisplayName,TotalItemSize

However the data outputted by this command is not in a format which can be used with script, it is not numeric as shown in the following screenshot.


To get the data for TotalItemSize just as a number such as KB, MB, GB etc, use the following commands:

{$_.TotalItemSize.Value.ToKB()}
{$_.TotalItemSize.Value.ToMB()}
{$_.TotalItemSize.Value.ToGB()}

For example:

Get-Mailbox | Get-MailboxStatistics |  select-object DisplayName, {$_.TotalItemSize.Value.ToMB()}

This will ensure the data returned is in a format which you can use for scripting.

Monday, September 2, 2013

Windows XP - End of Life Risk

Microsoft has announced that Windows XP will become end of life April 8, 2014 which means no more critical or security updates.  Despite this many organisations still do not have a clear plan in place on how to get client computers off Windows XP before this date.

As a an IT Professional I believe come April 8, 2014, companies still running Windows XP will be hit with a large spread of zero day exploit viruses - something which will go down in history.  For those of you who remember all the hype in the media regarding Y2K bug with the clocks ticking over to a new century and the computers no longer working - whilst there was an impact with the clocks turning over the impact was relatively low.  However with the Windows XP end of life date, I believe this is a huge risk which can cause billions of dollars of productivity loss.  Despite this huge risk, there has been little media coverage around it.

I have just made some very big statements such as "Chaos" and "Billions of dollars of productivity loss" - now I need to explain the facts behind my beliefs.

Today as of this writing there are over 21 million viruses according to virus definition signatures provided by lead anti-virus companies such as Symantec corporation.  Most of these viruses need to be executed on a workstation for infection to take effect - a virus will do nothing if the code is not executed!  There are numerous methods cyber criminals trigger unwanted code execution for viruses some including:
  • Fake Ads and URL Links which lead to viral code executing
  • Autorun files and USB keys which automatically run on the users workstation
  • Peer to Peer applications which spread viruses to individuals
  • Mass emailing worms which spread viral code through the use of email attachments
  • Microsoft office files which contain macro virtual code
All these methods of infection trick or silently execute viral code on user workstations to install the virus.  As all means are legitimate ways of launching code on computer systems and as a result companies can put in place methods which circumvent viruses being installed including:
  • Removing the local admin rights which ensure viruses do not have permissions to infect beyond the users profile.
  • Disabling autorun from computers to stop USB viruses from spreading
  • Putting in place advanced spam filtering technologies to ensure viral attachments are not executed.
  • Pushing out enhanced security policies to workstations on the network.
Out of the 21 million viruses, only a handful have been known as malicious zero day exploits.  Zero day exploits are viruses which exploit an operating system vulnerability to automatically copy themselves from computer to computer over a network providing security and anti-virus companies with zero days to prepare.  Zero day exploits generally perform Buffer Overflow attacks creating vulnerabilities in core system services by overwriting adjacent memory blocks outside of an applications working set.  When the system goes to call code in memory, the code has altered and as a result it executes miscellaneous code which creates a system vulnerability to infect a machine.

The only way to stop a zero day exploits is to patch the security vulnerability in the operating system to ensure the zero day exploit can no longer buffer overflow the vulnerability in the operating system/application.

Over the years there has been a number of zero day exploits which have hit including Conficker, MS Blaster and Stuxnet - a computer worm discovered in June 2010 that is believed to have been created by the United States and Israel to attack Iran's nuclear facilities.  All these viruses were able to spread by performing buffer overflows to simply hop from computer to computer bypassing corporate security measures.

Finding a zero day exploit in an operating system is a difficult task which can take months or years of testing and reverse engineering of compiled code.  Cyber criminals spend large amounts of time researching and performing trial buffer overflows until the right exploit can be identified which can trigger remote code execution.  As soon as the buffer overflow is identified, it can only be used once.  As soon as it is used IT security companies become aware and software companies such as Microsoft patch their software making the buffer overflow useless.

As a result these zero day exploits are worth a lot of money to the right buyer and there is no doubt there are many out there which have been identified but not yet been used.  This can be shown in the following article "Microsoft Said To Give Zero Day Exploits To US Government Before It Patches Them":

http://www.techdirt.com/articles/20130614/02110223467/microsoft-said-to-give-zero-day-exploits-to-us-government-before-it-patches-them.shtml

With the end of Windows XP date becoming so close, it is unlikely we will see many zero day exploits be released unless it is for a targeted purpose such as Stuxnet.  After the Windows XP end of life date I believe we will see a large number of exploits appear for Windows XP and no backing support from Microsoft.  Who knows, if I am correct and the world is hit by a large number of zero day exploit attacks against Windows XP after the end of life date, Microsoft may be forced to go back on this announcement and fix these patches.  If this happens, as for Windows XP, we may be seeing this around for years to come yet...

In summary I believe it is a huge risk to organisations to maintain Windows XP workstations after the April 8, 2014 deadline.  The best thing to protect your business is to get off Windows XP now!

It will be very interesting to see what happens...