
The remote desktop client on windows workstations cache a licence that has been delegated out by a terminal server licencing server. If this licence is no longer valid you need to delete it from the client computers cache in order to allow the client computer to login.
You may experiance either of these errors while connecting to a Terminal Server using the Remote Desktop Client:
The remote computer disconnected the session becuase of an error in the licensing protocol
The remote session was disconnected because the local computer's client access license could not be upgraded or renewed. Please contact the server administrator
To remove invalid licences from the client computers cache navigate to the following registry key:
HKEY_LOCAL_MACHINE\SOFTWARE\Microsoft\MSLicensing\Store\
Remove all values under this location. Alternatively you can use this VBS Script:
On Error Resume Next
Dim WshShell, cal1
Set WshShell = WScript.CreateObject("WScript.Shell")
cal1 = "HKEY_LOCAL_MACHINE\SOFTWARE\Microsoft\MSLicensing\Store\LICENSE000\"
WshShell.RegDelete cal1
Set WshShell = WScript.CreateObject("WScript.Shell")
cal1 = "HKEY_LOCAL_MACHINE\SOFTWARE\Microsoft\MSLicensing\Store\LICENSE001\"
WshShell.RegDelete cal1
Set WshShell = WScript.CreateObject("WScript.Shell")
cal1 = "HKEY_LOCAL_MACHINE\SOFTWARE\Microsoft\MSLicensing\Store\LICENSE002\"
WshShell.RegDelete cal1
Set WshShell = WScript.CreateObject("WScript.Shell")
cal1 = "HKEY_LOCAL_MACHINE\SOFTWARE\Microsoft\MSLicensing\Store\LICENSE003\"
WshShell.RegDelete cal1
Set WshShell = WScript.CreateObject("WScript.Shell")
cal1 = "HKEY_LOCAL_MACHINE\SOFTWARE\Microsoft\MSLicensing\Store\LICENSE004\"
WshShell.RegDelete cal1
Set WshShell = WScript.CreateObject("WScript.Shell")
cal1 = "HKEY_LOCAL_MACHINE\SOFTWARE\Microsoft\MSLicensing\Store\LICENSE005\"
WshShell.RegDelete cal1
Set WshShell = WScript.CreateObject("WScript.Shell")
cal1 = "HKEY_LOCAL_MACHINE\SOFTWARE\Microsoft\MSLicensing\Store\LICENSE006\"
WshShell.RegDelete cal1
Dumb Terminals that connect via RDP to terminal servers also cache terminal server licences. Please refer to vendor documentation on how to clear these.
Tuesday, March 31, 2009
Reset Terminal Server grace period - Server 2000/2003
Windows Server 2000/2003 both have 90 day grace periods for their Terminal Server Licencing Server. Sometimes you may need to reset this 90 day period for the following reasons:
- Your clents cannot log on because all of your Terminal services licences have been used up, even though you bought the right amount of licences and should have licences available.
- Your clients are not taking permanent licences after the 90-day grace period expires.
To reset the 90 day grace period on the Terminal Server Licensing Server perform the following steps:
net stop TermServLicensing
Rename %windir%\system32\LServer to %windir%\system32\LServer.old
Make a new empty directory in %windir%\system32\ named LServer
net start TermServLicensing
Freezes at Applying Computer Settings
If you have a Windows Server that is hanging on "applying computer settings", try booting it into safe mode, firing up msconfig and disabling all third party non microsoft services and startup applications.
If a server continues to hang at applying computer settings, boot it up in safe mode, disable the VSS service, then reboot.
The VSS service was the service preventing the server to boot in my case.
Also you can try removing all network cables from the server during the boot process - this can help push it through as well. I have seen servers hang at applying computer settings while doing hundreds of network discoveries for hours. Unplugging the network cable during the boot process will abort this procedure and get your server up and running giving you time to work out what is causing the issue.
Restoring Registry
If a windows operating system such as 2000/XP/2003 is hanging, services are freezing... its not booting - before formatting and re-installing it's worth restoring a previous verison of the registry as these problems are normally registry related. To restore a registry follow these steps.
Navigate on the server to c:\windows\repair check the date modified on these files. If they are really old don’t use them, if they are recent we will restore them.
Registry files need to be manually copied outside of windows in Recovery Console. To access this you need to boot of a windows 2003 CD, you will also need the RAID drivers on a floppy disk.
Once you’re in Recovery Console, If the windows\repair backups are too old, navigate to the System Volume Information directory provided. In the system volume information type:
DIR /O:D
This will show you all directories from oldest to newest. You want a relatively new one about 2 weeks old (or before the problem started happening). The directories look like this:
_restore{D86480E3-73EF-47BC-A0EB-A81BE6EE3ED8}
If we were using this directory, navigate to the snapshot directory with a name something like this:
C:\System Volume Information\_restore{D86480E3-73EF-47BC-A0EB-A81BE6EE3ED8}\RP1\Snapshot
In here there are a bunch of files that have this naming format:
_REGISTRY_USER_.DEFAULT
_REGISTRY_MACHINE_SECURITY
_REGISTRY_MACHINE_SOFTWARE
_REGISTRY_MACHINE_SYSTEM
_REGISTRY_MACHINE_SAM
Copy them to C:\Windows\System32\Config and rename them to suit the original name. ie. _REGISTRY_MACHINE_SYSTEM will be renamed to SYSTEM.
Make you backup the original registry files in system32\config to system.bak or something, so if it does not boot with the restored registry files, you can boot back into recovery console and restore the original ones.
Exchange 2007 Mail Flow - How It Works!
Exchange 2007 uses AD Sites and Services site links to get a network topology of the environment. By default Exchange 2007 will use the route with the lowest amount of site hops with the lowest site link cost.
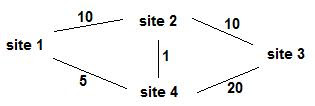
In this diagram there are 4 ways to get from Site1 to Site3.
Site1 -> Site2 -> Site3 = Cost 20
Site1 -> Site4 > Site3 = Cost 25
Site1 -> Site2 -> Site4 -> Site3 = Cost 31
Site1 -> Site4 -> Site2 -> Site3 = Cost 16
Site1 -> Site4 -> Site2 -> Site3 provides the lowest cost however exchange 2007 will use the path of the least hops with lowest cost... which in this case is Site1 -> Site2 -> Site3. Additionally when messages are realyed from Site1 -> Site2 -> Site3, messages will not hit Site2 hub transport server, it will just use the subnet information in sites and services to send it in that direction. This is because if Site2 hub transport had to recieve every email that comes through, it would use extra processing.
What if Site2 was responsible for spam filtering and you wanted email going from Site1 -> Site2 -> Site3 to actually pass through Site2's hub transport server?
This can be done by setting Site2 as a "Hub Site" by using the Set-ADSite command. This means that all messages flow along this journey must stop in site2 before being relayed on.
What if an exchange administrators wanted to to setup email replication different to active directory sites and services replication?
If you are not happy with the site link costs in AD, instead of updating sites and services you can use the powershell command Set-ADSiteLink to set new costs to that site link for exchange. This does not modify the value in sites and services. It only effects exchange. Whenever an exchange site link cost is specified, it will use this instead of the site link cost specified in AD Sites and Services. Very handy if you want mail to flow in a different direction to your AD replication.
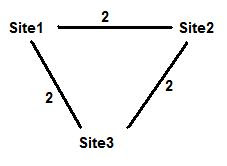
We want to get messages flowing from Site1 -> Site2 -> Site3, and not Site1 -> SIte3. We do not want to modify active directory site links. What needs to be done?
Answer
To perform this we need to do 2 things:
- First make site2 a "hub site" by using the Set-ADSite cmdlet.
- Second use the Set-ADSiteLink on the site1-site3 sitelink and make it a value of 5 or higher.
Conclusion
Provided your Active Directory Sites and Services is setup correctly in regards to site links and costs to reflect your physical network infrastructure, this should give you all the knowledge you need when it comes to the Exchange 2007 site to ensure your messages flow throughout your organisation efficiently and effectively.
If you have any questions feel free to drop me an email clint@kbomb.com.au
Exchange 2007 not installing on Server 2008 - Transport Service Hanging
If your Exchange 2007 Setup fails on Server 2008 when it gets to the client access and mailbox role because the Exchange Transport Service hangs on starting, it’s because the IPv6 protocol has been uninstalled. A stupid bug... it shouldn’t need IPv6.
You will also see this in the Exchange 2007 Installation log as a symptom located C:\ExchangeSetupLogs\ExchangeSetup.txt.
[30/03/2009 5:55:40 PM] [2] The remaining time for service status change is '00:10:30'.
[30/03/2009 5:55:40 PM] [2] [WARNING] Service checkpoint has not progressed. Previous checkpoint='1'- Current checkpoint='1'.
[30/03/2009 5:55:40 PM] [2] Previous service status query time is '30/03/2009 5:51:10 PM'.
[30/03/2009 5:55:40 PM] [2] Current service status query time is '30/03/2009 5:55:40 PM'.
[30/03/2009 5:55:40 PM] [2] Will wait '90000' milliseconds for the service 'MSExchangeTransport' to reach status 'Running'.
[30/03/2009 5:57:11 PM] [2] Service 'MSExchangeTransport' failed to reach status 'Running' on this server after waiting for '90000' milliseconds.
Simply re-enable IPv6 under TCP/IP Properties. I disabled it because I dont use IPv6 on my network and I wanted to minimize the attack surface.
How to setup SSL Host Headers IIS6
Host headers are used whenever you want to have multiple websites all on the same port, usually port 80 the standard http port. This can be configured in under Internet Information Services (IIS) Manager.

However in IIS Manager it does not let you configure host headers for SSL for websites listening on 443. Instead you need to use a vbs script provided by microsoft to achieve this. To do this perform the following:
· Create the website
· Setup your SSL Certificate as standard practices.
When you make changes in IIS Manager, it does not write them directly to the IIS Metabase, it simply stores them directly in memory. The IIS Service then does incremental updates to the IIS Metabase on a timed interval. To force the IIS Metabase to be updated with the new website you just created, run the iisreset program in a command prompt.
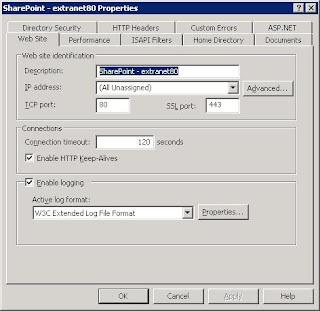
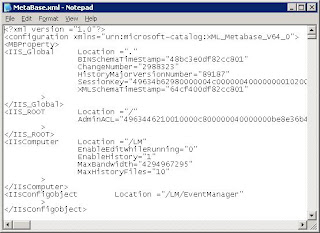
To setup the SSL host header we need the site identifier. To find this you need to open the IIS Metabase located by default in C:\WINDOWS\system32\inetsrv\MetaBase.xml
Find the name of your website for example "SharePoint - extranet80".
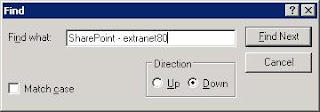
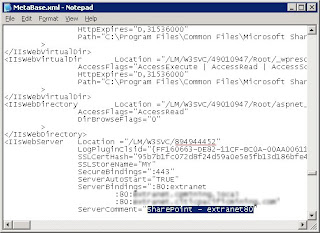
Under Location we have the Site Identifier, in this instance is 894944452.
There is a technet artical on how to Configuring Server Bindings for SSL Host Headers (IIS 6.0).
http://www.microsoft.com/technet/prodtechnol/WindowsServer2003/Library/IIS/8d9f2a8f-cd23-448c-b2c7-f4e87b9e2d2c.mspx?mfr=true
To bind the SSL Host Header for this site to extranet.citicpacificmining.com using the above article we would perform the following:
· Open a command prompt
· cd "C:\Inetpub\AdminScripts"
· cscript.exe adsutil.vbs set /w3svc/894944452/SecureBindings ":443:extranet.citicpacificmining.com"
· iisreset
If you navigate back to the MetaBase.xml file, you will notice that the SecureBindings string has changed:
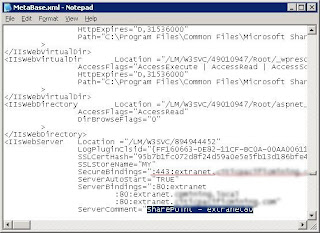
Perform the same steps for each SSL webpage you want to configure a host header for.


However in IIS Manager it does not let you configure host headers for SSL for websites listening on 443. Instead you need to use a vbs script provided by microsoft to achieve this. To do this perform the following:
· Create the website
· Setup your SSL Certificate as standard practices.
When you make changes in IIS Manager, it does not write them directly to the IIS Metabase, it simply stores them directly in memory. The IIS Service then does incremental updates to the IIS Metabase on a timed interval. To force the IIS Metabase to be updated with the new website you just created, run the iisreset program in a command prompt.
To setup the SSL host header we need the site identifier. To find this you need to open the IIS Metabase located by default in C:\WINDOWS\system32\inetsrv\MetaBase.xml

Find the name of your website for example "SharePoint - extranet80".


Under Location we have the Site Identifier, in this instance is 894944452.
There is a technet artical on how to Configuring Server Bindings for SSL Host Headers (IIS 6.0).
http://www.microsoft.com/technet/prodtechnol/WindowsServer2003/Library/IIS/8d9f2a8f-cd23-448c-b2c7-f4e87b9e2d2c.mspx?mfr=true
To bind the SSL Host Header for this site to extranet.citicpacificmining.com using the above article we would perform the following:
· Open a command prompt
· cd "C:\Inetpub\AdminScripts"
· cscript.exe adsutil.vbs set /w3svc/894944452/SecureBindings ":443:extranet.citicpacificmining.com"
· iisreset
If you navigate back to the MetaBase.xml file, you will notice that the SecureBindings string has changed:

Perform the same steps for each SSL webpage you want to configure a host header for.
How to Recover Deleted Items from any Outlook Folder
In Outlook versions prior to Outlook 2007, deleted item recovery is possible only from the deleted items folder. This means if you permently delete an email from your inbox, you wont be able to recover it - which is stupid! You will notice when you go to "Recover Deleted Items" it will be greyed out.
To enable it so a user can restore deleted items regardless which outlook folder they delete the email from perform the following steps:
1. Run regedit on client workstation and locate following hive
2. HKLM---Software----Microsoft----Exchange-----Client-----Options
3. Add a DWORD and name it DumpsterAlwaysOn
4. Give the newly created DWORD a value of 1
5. If Outlook is running, close it and restart it.
6. Set Outlook Client to open user’s mailbox
7. Highlight inbox
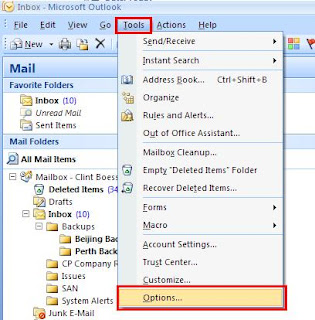
8. Select recover deleted items from the tools menu
9. Select the messages that need to be recovered and click on the recover button.
What happens if you want to make this option available to all users in your organisation?
You can create an ADM template and deploy this registry change to all your workstations. To do this flow these steps:
1. Open regedt32.exe on your local machine.
2. Navigate to
"HKEY_LOCAL_MACHINE\SOFTWARE\Microsoft\Exchange\Client\Options"
3. Choose Edit - New - DWORD Value
4. Name the value to "DumpsterAlwaysOn"
5. Right click the value and choose Modify
6. Set the Value Data to 1 and make sure the Base is Hexadecimal
7. Click OK
8. Highlight the value DumpsterAlwaysOn and choose File - Export
9. Export this .reg file to a location e.g. c:\temp
10. Name the file DumpsterAlwaysOn.reg
Next step is to install NUTS on your administrative workstation. NUTS stands for Network UTilities Set. It is full of awesome free very powerful tools for system engineers. Download it from http://yizhar.mvps.org/files/NUTS.EXE
Once NUTS is installed on your administrative workstation, create an adm file from the DumpsterAlwaysOn.reg file you exported previously by following these steps:
1. Click Start - Programs - NUTS - Reg to Adm
2. Choose File - Import REG file
3. Choose c:\temp\DumpsterAlwaysOn.reg
4. In the "REG Source" window, delete the following text:
"ExcludeCustomKeys"="FaxSep1;IMEX;SP0;SP1;WinRules0"
"FullAddressInText"="SMTP COMPUSERVE FAX"
5. Choose File - Regenerate ADM text
6. Choose File - Save ADM template
7. Save this file on the domain controller in c:\%windows directory%\inf as DumpsterAlwaysOn_template.adm
Now that you have the ADM File created... you just need to import it into Group Policy.
1. Choose Start - Administrative Tools - Group Policy Management
2. Expand the domain
3. Right click on Group Policy Objects - choose new
4. Name the new object DumpsterAlwaysOn
5. Right Click on the new Group Policy Object (DumpsterAlwaysOn) and choose Edit
7. Expand Computer Configuration
8. Right click Administrative Templates - choose Add/Remove Templates
9. Choose Add
10. Select file \\%domain_controller%\%windows directory%\inf\DumpsterAlwaysOn_template.adm
11. Click Open
12. Click Close
13. Highlight Computer Configuration\Administrative Templates
14. Choose View - Filtering - untick "Only show policy settings that....." and choose OK
15. Expand Computer Configuration\Administrative Templates\SOFTWARE\Microsoft\Exchange\Client\Options
16. In the right panel, right click DumpsterAlwaysOn and choose Properties
17. Ensure Enabled is checked
18. Ensure DumpsterAlwaysOn value is set to 1
19. Click OK
20. Close the Group Policy.
Monday, March 30, 2009
Fix a corrupt Exchange 2003 Database
1. Unmount databases.
2. Fix the physical database file: eseutil /p priv1.edb
3. Fix internal structore of file: isinteg -s servername -test alltests -fix
4. Defrag database file: eseutil /d priv1.edb
5. Mount databases.
2. Fix the physical database file: eseutil /p priv1.edb
3. Fix internal structore of file: isinteg -s servername -test alltests -fix
4. Defrag database file: eseutil /d priv1.edb
5. Mount databases.
How to configure an IP Address Blocklist in Exchange 2007
To block certain domain's or IP Addresses from sending email into your organisation, use powershell and execute the following:
Set-IPBlockListConfig -Enabled:$True
Add-IPBlockListEntry -IPAddress 123.456.0.1
Add-IPBlockListEntry -IPRange 123.456.1.1-123.456.0.255
To remove IP Addresses from being blocked execute the following in powershell:
Remove-IPBlockListEntry
Set-IPBlockListConfig -Enabled:$True
Add-IPBlockListEntry -IPAddress 123.456.0.1
Add-IPBlockListEntry -IPRange 123.456.1.1-123.456.0.255
To remove IP Addresses from being blocked execute the following in powershell:
Remove-IPBlockListEntry
How to audit mailbox access information
This is the powershell command to enable basic mailbox auditing. The audits get pumped out to Application Log on the Exchange Server.
Set-EventLogLevel "MSExchangeIS\9000 Private\Logons" -Level Low
Set-EventLogLevel "MSExchangeIS\9000 Private\Logons" -Level Low
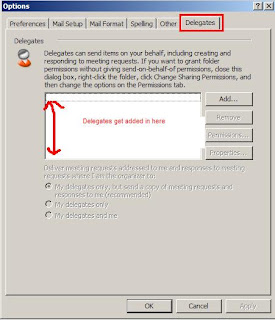
Duplicate Calendar Items - Caused by multiple delegates
With outlook 2003/2007 if you have more then 1-2 delegates, this can result in duplicate calendar items when receiving meeting requests. This bug has not been fixed by Microsoft. Many CEO’s have multiple delegates which causes this problem for their mailbox, such as their personal assistant and other staff members.
To check who you have delegated to your mailbox, simply do this:
Here is the experts exchange website that shows the solution to this issue:
http://www.experts-exchange.com/Software/Office_Productivity/Groupware/Outlook/Q_23036278.html
To check who you have delegated to your mailbox, simply do this:

Here is the experts exchange website that shows the solution to this issue:
http://www.experts-exchange.com/Software/Office_Productivity/Groupware/Outlook/Q_23036278.html
Deleted User Account or Mailbox not appearing in Disconnected Mailboxes
You deleted a user account/mailbox, you panic!
Before you go to your backups... lets just check that we have mailbox retentions enabled.
Server Configuration --> Mailbox --> Right click mailbox database (not storage group) hit properties --> Retention is under Deleted Settings on the Limits Tab.
User When a mailbox user/mailbox is deleted, it does not get removed from the exchange server until the retention has expired. However it does not get marked as a disconnected mailbox until the mailbox cleanup agent runs. The mailbox cleanup agent runs nightly by default as scheduled.
Note: Disconnected mailboxes are mailboxes marked as deleted pending their awaited retention period to expire before being permanently removed.
Scenario: You accidently delete a user account with a mailbox attached. Well if you have two DC's, great, reboot the one into directory services restore mode, restore sysstate then fireup your ntdsutil to mark the deleted user account as authorative. Back in business. But what if you only have one DC?
An alternative method is to create a new user account for that user, put him in the appropriate groups, then link his deleted mailbox to that account. You fire up your exchange management console/shell look in the disconnected users area, but hey, its not in the disconnected mailboxes area. Bet your panicing now. The reason its not in the disconnected mailboxes area is because exchange only realises a mailbox has been disconnected/deleted once the cleanup agent runs, scheduled nightly by default. Yes you can kick it off manually in management shell. Fire up your exchange management shell. The command you want is:
Clean-MailboxDatabase "Mailbox Database"
You have 30 mailbox databases, how do you know which mailbox database the mailbox was in? Who cares if you dont know, just run it on all by piping the Get-MailboxDatabase command.
Get-MailboxDatabase Clean-MailboxDatabase
Your new user account is back up online, however ppl's emails are bouncing saying recipient object cannot be found. Yes this is a pain in the ass. This is because the GUID id of the new mailbox does not match that of the NK2 file on the client workstations. The outlook.NK2 holds all the autocomplete contacts for outlook. The NK2 populates itself from the offline address book on a clients workstation. For affected users, you need to update the offline address book as it updates every 24 hours by default, then delete the NK2 file. Google for more info.
Connection to host lost telnet smtp Exchange 2007
I had an application that required sending email through a hub transport server. I created an additional receive connector with all the correct settings to lock it down to just a particular workstation that required to relay email unauthenticated. Whenever I attempted to send email from that host via telnet I received:
Connection to host lost
To fix this, restart the “Microsoft Exchange Transport Service”. This service replaces the Simple Mail Transport Protocol service (Part of IIS SMTP) that Exchange 2003 used. This service only deals with SMTP in Exchange 2007, it is not the transport dumpster.
Connection to host lost
To fix this, restart the “Microsoft Exchange Transport Service”. This service replaces the Simple Mail Transport Protocol service (Part of IIS SMTP) that Exchange 2003 used. This service only deals with SMTP in Exchange 2007, it is not the transport dumpster.
Certain Items not getting added to the OAB (not coming up in cached exchange mode)
OAB stands for Offline Address Book... it is a file that is distributed to the clients either through Public Folders or a web share located on your Client Access Servers. Sometimes there may be issues with particular recipients... and when Exchange goes to update the Address Book, it fails for those users, thus they never get added.
To find out any users that are experiancing this issue bump the logging up on the following items in your Exchange Management Shell.
Set-EventLogLevel "MSExchangeSA\OAL Generator" -level expert
Set-EventLogLevel "MSExchangeSA\Proxy Generation" -level expert
Once these are on expert mode, perform a manual update of your offline address book:
Update-OfflineAddressBook
Find out items in question under application log in event viewer.... repair the bad items. Ensure you return logging back to normal after.
Physical Volume Library Media not found
In Backup Exec every backup job was failing with this error:
Final Error Code: a000810d HEX (0xa000810d HEX) or e000810d HEX (0xe000810d HEX)Final Error Description: "Physical Volume Library Media not found"Final Error Category: Backup Media ErrorsError Text In Job Log: "Media mount failed."
To fix the problem i did the following:
1. In Backup Exec, go to Tools Options
2. Select the Catalog option under Settings
3. Clear the Use storage media-based catalogs check box
4. Re-catalog the tape
Apache2 Virtual Hosts Not Working - NameVirtualHost
I encountered this problem while setting up this website. I created 2 virtual hosts in:
/etc/apache2/sites-available/
- kbomb
- phpmyadmin
kbomb Virtual Host:
DocumentRoot /var/www/kbomb/public_html
ServerName kbomb.com.au
ServerAlias http://www.kbomb.com.au/
ErrorLog /var/log/apache2/kbomb.com.au-error.log
CustomLog /var/log/apache2/kbomb.com.au-acce ss.log combined
phpmyadmin Virtual Host:
DocumentRoot /usr/share/phpmyadmin
ServerName phpmyadmin.kbomb.com.au
ErrorLog /var/log/apache2/phpmyadmin.kbomb. com.au-error.log
CustomLog /var/log/apache2/phpmyadmin.kbomb. com.au.log combined
Whenever i went to kbomb.com.au, http://www.kbomb.com.au/ or phpmyadmin.kbomb.com.au i would get the same website.
With a bit of research here is my findings...
Because my debian server has 3 static IP addresses and does routing, Apache2 doesnt know which interface the Virtual Hosts are to work on. You need to define them in /etc/apache2/apache2.conf.
If you want your Virtual Hosts working on just 1 IP Address you would want to enter:
NameVirtualHost 202.89.160.16:80
If you would like your Virtual Hosts working on all network interfaces you want to define a wildcard. This is the most practical method unless you want to lock certain network interfaces from viewing your websites.
NameVirtualHost *
I wacked this line at the end of my apache2.conf file just before Include /etc/apache2/sites-enabled/.
So the end of my file looks like:
NameVirtualHost *
# Include the virtual host configurations:
Include /etc/apache2/sites-enabled/
This fixed my problem
Subscribe to:
Posts (Atom)


