Wednesday, December 28, 2011

SACL Watcher servicelet found that the SeSecurityPrivilege privilege is removed from account

In this post I will share with you the resolution to a problem I had on one of my clients Exchange environments. The following error was experienced in the event logs of my Exchange 2010 servers.

Log Name: Application
Source: MSExchange SACL Watcher
Date: 28/12/2011 11:00:43 AM
Event ID: 6006
Task Category: General
Level: Warning
Keywords: Classic
User: N/A
Computer: exchangeserver.domain.local
Description:
SACL Watcher servicelet found that the SeSecurityPrivilege privilege is removed from account S-1-5-21-54938807-350570593-2036031536-21088.


Next I used LDP.exe to translate the SID from the error message into something readable.


After investigating the problem I found out that "SeSecurityPrivilege privilege" translates to "Manage audit and security log" under user rights assignment in group policy. Exchange setup automatically adds "DOMAIN\Exchange Enterprise Servers" and "DOMAIN\Exchange Servers" to the "Manage audit and security log" user rights assignment on the Default Domain Controllers Policy.


My client had unlinked the Default Domain Controllers Policy from the Domain Controllers OU and created their own custom policy - NOT RECOMMENDED. Restoring this policy resolved the problem.

451 4.4.0 Primary target IP address responded with: "451 5.7.3 Cannot achieve Exchange Server authentication."

In this post we will look at what this error means:

451 4.4.0 Primary target IP address responded with: "451 5.7.3 Cannot achieve Exchange Server authentication." Attempted failover to alternate host, but that did not succeed. Either there are no alternate hosts, or delivery failed to all alternate hosts.


Lets have a look in the SMTP Receive protocol logs:

C:\Program Files\Microsoft\Exchange Server\V14\TransportRoles\Logs\ProtocolLog\SmtpReceive

- We can see connections trying to be established from 10.4.8.1 (in a remote AD site) and 10.4.2.8 (in the same AD site)
- We can see the connections are hitting the receive connector SVR01\External
- The receive connector is terminating the connection with "Service closing transmission channel"

2011-12-29T06:10:25.668Z,SVR01\External,08CE9265B5AAB0D9,0,10.4.2.10:25,10.4.8.1:49547,+,,
2011-12-29T06:10:25.668Z,SVR01\External,08CE9265B5AAB0D9,1,10.4.2.10:25,10.4.8.1:49547,*,SMTPSubmit SMTPAcceptAnySender SMTPAcceptAuthoritativeDomainSender AcceptRoutingHeaders,Set Session Permissions
2011-12-29T06:10:25.668Z,SVR01\External,08CE9265B5AAB0D9,2,10.4.2.10:25,10.4.8.1:49547,>,"220 mail.4logic.com.au Microsoft ESMTP MAIL Service ready at Thu, 29 Dec 2011 14:10:24 +0800",
2011-12-29T06:10:25.699Z,SVR01\External,08CE9265B5AAB0D9,3,10.4.2.10:25,10.4.8.1:49547,<,EHLO OP-SRV1.4logic.lan, 2011-12-29T06:10:25.699Z,SVR01\External,08CE9265B5AAB0D9,4,10.4.2.10:25,10.4.8.1:49547,>,250-mail.4logic.com.au Hello [10.4.8.1],
2011-12-29T06:10:25.699Z,SVR01\External,08CE9265B5AAB0D9,5,10.4.2.10:25,10.4.8.1:49547,>,250-SIZE 31457280,
2011-12-29T06:10:25.699Z,SVR01\External,08CE9265B5AAB0D9,6,10.4.2.10:25,10.4.8.1:49547,>,250-PIPELINING,
2011-12-29T06:10:25.699Z,SVR01\External,08CE9265B5AAB0D9,7,10.4.2.10:25,10.4.8.1:49547,>,250-DSN,
2011-12-29T06:10:25.699Z,SVR01\External,08CE9265B5AAB0D9,8,10.4.2.10:25,10.4.8.1:49547,>,250-ENHANCEDSTATUSCODES,
2011-12-29T06:10:25.699Z,SVR01\External,08CE9265B5AAB0D9,9,10.4.2.10:25,10.4.8.1:49547,>,250-STARTTLS,
2011-12-29T06:10:25.699Z,SVR01\External,08CE9265B5AAB0D9,10,10.4.2.10:25,10.4.8.1:49547,>,250-AUTH,
2011-12-29T06:10:25.699Z,SVR01\External,08CE9265B5AAB0D9,11,10.4.2.10:25,10.4.8.1:49547,>,250-8BITMIME,
2011-12-29T06:10:25.699Z,SVR01\External,08CE9265B5AAB0D9,12,10.4.2.10:25,10.4.8.1:49547,>,250-BINARYMIME,
2011-12-29T06:10:25.699Z,SVR01\External,08CE9265B5AAB0D9,13,10.4.2.10:25,10.4.8.1:49547,>,250 CHUNKING,
2011-12-29T06:10:25.746Z,SVR01\External,08CE9265B5AAB0D9,14,10.4.2.10:25,10.4.8.1:49547,<,QUIT, 2011-12-29T06:10:25.746Z,SVR01\External,08CE9265B5AAB0D9,15,10.4.2.10:25,10.4.8.1:49547,>,221 2.0.0 Service closing transmission channel,
2011-12-29T06:10:25.746Z,SVR01\External,08CE9265B5AAB0D9,16,10.4.2.10:25,10.4.8.1:49547,-,,Local
2011-12-29T06:10:32.761Z,SVR01\External,08CE9265B5AAB0DA,0,10.4.2.10:25,10.4.2.8:65117,+,,
2011-12-29T06:10:32.761Z,SVR01\External,08CE9265B5AAB0DA,1,10.4.2.10:25,10.4.2.8:65117,*,SMTPSubmit SMTPAcceptAnySender SMTPAcceptAuthoritativeDomainSender AcceptRoutingHeaders,Set Session Permissions
2011-12-29T06:10:32.761Z,SVR01\External,08CE9265B5AAB0DA,2,10.4.2.10:25,10.4.2.8:65117,>,"220 mail.4logic.com.au Microsoft ESMTP MAIL Service ready at Thu, 29 Dec 2011 14:10:31 +0800",
2011-12-29T06:10:32.761Z,SVR01\External,08CE9265B5AAB0DA,3,10.4.2.10:25,10.4.2.8:65117,<,EHLO QV1-EXC1.4logic.lan, 2011-12-29T06:10:32.761Z,SVR01\External,08CE9265B5AAB0DA,4,10.4.2.10:25,10.4.2.8:65117,>,250-mail.4logic.com.au Hello [10.4.2.8],
2011-12-29T06:10:32.761Z,SVR01\External,08CE9265B5AAB0DA,5,10.4.2.10:25,10.4.2.8:65117,>,250-SIZE 31457280,
2011-12-29T06:10:32.761Z,SVR01\External,08CE9265B5AAB0DA,6,10.4.2.10:25,10.4.2.8:65117,>,250-PIPELINING,
2011-12-29T06:10:32.761Z,SVR01\External,08CE9265B5AAB0DA,7,10.4.2.10:25,10.4.2.8:65117,>,250-DSN,
2011-12-29T06:10:32.761Z,SVR01\External,08CE9265B5AAB0DA,8,10.4.2.10:25,10.4.2.8:65117,>,250-ENHANCEDSTATUSCODES,
2011-12-29T06:10:32.761Z,SVR01\External,08CE9265B5AAB0DA,9,10.4.2.10:25,10.4.2.8:65117,>,250-STARTTLS,
2011-12-29T06:10:32.761Z,SVR01\External,08CE9265B5AAB0DA,10,10.4.2.10:25,10.4.2.8:65117,>,250-AUTH,
2011-12-29T06:10:32.761Z,SVR01\External,08CE9265B5AAB0DA,11,10.4.2.10:25,10.4.2.8:65117,>,250-8BITMIME,
2011-12-29T06:10:32.761Z,SVR01\External,08CE9265B5AAB0DA,12,10.4.2.10:25,10.4.2.8:65117,>,250-BINARYMIME,
2011-12-29T06:10:32.777Z,SVR01\External,08CE9265B5AAB0DA,13,10.4.2.10:25,10.4.2.8:65117,>,250 CHUNKING,
2011-12-29T06:10:32.777Z,SVR01\External,08CE9265B5AAB0DA,14,10.4.2.10:25,10.4.2.8:65117,<,QUIT, 2011-12-29T06:10:32.777Z,SVR01\External,08CE9265B5AAB0DA,15,10.4.2.10:25,10.4.2.8:65117,>,221 2.0.0 Service closing transmission channel,
2011-12-29T06:10:32.777Z,SVR01\External,08CE9265B5AAB0DA,16,10.4.2.10:25,10.4.2.8:65117,-,,Local


If we look at the receive connector "External" on SVR01 we notice that Exchange Server authentication is not enabled meaning SVR01 is not able to receive mail relay from other hub transport servers in the Exchange organisation.

If we tick the box we will resolve the problem.

Thursday, December 22, 2011

Hybrid Office 365 Deployment with Threat Management Gateway

After working with a Hybrid Office 365 deployment with Threat Management Gateway performing SSL offloading to an Exchange 2010 SP2 hybrid server for one of my customers I experienced a number of gotcha's which are not documented.

MRSProxy with SSL Offloading

The first issue was with MRSProxy. I found out the hard way that MRSProxy "/EWS/mrsproxy.svc" does not support SSL offloading. The MRSProxy connection must hit the Exchange 2010 Client Access Server on TCP443 using a secure SSL connection. When using SSL offloading with Forefront Threat Management Gateway as soon as unsecure HTTP port 80 connections were passed to MRSProxy on the Exchange 2010 Hybrid server we were receiving was (404) Not Found in the IIS logs.

We created a separate TMG firewall rule with a path rule of "/EWS/mrsproxy.svc" which is processed before our Hybrid firewall rule. This path rule re-encrypts and forwards to the Hybird server on TCP443. All other connections come through on TCP80.

Free/Busy with Office 365

The second issue was with free/busy. Users on-premises were able to view Free/Busy for users in Office 365, however users in Office 365 were unable to view Free/Busy for users on-premises. This was caused by the Web Listener being configured for Basic or Windows Integrated authentication. Free/Busy over an Organization Relationship uses Microsoft.Web.Services.SoapContext to authenticate free/busy... in other words the authentication is handled by the .NET framework. Threat Management Gateway must pass through authentication requests to /EWS/*. Setting the TMG listener to No Authentication achieves this.

Send As From a Second Email Address

From Exchange Server 2003 to Exchange 2010 SP2 (as of this writing) supports the ability to send email from different email addresses as long as the "send as" address has the same email address suffix of the users primary email address. For example I have an email address of clint.boessen@4logic.com.au. Provided I have been granted permissions I can send as from different addresses such as accounts@4logic.com.au or orders@4logic.com.au. However if my Exchange server has different Accepted Domains such as @kbomb.com.au I am not able to send as accounts@kbomb.com.au even if I have been granted permissions. Doing so will result in the following error:

You can't send a message on behalf of this user unless you have permission to do so. Please make sure you're sending on behalf of the correct sender, or request the necessary permission. If the problem continues, please contact your helpdesk.

Microsoft's claims this functionality is "by design" and there is no intention to create a resolution at this stage.

There is a 3rd party tool called ChooseFrom which you install on your Exchange 2007/2010 server. This tool enables Send As functionality from different domains however its rather pricey. As of this writing the asking price was 286.46 USD for a 1-2 user license, $214.84 USD if you want over 3 licenses, $7161.50 USD for a site license or $30078.30 USD for an enterprise license in which they will also provide you with the source code. If you are interested in this tool please see the following website:

http://ivasoft.com/choosefrom2007.shtml

As an alternative you can create a new Outlook Profile and create a POP account. Outlook 2010 supports multiple profiles at the same time. In the address enter your Exchange 2010 hub transport server and configure SMTP authentication. In the POP3 server address enter something bogus like mail.local. Next you need to configure the send and receive group for your POP3 profile. To do this perform the following steps:

1. Under Send/Receive Groups select Define Send/Receive Groups.
2. Select your group name or define a new group and click Edit.
3. In the Send/Receive Settings disable Receive mail items.


Now when you send/receive you wont get an error about not being able to receive from the bogus pop server.

Decrypting Network Packet Capture

There may be times where you need to view a network conversation which is encrypted with SSL. What do you do?

You may decrypt the conversation using a tool called "Network Monitor Decryption Expert" which is available for free from codeplex.

http://nmdecrypt.codeplex.com/

How do I go about decrypting the traffic?

Step 1

Start Microsoft Network Monitor (NetMon) and capture the Traffic from Office 365. The latest version as of this writing is 3.4 which is available from http://www.microsoft.com/download/en/details.aspx?id=4865

Step 2

Export the Server Certificate with private key in to a PFX

Step 3

Install the Netmon expert for SSL

Step 4

Now you should be able to decrypt the encrypted traffic.

Friday, December 16, 2011

Wild Card Certificates and Hybrid Configuration Wizard

When running the Hybrid Configuration Wizard I noticed the wizard crashes when attempting to create a Send Connector if a wild card certificate is attached to the default web site in IIS. What the Hybrid Configuration Wizard does is look at the common name of the certificate associated with the IIS service (verify this by using Get-ExchangeCertificate) and attempts to associate the common name as the FQDN on the Send Connector for the purpose of SMTP encryption. In a wildcard certificate *.example.com is the common name of the certificate. *.example.com is not a valid FQDN for a send connector in Exchange as thee FQDN must be associated to a domain name, not a wild card name. As a result the wizard crashes when trying to set *.example.com as the FQDN on the send connector. The following error is generated...

Update-HybridConfiguration
Failed

Error:
Updating hybrid configuration failed with error 'Subtask Configure execution failed: Configure Mail Flow


Execution of the New-SendConnector cmdlet had thrown an exception. This may indicate invalid parameters in your Hybrid Configuration settings.

Cannot process argument transformation on parameter 'Fqdn'. Cannot convert value "*.example.com" to type "Microsoft.Exchange.Data.Fqdn". Error: ""*.example.com" isn't a valid SMTP domain."
at System.Management.Automation.PowerShell.CoreInvoke[TOutput](IEnumerable input, PSDataCollection`1 output, PSInvocationSettings settings)
at System.Management.Automation.PowerShell.Invoke(IEnumerable input, PSInvocationSettings settings)
at System.Management.Automation.PowerShell.Invoke()
at Microsoft.Exchange.Management.Hybrid.RemotePowershellSession.RunCommand(String cmdlet, Dictionary`2 parameters, Boolean ignoreNotFoundErrors)
'.

Additional troubleshooting information is available in the Update-HybridConfiguration log file located at C:\Program Files\Microsoft\Exchange Server\V14\Logging\Update-HybridConfiguration\HybridConfiguration_12_16_2011_5_58_59_634596119396658235.log.

Exchange Management Shell command attempted:
Update-HybridConfiguration -OnPremisesCredentials 'System.Management.Automation.PSCredential' -TenantCredentials 'System.Management.Automation.PSCredential'

Elapsed Time: 00:07:13


Workaround...

I have a work around which will allow you to complete the Hybrid Configuration Wizard. What you need to do is use another certificate with a valid common name such as mail.example.com so the wizard is able to create its Send Connector. If you use a self signed certificate or a certificate issued by an internal certificate authority the wizard will fail. You must use a public certificate trusted from a public root certificate authority.

Does this mean I need to purchase another digital certificate, I already own a wild card certificate?

No, you can use a digital certificate from http://www.freessl.com/ (provided by RapidSSL) which is free for 30 days. This certificate is not a SAN (subject alternative name) certificate which is trusted under multiple names. As a result you must issue the certificate to autodiscover.yourdomain.com as the autodiscover service is required when running the Update-HybridConfiguration command. The autodiscover address must be pointed at the same address for the hybrid server in which your trying to configure on your firewall. When you finish creating your new certificate and associating it with the IIS service and SMTP service, re-run the Update-HybridConfiguration tool. Your send connector will be created with autodiscover.yourdomain.com as the FQDN. Now you can re-assign your wild card certificate to the IIS service and SMTP service and update the FQDN on your send connector to a domain name of your choice in alignment with the wild card certificate such as mail.example.com.

SSL Offloading...

If your running SSL offloading, i.e. your Exchange web services are all running on port 80 you still need to link a digital certificate to your IIS service to complete the wizard. Simply untick Require SSL on the various Exchange web services in IIS manager. The digital certificate you use needs to be valid for the FQDN on the SMTP service and must be linked to IIS and SMTP (Get-ExchangeCertificate).


Also if your using SSL offloading you do not have to worry about using autodiscover.yourdomain.com on the certificate associated with IIS as the autodiscover requests will be hitting your Exchange server on port 80... another device such as Threat Management Gateway or an F5 BIG-IP will be decrypting the traffic and forwarding it to Exchange 2010.

Thursday, December 15, 2011

Microsoft NLB Layer 3 not working through Cisco in Multicast Mode

I experienced an issue with Microsoft Network Load Balancing (NLB) configured in a multicast mode cluster. I was able to contact my cluster virtual IP address from my other computers on the same subnet (Layer 2), However I was unable to contact the Virtual IP address from a different subnet by routing through my Cisco router (Layer 3).

After a little investigation I stumbled across the following Cisco website:

http://www.cisco.com/en/US/products/hw/switches/ps708/products_configuration_example09186a0080a07203.shtml

To resolve this issue I was required to add the MAC address for the Virtual IP a of my NLB cluster to the Cisco router as a static MAC entry.

To grab the MAC address of the Virtual IP address first you need to make connectivity with the IP from another PC on the same subnet. Ping will do the trick. Then display the ARP cache on the PC with arp -a.


To add the static MAC address entry to the Cisco Router use the following commands.

conf t
arp 10.4.2.15 03bf.0a04.020f arpa


This will ensure you can route layer 3 to the Virtual IP of your NLB cluster when in Multicast mode.

For a detailed description as to why this happens refer to the above Cisco link.

An error occurred while attempting to retrieve the security token.

Problem:

When using the Exchange Remote Connectivity Analyzer (ExRCA) using the Office 365 Microsoft Single Sign-on (BETA) tool you may experience the following error message.

ExRCA is attempting to retrieve and analyze a security token for user mr.cloud@4logic.com.au.
An error occurred while attempting to retrieve and analyze the security token.
Test Steps
ExRCA is attempting to authenticate to the security token service at https://fs.4logic.com.au/adfs/services/trust/2005/usernamemixed.
An error occurred while attempting to retrieve the security token.
Tell me more about this issue and how to resolve it
Additional Details
The Security Token service indicated that the authentication failed. Check the user name and password and try again.


Resolution:

I have seen this problem occur in two circumstances:

a.) the username and password you have entered is incorrect.

b.) the UPN suffix for the user account has not been updated yet to a public UPN suffix. Do this in AD Users and Computers. I set it to @4logic.com.au.


You may have to create a public UPN suffix under Active Directory Domains and Trusts first.

An HTTP 503 Service Unavailable response was received while trying to validate ADFS metadata

Today I went to connect to Office 365 with single sign-on only to notice that it is no longer working. When using the Exchange Remote Connectivity Analyzer (ExRCA) using the Office 365 Microsoft Single Sign-on (BETA) tool I received the following error:

Validating ADFS metadata for the on-premises ADFS server.
There was a problem validating the ADFS metadata.
Test Steps
Retrieving ADFS metadata information from metadata exchange URL https://fs.4logic.com.au/adfs/services/trust/mex.
ExRCA failed to retrieve ADFS metadata.
Tell me more about this issue and how to resolve it
Additional Details
An HTTP 503 Service Unavailable response was received while trying to validate ADFS metadata.


On my internal network when I tested https://fs.4logic.com.au/adfs/fs/federationserverservice.asmx from Internet Explorer I received

Service Unavailable
HTTP Error 503. The service is unavailable.


After further investigation we noticed the AD FS 2.0 Windows Service was not running on my AD FS 2.0 servers.


After starting this service the issue was resolved. If we navigate to https://fs.4logic.com.au/adfs/fs/federationserverservice.asmx to test we can verify that our AD FS servers are giving us XML.


Please note that you cannot use https://fs.4logic.com.au/adfs/fs/federationserverservice.asmx to test your Federation Proxy servers. This test can only be used against AD FS 2.0 servers, not the AD FS 2.0 Proxy servers. When passing this address through your federation proxy you will ALWAYS receive:

Service Unavailable
HTTP Error 503. The service is unavailable.


Why was the service not running?

I looked into why the service was not running and in the event log I noticed the service crashed during startup. The following error was generated in the SYSTEM event log:

Log Name: System
Source: Service Control Manager
Date: 15/12/2011 3:22:43 AM
Event ID: 7023
Task Category: None
Level: Error
Keywords: Classic
User: N/A
Computer: qv1-dc2.4logic.lan
Description:
The AD FS 2.0 Windows Service service terminated with the following error:
An exception occurred in the service when handling the control request.
Event Xml:
<Event xmlns="http://schemas.microsoft.com/win/2004/08/events/event">
<System>
<Provider Name="Service Control Manager" Guid="{555908d1-a6d7-4695-8e1e-26931d2012f4}" EventSourceName="Service Control Manager" />
<EventID Qualifiers="49152">7023</EventID>
<Version>0</Version>
<Level>2</Level>
<Task>0</Task>
<Opcode>0</Opcode>
<Keywords>0x8080000000000000</Keywords>
<TimeCreated SystemTime="2011-12-14T19:22:43.912273400Z" />
<EventRecordID>4333</EventRecordID>
<Correlation />
<Execution ProcessID="456" ThreadID="1504" />
<Channel>System</Channel>
<Computer>qv1-dc2.4logic.lan</Computer>
<Security />
</System>
<EventData>
<Data Name="param1">AD FS 2.0 Windows Service</Data>
<Data Name="param2">%%1064</Data>
</EventData>
</Event>


Looking at the service we can already see it is configured with a delay start.


Interestingly I noticed on the recovery tab of the service by default it is configured to Restart the Service on the First and Second failure. This hints to me that the product team is already aware of this issue with the service crashing on startup. This is most likely due a dependency not starting in time. My AD FS 2.0 servers are also domain controllers which is recommended for small organisations. Being domain controllers means the startup time for these servers is even longer then normal. What I did was in the "Restart service after" box I entered in 2 minutes to ensure the delay was longer. This resolved the problem.

Wednesday, December 14, 2011

Federation information could not be received from the external organization.

I had an issue when completing the Hybrid Configuration Wizard in Exchange 2010 SP2. It continuously crashed out with the following error.

Error:
Updating hybrid configuration failed with error 'Subtask Configure execution failed: Creating Organization Relationships.

Execution of the Get-FederationInformation cmdlet had thrown an exception. This may indicate invalid parameters in your Hybrid Configuration settings.

Federation information could not be received from the external organization.
at Microsoft.Exchange.Management.Hybrid.RemotePowershellSession.RunCommand(String cmdlet, Dictionary`2 parameters, Boolean ignoreNotFoundErrors)
'.

Additional troubleshooting information is available in the Update-HybridConfiguration log file located at C:\Program Files\Microsoft\Exchange Server\V14\Logging\Update-HybridConfiguration\HybridConfiguration_12_8_2011_18_2_52_634589641723224440.log.

Exchange Management Shell command attempted:
Update-HybridConfiguration -OnPremisesCredentials 'System.Management.Automation.PSCredential' -TenantCredentials 'System.Management.Automation.PSCredential'

Elapsed Time: 00:02:56


I also received the following error when running this command:

Get-FederationInformation -DomainName 4logic.com.au

Federation information could not be received from the external organization.
+ CategoryInfo : NotSpecified: (:) [Get-FederationInformation], GetFederationInformationFailedException
+ FullyQualifiedErrorId : ABE6A500,Microsoft.Exchange.Management.SystemConfigurationTasks.GetFederationInformation


Externally my autodiscover was working correctly which I confirmed by using the Exchange Remote Connectivity Analyzer (ExRCA).


However what we found was internally the Get-FederationInformation does not use the Service Connection Point (SCP) objects in Active Directory for performing Autodiscover. As a result it must be able to resolve autodiscover.4logic.com.au to an internal IP address.

We have two ways we can do this... add your public DNS zone to your internal network and populate it with internal IP addresses or create an entry in your hosts file on your Hybrid Server. This is what I did.

The hosts file is located under C:\Windows\System32\drivers\etc


Also your certificate attached to Exchange must have a valid SAN name for your autodiscover record.

Tuesday, December 13, 2011

NLB Installed on DNS Servers Issues

I needed to install Microsoft Network Load Balancing (NLB) on two Active Directory Domain controllers running Windows Server 2008 R2 SP1 to load balance Active Directory Federation Services AD FS 2.0 on TCP443.

Here is the my setup:


Generally the Network Load Balancing Virtual IP Addresses do not get registered in DNS automatically. However I found out that if Network Load Balancing is installed and configured on a DNS server, both the virtual network adaptor address and dedicated network adaptor address get registered in DNS.

For my two domain controllers QV1-DC1 and QV1-DC2 there were two A records for each... the servers IP address and my virtual NLB address. DNS round robin, which is enabled by default on all Windows DNS servers was distributing at random either the servers IP address or the virtual address.

The problem here is the virtual address was only listening on port 443 meaning no Active Directory queries could reach the domain controller for any hosts who resolved the virtual IP address.

I found a fix which allowed me register the IP addresses I want on each of my servers to DNS, instead of turning of dynamic DNS updates all together. This registry key is:

HKEY_LOCAL_MACHINE\SYSTEM\CurrentControlSet\Services\DNS\Parameters\PublishAddresses


Now my two domain controllers only register their IP address in DNS, not the NLB Virtual IP.

I found the fix on the following KB Article:

http://support.microsoft.com/kb/246804

Mailbox could not be created. Verify that OU ( Users ) exists

In Exchange when you run the test commands such as Test-OutlookWebServices or Test-FederationTrust for example it requires a Exchange Test account. This is usually created by running the New-TestCasConnectivityUser.ps1 script from the Exchange 2010 scripts Directory C:\Program Files\Microsoft\Exchange Server\V14\Scripts.

If you don't create a test user account you will receive such errors in PowerShell:

Test-OutlookWebServices

Failed to find the mailbox. Mailbox = 'extest_40f651ff86fd4@4logic.lan'.
+ CategoryInfo : NotSpecified: (:) [Test-OutlookWebServices], MailboxNotFoundException
+ FullyQualifiedErrorId : Microsoft.Exchange.Monitoring.MailboxNotFoundException,Microsoft.Exchange.Management.SystemConfigurationTasks.TestOutlookWebServicesTask


Test-FederationTrust

Couldn't find object "extest_40f651ff86fd4". Please make sure that it was spelled correctly or specify a different object.
+ CategoryInfo : NotSpecified: (:) [Test-FederationTrust], ManagementObjectNotFoundException
+ FullyQualifiedErrorId : C5C16259,Microsoft.Exchange.Management.SystemConfigurationTasks.TestFederationTrust


However today when I ran the New-TestCasConnectivityUser.ps1 it complained that it could not find the Users OU, a problem which I had not seen before. I know that the password I supplied met the complexity requirements. This is the error I was receiving.

CreateTestUser : Mailbox could not be created. Verify that OU ( Users ) exists and that password meets complexity requirements.
At C:\Program Files\Microsoft\Exchange Server\V14\Scripts\new-TestCasConnectivityUser.ps1:267 char:31
+ $result = CreateTestUser <<<< $exchangeServer $mailboxServer $securePassword $OrganizationalUnit $UMDialPlan $UMExtension $Prompt
+ CategoryInfo : NotSpecified: (:) [Write-Error], WriteErrorException
+ FullyQualifiedErrorId : Microsoft.PowerShell.Commands.WriteErrorException,CreateTestUser


I simply specified my Users OU and it created the object...

get-mailboxServer .\new-TestCasConnectivityUser.ps1 -ou 4logic.lan/users


Wednesday, November 23, 2011

Exchange 2010 Management Shell into Existing Exchange 2007 Servers

By default Exchange 2010 Management Shell (EMS 2010) cannot manage/access information stored on the Exchange 2007 servers such as IIS configuration in the example below. When attempting to get information from an Exchange 2007 server in an Exchange 2010 management shell you will receive the following error:

An IIS directory entry couldn't be created. The error message is Access is denied.
. HResult = -2147024891
+ CategoryInfo : NotInstalled: (PER-EXCHMBX\Exchange (Default Web Site):ADObjectId) [Get-OwaVirtualDirecory], IISGeneralCOMException
+ FullyQualifiedErrorId : EBEB5204,Microsoft.Exchange.Management.SystemConfigurationTasks.GetOwaVirtualDirectory


For example here we have an Exchange 2010 shell and an Exchange 2007 shell. We can see the Exchange 2010 shell cannot access the Exchange 2007 servers... where the Exchange 2007 shell is fine.


To allow the Exchange 2010 shell to connect to the Exchange 2007 servers you must add "Microsoft Exchange Security Groups\ Exchange Trusted Subsystem" as a local admin to all Exchange 2007 servers.

Tuesday, November 22, 2011

Windows RPC/HTTP and Outlook Anywhere

Prior to Windows Vista SP1, the Windows RPC/HTTP client-side component required that the Subject Name (aka Common Name) on the certificate match the "Certificate Principal Name" configured for the Outlook Anywhere connection in the Outlook profile. Therefore, as a best practice, you should ensure that your certificate common name is configured as the name Outlook Anywhere references which can be achieved by using the Set-OutlookProvider cmdlet with the -EXPR parameter.

To understand how to configure the EXPR parameter please view this blog post:

http://clintboessen.blogspot.com/2009/06/configuring-outlook-anywhere-settings.html

As many people still use Windows XP, I recomend always configuring the the EXPR parameter to use the certificate common name.

Monday, November 21, 2011

Where are Exchange 2003 relay restrictions stored?

I was asked by a client where Exchange 2003 Relay Restrictions are stored? The SMTP Virtual Server in Exchange 2003 is actually apart of IIS and as a result its configuration is not stored in Active Directory (for the most part). This means if you recover an Exchange 2003 server using the Disaster Recovery switch you will need to re-enter this configuration.

drive:\Setup\I386\Setup.exe /DisasterRecovery

See Recovering a failed Exchange 2003 server:

http://www.msexchange.org/tutorials/Recovering-Failed-Exchange-2003-Member-Server-Using-Disaster-Recovery-Switch.html

The relay restrictions are stored under a series of REG_DWORD and REG_MULTI_SZ values under the following registry key:

HKEY_LOCAL_MACHINE\SYSTEM\CurrentControlSet\Service\MSExchangeIMC\Parameters

For more information please see the following Microsoft KB article:

http://support.microsoft.com/kb/193922

Thursday, November 17, 2011

Load Balance SMTP with F5 BIG-IP

The F5 BIG-IP has a template for Exchange 2010 which assists administrators with configuring load balancing for Outlook Anywhere, Active Sync and Outlook Web App. This template does not configure SMTP load balancing. There are many circumstances where you may want an SMTP endpoint IP address to be highly available and load balanced between multiple hub transport servers.

In this post I will go through and show you how to configure the BIG-IP LTM for load balancing the SMTP protocol and the challenges associated with this. This article was written using the F5 BIG-IP LTM VE version 10.2.3.

Create a Health Monitor

Create a health monitor which monitors the Exchange 2010 SMTP service on our Exchange 2010 servers. The heath monitor will send SMTP HELO requests on a regular basis to ensure the SMTP servers are healthy.

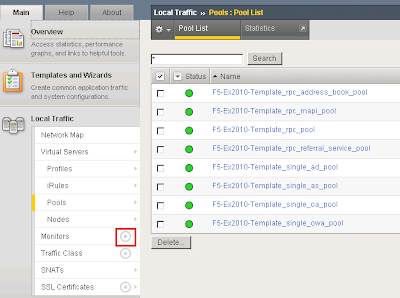
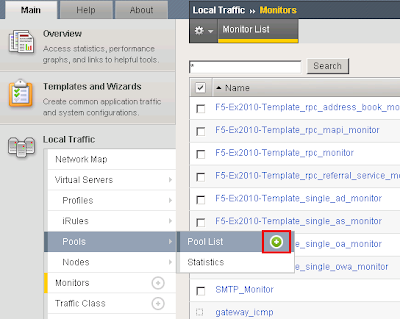
Expand Local Traffic and click Add next to Monitors.


I called the monitor SMTP_Monitor. Set the Type to SMTP. Provided an interval of 120 seconds meaning the monitor will send an SMTP HELO every 2 minutes to the Ex2010 servers to see if they are still online. Configured the Alias service port to 25.


Create a Pool for the SMTP Servers

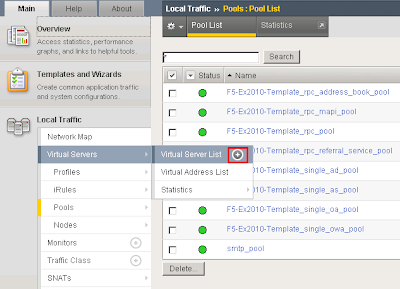
A load balancing pool is a logical set of devices, in our case SMTP servers, that you group together to receive and process traffic. To create a new pool under Pool List click Add.


I called the pool smtp_pool. Select the SMTP_Monitor we created earlier. Select the load balancing method as Round Robin. Add the SMTP servers to our pool in which we wish to distribute inbound SMTP connections to.


Create an SMTP Virtual Server

Create an SMTP Virtual Server on the F5 BIG-IP which will allow the BIG-IP system to listen on TCP25 to load balance incoming SMTP sessions. To do this under Virtual Servers --> Virtual Server List click add.


I called the SMTP Virtual Server SMTP_VS. Under Destination I specified 172.16.51.174. This is the Virtual IP the BIG-IP will listen on for incoming SMTP traffic. Select a service port of 25 and place the device in an enabled state.

Under configuration set SNAT Pool to Auto Map (I have explained what Auto Map is below).


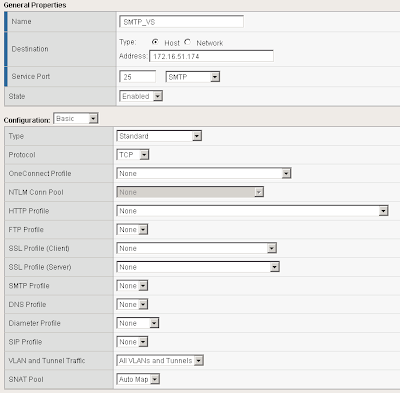
Scroll down further and under resources set the Default Pool to smtp_pool along with the default persistence profile to source_addr.


Test our BIG-IP SMTP Virtual Server

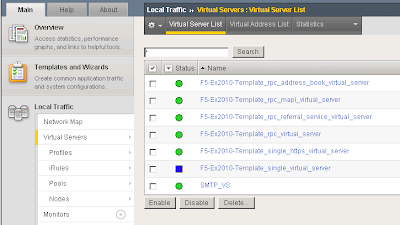
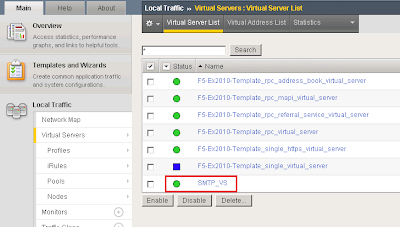
The F5 BIG-IP device should now be configured to load balance SMTP requests between the two Exchange 2010 servers. In your Virtual Server List the SMTP_VS should come up green.


From a command prompt verify you can telnet our SMTP virtual server on 172.16.51.174 on port 25.


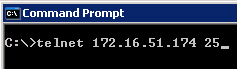
We can see that it successfully connected to one of the SMTP servers in our load balancing pool "smtp_pool"


At this point your F5 BIG-IP is successfully load balancing SMTP.

The Problem...

When building an email solution it is absolutely critical to avoid becoming an open SMTP relay. Most organisations implement relay restrictions by locking anonymous relay down to certain source IP addresses on their internal network such as applications and printers. Source IP is generally the preferred method as Administrators do not have to deal with SMTP authentication methods. The list of IP addresses who are allowed relay anonymously are usually configured on the Exchange SMTP receive connectors. However when dealing with load balancers such as a F5 BIG-IP Local Traffic Manager this becomes a difficult task.

Why?

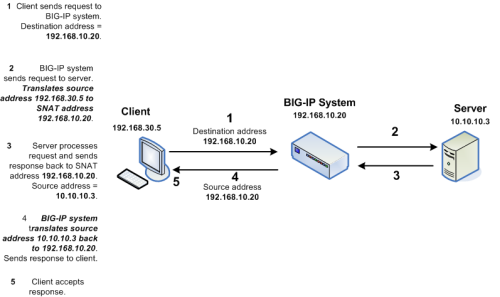
Whilst load balancing connections the F5 BIGIP uses SNAT to re-write the source IP address on the SMTP packets to one of its "Self IP" addresses or "Virtual IP" addresses. This means the Exchange servers will see all requests coming from the same IP address making it impossible to determine which request belongs to what client. This is illustrated in the following diagram:


However I have a workaround for you. If we setup two SNAT addresses on the F5 BIG-IP for example 172.16.51.174 and 172.16.51.175 we can configure our BIG-IP to say any source IP addresses that need to be an anonymous open relay hit our Exchange 2010 servers from 172.16.51.174 ELSE hit our Exchange 2010 servers from 172.16.51.175. This solution means we need to configure our list of allowed IP addresses for SMTP relay on our F5 BIG-IP instead of our Exchange SMTP Receive Connectors.

Create a Data Group List

First we must create a list of IP addresses we want to allow anonymous relay for on our F5 BIG-IP. These are the IP addresses we would normally configure on our Exchange receive connectors. To do this we need to create a new data group list.

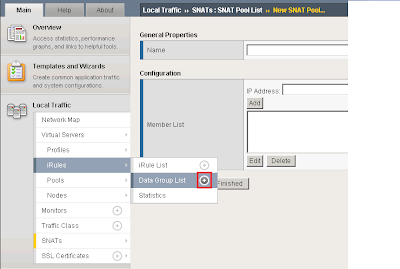
Add a new data group list by expanding iRules --> Data Group List and clicking the add button.


I called my Data Group List smtp_relay_allowed and specified the IP address 172.16.51.21. You can add as many IP addresses as you want for anonymous relay.


Create a new iRule

An iRule is a powerful and flexible feature of BIG-IP devices which provide you with unprecedented control to directly manipulate and manage any IP application traffic. By creating an iRule we can instruct the BIG-IP to return a different SNAT address based on on the condition. We want to instruct our BIG-IP to perform the following:

IF a clients source IP is on our Data Group List THEN use an SNAT address of 172.16.51.174 ELSE use the SNAT address of 172.16.51.175.

To create the iRule under Local Traffic Select iRule --> iRule List and click the add button.


I called my iRule smtp_irule and created the following code to perform my required conditions as mentioned above.
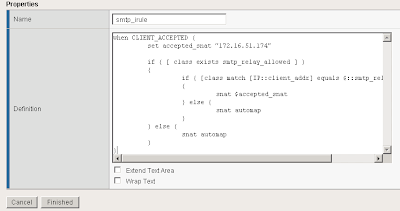


A copy of the code:

when CLIENT_ACCEPTED {
set accepted_snat "172.16.51.174"

if { [ class exists smtp_relay_allowed ] }
{
if { [class match [IP::client_addr] equals $::smtp_relay_allowed] }
{
snat $accepted_snat
} else {
snat automap
}
} else {
snat automap
}
}


Automap is a feature of the BIGIP where it automatically selects a Self IP at random to use for the SNAT translation. A Self IP is an IP you have assigned to the BIGIP manually under your network configuration. This is different to a Virtual IP address which is created when you setup a virtual server. I only have one Self IP on my BIG IP set to 172.16.51.175 and one virtual IP set to 172.16.51.174 used by all my F5 virtual servers on different TCP ports. As a result automap will ONLY select 172.16.51.175.

Why would you want multiple source SNAT IP addresses?

For each connection made from the BIG-IP to your load balanced servers a TCP source port needs to be opened for the communication. TCP only has 65535 ports for source and destination traffic so if the number of connections exceeded the number of available ports, the BIG-IP would not be able to take new connections. In this event you could add an additional Self IP and rely on the Automap feature or create an SNAT pool which is a predefined list of IP addresses the BIG-IP is allowed to use for SNAT.

I recommend reading the chapter on SNAT configuration from the F5 website:

http://support.f5.com/kb/en-us/products/big-ip_ltm/manuals/product/ltm_configuration_guide_10_0_0/ltm_snat.html

How do I configure Exchange 2010:

On your Exchange 2010 servers create your two receive connectors as normal. Create one receive connector configured for your anonymous relay and setup yoru default receive connector for all other SMTP traffic. Both receive connectors must listen on port 25. Do this on all Exchange servers in your pool.

For information on how to configure your application receive connector for anonymous relay follow this blog post:

http://clintboessen.blogspot.com/2009/07/allow-network-applications-to-relay.html

Apply my new iRule to the SMTP Virtual Server

Next we need to attach the iRule to the SMTP virtual server in the F5 configuration screen. To do this go to your Virtual Servers --> Click Virtual Server List then select our SMTP_VS created earlier.


Select Resources then under iRules click Manage.


Select our smtp_irule out of the list available then click finish.


Testing our Configuration

So time to test the configuration to ensure it works as configured. Lets telnet my BIG-IP SMTP Virtual Server from the host we allowed 172.16.51.23 by running the following command:

telnet 172.16.51.174 25

I then wrote some random comments in the telnet session so we can identify our server 172.16.51.23 in our SMTP logs.


I then repeated the procedure from another server which is not in our Data Group List created above.


In our SMTP logs on our Exchange 2010 server as expected the 172.16.51.23 server came from 172.16.51.174 and the non trusted IP came from 172.16.51.175.