Wednesday, December 18, 2013

80090328 - The token supplied to the function is invalid

In this post I am going to show you how to resolve the below error in Exchange 2003 System Manager when attempting to browse the public folder certificate store.

The token supplied to the function is invalid.

ID no: 80090328
Exchange System Manager


To resolve this error perform the following steps.

Navigate to Internet Information Services on the Exchange 2003 server, right click Exadmin and select properties.

 
Under secure communications click Edit.
 
 
Untick require secure channel then click OK, followed by OK.
 
 
Make sure you perform an IISRESET after making the changes documented in this blog post.
 

80090328 - The received certificate has expired

In this post I am going to show you how to resolve the below error in Exchange 2003 System Manager when attempting to browse the public folder certificate store.

The received certificate has expired.

ID no: 80090328
Exchange System Manager


This error occurs when the certificate linked to the Exchange 2003 default website has expired.


Simply replace the certificate linked to the default website in Internet Information Services (IIS) and this will resolve the problem.

Make sure you perform an IISRESET after making the changes documented in this blog post.


Note if you perform these steps and get the following error "The token supplied to the function is invalid", please refer to the following blog post:

http://clintboessen.blogspot.com.au/2013/12/80090328-token-supplied-to-function-is.html

Tuesday, December 17, 2013

Enterprise Certificate Authority Pushing Old Certificates through Active Directory

A new public key infrastructure was deployed on Windows Server 2012 R2 consisting of two certificate authorities.  For security reasons and to adhere to Microsoft best practice, we deployed a new stand alone offline certificate authority and a subordinate enterprise certificate authority which is Active Directory integrated and will be responsible for issuing certificates to all devices, users and service accounts on the domain.

The following image is an overview of the deployed solution.


When I setup the subordinate certificate authority, I issued a certificate to the subordinate from the root certificate authority to validate its identity and authorise it to issue certificates on behalf of the root.  Only after I issued this certificate, I found out the default issuing time for certificates on stand alone certificate authorities in Windows Server 2012 R2 is only 1 year.  This period of time is far to small for a certificate that is assigned to another certificate authority.

As a result we increased the time that the root certificate authority issues certificates for which was performed with the following command:

certutil -setreg ca\ValidityPeriodUnits "10"

This changed it from 1 year to 10 years.
We then issued a new certificate from the root authority to the subordinate certificate authority for the 10 year period.

The Problem

After issuing a new certificate to the subordinate certificate authority I realised the subordinate certificate authority is pushing out the new 10 year certificate to the intermediate certificate store on workstations as well as the old 1 year certificate.  This is shown in the following screenshot below on a domain member machine.  The two certificates highlighted were old certificates which use to be assigned to the enterprise subordinate certificate authority.  There are two because we issued two (we forgot to restart the certificate authority service on the root CA after running the certutil command above to extend the validity period so we had to repeat the process).


I don't want the Active Directory certificate authority pushing out these invalid certificates to all domain joined devices.

How to Remove Certificates from Active Directory Deployment

To remove certificates from Active Directory deployment, you must open an application called pkiview.msc on an Enterprise Certificate Authority.

 
Right click Enterprise PKI and select Managed AD Containers.
 
 
Enterprise root certificate authorities are located in the "Certification Authorities Container" tab and enterprise subordinate certificate authorities are located under the "NTAuthCertificates" and "AIA Container" tab. View the certificates by looking at expiry date or thumb print to ensure you find the correct certificate.  Remove the unwanted certificates which are no longer required by your workstations.
 
 
After removing the unwanted certificates performing a gpupdate /force on a domain member automatically removes the unwanted certificates from the intermediate store and root store.  This is shown in the following screenshot taken of the computers certificate store in a mmc snapin.


A big thankyou to River Mei from Microsoft who assisted me with this issue.

Routing Group Connector - The mailbox recipient does not have a mailbox database

If you are a regular follower of my blog, you will have noticed I have been writing about different problems you may experience whilst in co-existence between Exchange 2003 and Exchange 2010 using Routing Group Connectors.  Previously I wrote about error "There is currently no route to the mailbox database" and how to overcome it which can be found on the following page:

http://clintboessen.blogspot.com.au/2013/12/routing-group-connectors-there-is.html

 Today we are going to look at another issue using Routing Group Connectors

The mailbox recipient does not have a mailbox database.

This error can too be viewed using the "Get-Message | fl" command by looking at the last error attribute.


 As before, we have a valid routing group connector between a single Exchange 2010 and Exchange 2003 server setup correctly:


However mail is not passing between the servers for select users only!

Resolution

When installing Exchange 2010 into an existing Exchange 2003 organisation, the Exchange 2010 infrastructure has a new list of security groups it creates to assign permissions over Active Directory objects.  These permissions extend over user account objects to Active Directory configuration partition exchange related objects.

The error message "The mailbox recipient does not have a mailbox database" is being shown because Exchange 2010 does not have permissions to see the user account in Active Directory.  It does not know the Exchange 2003 legacy mailbox exists and the Exchange 2010 server definitely does not have the mailbox hence it is complaining that the recipient has no mailbox database!

This can happen when user accounts have broken inheritance in Active Directory.  To fix this, open Active Directory Users and Computers, find the user account in question and navigate to the account properties.  Under security, advanced make sure that inheritance is enabled for the user in question.  This ensures the Exchange 2010 environment has access to the user object and can see that it is a mailbox.


Note: If you cannot see the security tab on the user account in Active Directory, you will need to enable Advanced Features from the view menu.

Monday, December 16, 2013

Websense Appliance - Internal Error - Server Connection Terminated

When setting up a Websense V5000 G2 appliance 7.8.1, in Gateway Manager I enabled integrated Windows Authentication, joined the appliance to the domain then enabled SOCKS.  After making these changes, when navigating to websites from clients the following error was experienced:

internal error - server connection terminated

The Internal Error generally occurs when SOCKS has been enabled but not configured.  After disabling SOCKS in the Websense Gateway Manager interface, the issue was resolved.


Friday, December 13, 2013

Routing Group Connectors - There is currently no route to the mailbox database

When performing an Exchange 2003 to Exchange 2010 migration, mail flowing between the two servers using a routing group connector was not working.  When relaying an email to the Exchange 2010 server for a user mailbox residing on Exchange 2003, the email would simply sit in the queue and not send.

The following error was experienced:

There is currently no route to the mailbox database

This can be seen in the message log with "Get-Message | fl"


 The messages simply sat in the Unreachable queue on the Exchange 2010 server.


This error generally means no routing group connector was made between the two servers.  However I confirmed the routing group connector was created by Exchange Setup automatically.


Next I removed these routing groups and recreated them with new ones through PowerShell:


After recreating the routing group connectors you must restart the "Simple Mail Transfer Protocol" service on Exchange 2003 and the "Microsoft Exchange Transport" service on Exchange 2010.

This still did not resolve the problem.

Resolution

Next I started checking permissions of Exchange container objects in the configuration partition within Active Directory against a default install of Exchange 2003 in a test lab.  I noticed that permissions on the Exchange 2003 object in Active Directory was no longer inheriting from the Administrative Group/Servers Container.

After re-enabling inheritance using ADSI Edit over the Exchange 2003 server object, this resolved the issue.

Sunday, December 1, 2013

Secure Email, The Next Generation Today

The following post is a guest post by Andy Campbell.

Secure Email, The Next Generation Today

Out With the Old In With the New
If you exchange data regularly with colleagues, business partners and clients, which probably describes all of us, then no doubt you will have at some point considered the risks to that data being leaked or compromised in some way. This will have led you to investigate encryption as a tool to safeguard both you and your recipient’s data. Many of you might have elected not to proceed with an encryption solution because of the burden this would place on normal business practices. Well if that’s you, it’s time you looked again. This year’s winner of the UK IT Industries Cloud Provider of the Year, Egress Software Technologies, have an email encryption product called Switch that just might have the answer.

Sending Secure Emails
This can be done via either a desktop app, smartphone/tablet app or web interface, or if you are a Microsoft Outlook or Lotus Notes user from within your email client. Plus you don’t need to worry whether your recipient is a current user of Switch or has even heard of it. We are running this demonstration on a MacBook Pro using OS X version 10.7.5.

 Fig. 1 Welcome Screen

From the “Welcome” screen (Fig. 1) you can choose to create a package, create a secure message or view the packages you have created earlier. Creating a package is the term used here that describes how you can wrap encryption around any form of data to be exchanged by USB stick, CD ROM, FTP file transfer or DVD.

However since we are talking about secure email let’s look more closely at that aspect of this product.

On clicking the “Create Message” icon your browser will be opened at Egress’s web mail page where you can compose your email and add attachments as required (Fig. 2). If you are using a Windows PC it will integrate with either Microsoft Outlook or Lotus Notes if available.

 Fig. 2 Secure Email

Clicking “Send Secure” will automatically encrypt and send your email to your recipient, you will get a confirmation screen (Fig. 3). It couldn’t be easier!

 Fig. 3 Confirmation Screen

Your recipient will receive an email as shown in Fig. 4.

 Fig. 4 Secure Email Arrives

It is no problem if your recipient has never used Switch before, they will most likely click on the “read this secure email” link, which will take them to the account sign in screen (Fig. 5) where they can create a free Switch account for themselves.

Fig. 5 Sign In Screen

Once you have created an account and signed in you will have automatic access to the decrypted email and attachment (Fig. 6)

Fig. 6 Decrypted Email

From here you can obviously read the email and any attachment, but and this is where it gets quite cleaver, both the email and attachment are “water-marked” with the recipients email address. This extra layer of protection is designed to encourage users not to share the contents of your email with others without your permission. The copying of and attachment has been made more difficult by making the contents appear opaque when the window in which they appear is no longer the focus (Fig. 7).

 Fig. 7 Opaque Content

Should the user try to forward this email securely to someone else they will not be able to open it even if they have a Switch account in their name unless you have added them to the list of approved recipients of this email. Does that make sense? In other words you keep control of where your data can be viewed. This makes Switch so much more than just a secure email product. You can even time when access is to be granted.

How Secure Is Switch?
Switch offers pretty strong encryption, using AES at 256 bits and coming with a stamp of approval from CESG and FIPS, you can be assured that the algorithm has been properly implemented. And since each communication is encrypted with fresh keys any possible future breach would effect only the single communication not previous ones or future ones. Hopefully I told you enough for you to go and take a look for yourselves.


About Andy Campbell
Andy Campbell has over 40 years experience in the computer business, 20 of those years were spent at Reflex Magnetics Ltd a UK developer of security software. As managing director he was instrumental in forging a close relationship with the MoD and CESG, Reflex's Disknet and Data Vault products being used extensively by both the UK's armed forces and NATO. More recently he has been involved as a director and investor in Reflect Digital a web marketing agency.

Wednesday, November 27, 2013

Cannot manage Active Directory Certificate Services

On a new Windows Server 2012 R2 server after installing the Active Directory Certificate Authority role, you may experience the following error when first launching the Certificate Authority MMC Snap-in.

Cannot manage Active Directory Certificate Services.

The system cannot find the file specified. 0x80070002 (WIN32: 2 ERROR_FILE_NOT_FOUND)


This error is caused because you have not yet finished the configuration of AD CS using Windows Server 2012 R2 Server Manager.  In previous versions of Windows Server, these installation steps were part of "adding the role", however in Server 2012 these additional configuration steps are hard to find and had me stumped.

To finish the configuration, click on AD CS on the left in server manager then hit the little "more" button that comes up.  On the "All Servers Task Details and Notifications" select Configure Active Directory Certificate Services".

These have been marked in red in the following screenshot.


This is the only way using the GUI I could find to finish the installation.  Hopefully this helps someone and safes some time, took me a good 10 minutes to figure this one out!

Tuesday, November 26, 2013

How to Change your Network Profile in Server 2012

Network Profiles were first introduced as part of Windows Firewall with Advanced Features in Vista/2008 to allow administrators to configure different firewall profiles based upon what network a user connects to.  Administrators could change the profile by navigating to Network and Sharing Center in control panel and selecting the profile which suits their needs.

In Server 2012, Administrators can no longer change the network profile in Network and Sharing Center, they can view just not change.


To change the network profile you must use the new PowerShell cmdlets introduced in PowerShell version 4 in Windows Server 2012.

Please refer to the following screenshots for performing this procedure.


After making this change, it will update in Network and Sharing Center.


The default profile in Windows Server 2012 is public.  This changes automatically when you join the server to the domain however in the event your server is not to be joined to the domain, you need to change the profile manually yourself.  In this instance I'm setting up a stand alone offline certificate authority which must not be domain joined.  As a result I needed to configure this manually.

Hope this has been helpful.

Monday, November 18, 2013

The server holding the PDC role is down

My customer is running a single Active Directory domain with a single forest.  This domain has a central site and approximately 15 remote branch sites in a hub and spoke type deployment.

When running a FSMO role check using DCDiag on any domain controller in the domain, all domain controllers complained the PDC role is down.  This error experienced below was experienced on all domain controllers throughout the domain.

dcdiag /test:FSMOcheck

Warning: DsGetDcName(TIME_SERVER) call failed, error 1355
A Time Server could not be located.
The server holding the PDC role is down.
Warning: DcGetDcName(GOOD_TIME_SERVER_PREFERRED) call failed, error 1355.
A Good Time Server could not be located.


The time errors just mean the domain time hierarchy is not configured correctly, most likely cause is the PDC emulator in the forest root domain is not configured to sync to an external time source (common configuration requirement in all AD domains).

What was most concerning however is the error "The server holding the PDC role is down".  Testing the PDC emulator, I could connect to it using MMC snap-ins such as Active Directory Users and Computers and verified the PDC Emulator domain controller was processing authentication requests.  Why is this error saying it is down?

Next I performed a test to verify if the PDC emulator is working correctly.  The PDC Emulator has many roles including being the source of authority for domain group policy changes, the source of authority for time synchronisation and being a reliable source for all password synchronization.  For example, all password changes performed by other DCs in the domain are immediately replicated to the PDC emulator role.  If a logon authentication fails at a given DC in a domain due to a bad password, the DC will forward the authentication request to the PDC emulator to validate the request against the most current password.

Using this understanding around how the PDC emulator works, I performed a password change on a remote domain controller in another Active Directory site which has a replication interval of 3 hours.  I then attempted to login using the user account changed password in a different AD site using a domain controller which does not have the updated password.  I verified the request went to the PDC emulator to validate the users password has changed - hence the PDC emulator is in working order.

Also querying the PDC emulator with netdom returned it successfully.


Why are all domain controllers complaining the PDC role is down when doing a DCDiag?

The Resolution

I first went to tackle the time issue.  After logging in to the PDC emulator I noticed the PDC emulator time configuration was setup incorrectly.  It was set to use NT5DS instead of NTP, had the announce flag set to 10 instead of 5 and did not have an NTP server specified.  The PDC emulator in the forest root domain is the only computer in an Active Directory forest which should synchronise using NTP to an external time source, all other domain controllers and member computers need to be set to use NT5DS which tells them to use the Windows Time Hierarchy.

If you are not aware how this works, have a look at the following article (note some of the commands are slightly different in Vista/2008 upwards but concepts still apply).

http://www.windowsnetworking.com/articles-tutorials/windows-2003/Configuring-Windows-Time-Service.html

For changes in some of the commands in the windowsnetworking.com article please see:

http://clintboessen.blogspot.com.au/2012/07/windows-time-sync-changes-in-2008.html

 To fix this up I first ran to configure the PDC to use the pool.ntp.org NTP time server, one of the most widely used time servers on the Internet.

w32tm /config /update /manualpeerlist:pool.ntp.org

Next I went to regedit to the following key:

HKLM\SYSTEM\CurrentControlSet\services\W32Time\Config

And set the AnnounceFlags from 10 to 5 to make it a "reliable time source".  The PDC emulator must always be a reliable time source.  All other domain controllers and member servers should be set to 10.


Next under Parameters you need to set the Type to NTP instead of NT5DS, even though we configured a NTP server it wont use it unless we tell it to use NTP under Type.  You can also see the NtpServer is pool.ntp.org which we configured with the command above.


Next restart the Windows Time service in services.msc on the PDC Emulator.

Lastly perform a w32tm /resync from an elevated command prompt.

 
After fixing up the time issue I ran the following dcdiag test command on a remote domain controller again:
 
dcdiag /test:FSMOcheck


The error did not reoccur, all tests passed.

Conclusion

The conclusion from these findings that the error "The server holding the PDC role is down" from DCDiag is bogus, the PDC emulator is in working order, DCDiag simply said this because the time configuration was not setup correctly.

Wednesday, November 13, 2013

Office 365 Migration Solutions for Email Services - Must Read

Despite large amounts of effort from Microsoft in online resources and education over the past year, many organisations are still having difficulty with migrating their email infrastructure to the cloud and are confused as to the various migration options available.  This blog post is intended to assist organisations gain an understanding as to the various options available to them for migration to Office 365 and pick the right migration solution to meet their needs.

Microsoft provides organisations four methods for migrating user mailboxes from an on-premises Exchange environment to the Microsoft Office 365 cloud based on an organisations requirements.  These migration solutions include:
  • Exchange Cutover Migration
  • Exchange Staged Migration
  • Hybrid Exchange Deployment
  • IMAP-based Email Migrations
Each of these migration solutions will be covered individually below.
 
Exchange Cutover Migration
 
An Exchange cutover migration involves cutting over all domains from an on-premises infrastructure to the cloud in one hit, usually over a weekend.  The advantage of Cutover Migrations is that no additional infrastructure needs to be provisioned on premises such as the Microsoft Online Services Directory Synchronisation tool, Hybrid Exchange Servers or Active Directory Federation servers.  The disadvantage with Exchange Cutover Migrations is it provides no co-existence between the on-premises Exchange environment and Office 365.  Cutover migrations migrate the user’s entire on-premises mailbox to the cloud and are generally used when there is a small number of on-premises users which need migrating to Office 365.
 
Exchange cutover migrations work by the Office 365 servers connecting to your on-premises Exchange servers through RPC over HTTPS (also known as Outlook Anywhere) and downloading all mailboxes into Office 365.  To ensure Office 365 is kept up to date with new emails/items and calendar information or content deleted by the end user, Office 365 will automatically synchronize with the on-premises Exchange environment once every 24 hours.
 
In a cutover migration, once all on-premises mailboxes are synchronised in Office 365, administrators can plan a date in which disruption can occur (usually a weekend) to cutover the mail MX records to the cloud.  This means all external mail servers on the Internet relaying mail to the organisation will now send mail directly to the cloud.
 
It is recommended prior to performing the MX record update, the time to live (TTL) on the MX record be reduced to a smaller value such as 30 minutes to ensure mail servers around the world release the old record and request the updated record.  If the MX record has a large TTL value such as one week, it could mean that for some mail servers, it may take up to a week before mail is sent to the new Office 365 address.  Directly after the MX records are changed, it is recommended a final on-demand synchronisation be performed within the Office 365 interface.
 
Office 365 will automatically generate new passwords for all user accounts in the cloud.  On Monday morning administrators will need to run around to all computers and recreate the users a new Outlook profile to ensure users are setup correctly.  It is important to note that because the users Outlook profiles need to be recreated, the user will lose their local cached mailbox or OST file.  In an Exchange cutover migration every user will need to re-download their cached mailbox which can present problems especially when there are a large number of users accessing Office 365 behind the same internet link.
 
It is also important to note that not all permissions are preserved when mailboxes are moved to Office 365 using a cutover migration.  For example Send As permissions on mailboxes will be lost and administrators will need to reconfigure this once users are moved across into the cloud.
 
Exchange cutover migrations support Exchange 2003, Exchange 2007, Exchange 2010 and Exchange 2013.
 
Exchange Staged Migration
 
Unlike an Exchange cutover migration, staged migrations allow users to be moved across to Office 365 in small controlled batches.  Staged migrations provide simple co-existence with Office 365 in which mail flow is maintained between the on-premises Exchange organisation and Office 365.  This allows for users to exist both on-premises and in the cloud during migration.  It is important to note that staged migrations only provide simple co-existence meaning only mail flow will be available between the on-premises and environment and Office 365.  Exchange rich collaboration features such as delegation, calendar sharing, free-busy and meeting rooms will not function between Office 365 and on-premises users in a staged migration deployment.

Staged migrations also require additional infrastructure be deployed on premises.  The Microsoft Online Services Directory Synchronisation tool (also known as Forefront Identity Manager or DirSync) needs to be deployed on-premises on a server which is not running as an Active Directory domain controller.  This tool ensures that all recipient objects on premises are synchronised to Office 365 to ensure the Global Address List is fully populated both on-premises and in the Office 365 cloud.  This allows users both on-premises and in the cloud to view the entire global address list - a process which is often referred to in online documentation as GALSync.  It is also important to note that Office 365 tenants must have an M or an E type licensing plan available in their Office 365 subscription in order to use the Microsoft Online Services Directory Synchronisation tool.

Exchange staged migrations also work by the Office 365 servers connecting the on-premises Exchange servers through RPC over HTTPS (also known as Outlook Anywhere) and downloading all mailboxes into Office 365.  As a result the on-premises Exchange environment must be configured with Outlook Anywhere and a valid digital certificate for the migration process.

Unlike cutover migrations however, staged migrations do not support incremental synchronisation of mailbox information.  This is because in a sense, staged migrations do not need incremental synchronisation to due to simple coexistence.  When the Office 365 migration wizard starts migration on a selected batch of on-premises users, the wizard automatically configures the TargetAddress property of the user’s on-premises mailbox using administrative credentials of an on-premises administrator supplied to Office 365 to an Office 365 specific email address.  This ensures for every email the on-premises mailbox receives, the on-premises Exchange server also forward a copy of the email onto Office 365.  This process is shown in the following diagram.
 
 
Note: If the user creates changes in the user’s mailbox such as deleting content or performing tasks which do not involve SMTP transport, these changes will not be synchronised to the cloud during simple co-existence as these activities cannot be sent via an email message.
 
When the Microsoft Online Services Directory Synchronisation tool runs it creates mail-enabled users for every mailbox user on-premises within Office 365.  As soon as the first migration batch is run in a staged migration, Office 365 will convert the mail-enabled user in Office 365 to a mailbox user.  As a result users can begin using the cloud based mailbox instantly – with this in mind however the users mailbox will be completely empty as the migration batch has just been kicked off and has not synchronised yet.  Companies can provide users instant access to their Office 365 cloud mailbox and advise the users their mail “is still coming” and reinsure the users they will not lose any mail.  Alternatively administrators can wait until a synchronisation batch has completely finished and then provide users access to their Office 365 cloud mailboxes.

After every mailbox in the on-premises organisation has been migrated to Office 365, companies can then point the MX records for any on-premises “accepted domains” to the mail gateway addresses provided by Microsoft for Office 365.  Like with cutover migrations, all user profiles will require recreation and users will get a new OST file meaning they need to re-download their entire mailbox from Office 365.  Staged migrations do have an advantage over cutover migrations however - companies can minimize the performance hit of re-downloading the users OST files by allowing users to recreate their profile in batches.  Also as with cutover migrations, all users will receive a new password from Microsoft which is to be used for accessing their Office 365 mailbox.

It is important to note that staged migrations only support Exchange Server 2003 and 2007, not Exchange Server 2010.  In Exchange 2010 and Exchange 2013, the TargetAddress property can't be modified. This is the reason that staged Exchange migration doesn't support migrating Exchange 2010 and Exchange 2013 mailboxes to Exchange Online.
 
Hybrid Exchange Deployment
 
Microsoft Office 365 hybrid migrations provide rich coexistence between an on-premises Exchange environment and Office 365 such as mail routing, calendar and free/busy information and mailbox delegation.  It provides organisations the ability to slowly move individual mailboxes to the Office 365 whilst keeping the rich collaboration experience provided by Microsoft Exchange between on-premises and cloud users.

Unlike cutover and staged migrations, Exchange hybrid migrations do not rely on RPC over HTTPS (Outlook Anywhere) to transfer the user mailboxes from an on-premises Exchange to Office 365.  In fact Exchange hybrid migrations use the mailbox replication proxy (MRSProxy) to perform mailbox moves to the cloud - a concept known as "cross-forest" mailbox moves.  MRSProxy is the same technology built into Exchange for performing things such as on-premises mailbox moves between mailbox databases or between Exchange servers in a local Exchange organisation.  The mailbox moves between an on-premises Exchange server and Office 365 are "online mailbox moves" which means the user is able to work and send/receive email while their mailbox is being uploaded to Office 365.

Out of all the Office 365 migration methods, Exchange hybrid migrations require the most amount of on-premises infrastructure be deployed and is the most complex migration method in terms of integration work.  The complexity built into the solution is what gives users a completely seamless experience irrespective of what environment they are in whether it be cloud or on-premises.

Exchange hybrid migrations require a minimum of three servers be deployed on-premises with more required in the event high availability be implemented.  These servers include:
  • The Microsoft Online Services Directory Synchronisation tool (also known as Forefront Identity Manager or DirSync)
  • Active Directory Federation Services (ADFS)
  • At least one Exchange 2010/2013 server on the on-premises Exchange environment
Note: The term Exchange hybrid server is used many places on the Internet.  This is simply an Exchange 2010 server with at minimum the Client Access and Hub Transport roles installed in an existing Exchange 2003 or Exchange 2007 on-premises organisation.  Exchange hybrid servers are not a different version of Exchange 2010 nor do they have different installation media.  It is the same version of Exchange, just configured to provide rich coexistence through federation.
 
Below is an overview of how hybrid configurations with Office 365 fit together taken from the Microsoft Exchange Deployment Assistant.
 
 
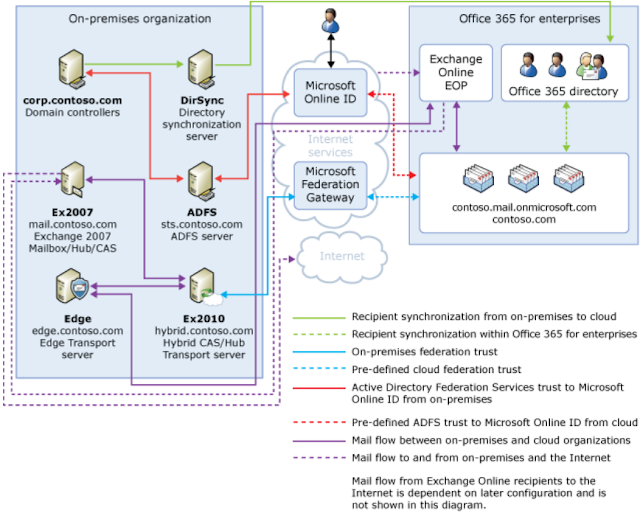
 The DirSync server as with staged migrations is responsible for ensuring the global address list in both on-premises and Office 365 environments remains fully populated with all mail-enabled users, groups and contacts in the Exchange environment.  This process is often referred to as GALSync in online documentation.

The Active Directory Federation Services (ADFS) server is a mission critical server in hybrid configurations and as a result it is often recommended clustering be implemented through Microsoft Network Load Balancing (NLB) or a third party load balancer technology.  When Office 365 is configured in a hybrid deployment with an on-premises environment, the "source of authority" is configured to point to the on-premises Active Directory environment.  What this means is all authentication requests for user which happens within a tenants Office 365 environment is sent back to the on-premises environment through ADFS to authenticate against an on-premises domain controller.  In the event the on-premises ADFS deployment become unavailable, users will not be able to authenticate with Office 365.

The Exchange 2010 / 2013 server is required to setup a federation trust between the on-premises Exchange organization and Microsoft Federation Gateway.  This is what enables the rich co-existence to occur between the on-premises Exchange environment and Office 365 to allow features such as free/busy and delegation to work between the two environments.

A hybrid configuration between Office 365 and an on-premises Exchange environment is the best approach for organisations who wish to setup rich co-existence and migrate users slowly in controlled batches.  Unlike other migration methods such as cutover or staged, hybrid configurations do not require users to obtain a new password.  Through the use of ADFS they can continue using their on-premises username and password for logging in and accessing cloud resources a process known as single sign-on.

Another advantage of performing a hybrid migration to Office 365 is users do not need to recreate their Outlook profile, a major disadvantage of cutover and staged migrations.  This means users do not need to re-re-download the entire Outlook OST file or “cached exchange mode” cache.

Think of a hybrid configuration as making your on-premises Exchange and Office 365 environment one and the same.  Some organisations setup a hybrid configuration for other purposes other than just migration to Office 365.  For example, if you want to put a user’s secondary archive mailbox in the cloud a hybrid configuration is needed.  Hybrid configuration also allows you to migrate users through mailbox moves from the cloud back to an on-premises environment providing the utmost flexibility.

IMAP-based Email Migrations

An Office 365 IMAP migration provides the ability to migrate an IMAP based mailboxes to Office 365 in which Office 365 downloads the user’s mailbox by connecting to the IMAP server.  IMAP migrations are intended to provide a migration path for non-Microsoft email systems to Office 365.

An IMAP migration works by creating a CSV file with all the account names and passwords for each of the IMAP users which are to be migrated to Office 365.  This process means administrators need to gather each user’s password to their IMAP mailbox and manually input the password into the CSV file.  This CSV file is uploaded to Office 365 in the web interface.  Office 365 will then connect to each mailbox and download all email for each user into Office 365.

As with cutover migrations, Office 365 is able to perform incremental syncs every 24 hours for IMAP mailboxes to ensure any new emails which arrive on-premises are also synchronised to the cloud.

When all users have been migrated to Office 365, administrators simply need to cut over the MX records for any domain names associated with the mailboxes and distribute the new Office 365 username and passwords to the end users.


I still need help!

In the event you need assistance with planning or performing your Office 365 email migration, I am more then happy to assist.  Please get in contact with me by emailing me on clint.boessen@avantgardetechnologies.com.au or leave a comment below.

I hope this blog post has been helpful.

Tuesday, November 12, 2013

Autodiscover 0x800710DD

A customer of mine was having problems downloading the Offline Address Book and performing test Autodiscover attempts using "Test E-mail AutoConfiguration" through Microsoft Outlook.

When attempting to test Autodiscover using their user account credentials from an Exchange Management Shell using the Test-WebServicesConnectivity command, the autodiscover test completed successfully.  This brought it down to an issue with the end workstation, not the server, user account or mailbox.

The error which was experienced when performing an Autodiscover attempt in "Test E-mail AutoConfiguration" was:

GetLastError=0;httpStatus=407

Autodiscover to https://EXCHANGESERVER.DOMAIN/Autodiscover/Autodiscover.xml Failed (0x800710DD)

This is shown in the following screenshot:


After diagnosing the problem it turns out that this issue was caused by a proxy server configured on the end workstation.  Disabling the proxy server resolved the issue.

As a permanent solution, the proxy server must remain enabled.  To ensure the Exchange server is not used via the proxy, you can add the Exchange server as an exception.

 
This can be done through Group Policy for all users using Internet Explorer Maintenance.  Please note moving forward with Internet Explorer 10 and onwards, you need to make these changes from a Windows 8 or Windows Server 2012 machine.  For more information about this please see my following blog post:
 

Thursday, October 31, 2013

Exporting Drivers from Windows

I stumbled across a great application today called DriverMax - a free application which lets you export drivers from Windows based operating systems.  This tool is handy when you are having difficulty tracking down an unknown driver but have it readably available already installed on another workstation.  With this tool you can simply export the driver from one computer to another.

The latest version of DriverMax as of this writing is version 7.21 which can be downloaded from the following URL:

http://small.drivermax.com/soft/dmx/drivermax.exe

Once installed you will be presented with the following splash screen.  Simply click "Driver backup and restore"


Next select "Backup drivers".


Select the drives you wish to export from the operating system such as display, network or audio drivers.  In my case I have a HP USB mouse/keyboard which is not being recognised by Windows 7 x64 (weird) so I want to move the drivers from a PC which I know have the correct drivers for this device.

I selected "USB Input Device" (both the Mouse and Keyboard both use the same driver).


Next under the backup button select "Backup selected drivers to a specified folder".  Select the folder and then select backup.


Under the folder specified the drivers will be backed up to the respective location as shown in the following screenshot with the driver ini file and system files.