
This blog post goes through what is required to get Windows 10 Enterprise Edition 1703 ready for deployment in an enterprise environment with Internet Explorer.
In Windows 10 Enterprise Edition 1607, a common practice to prepare the image for deployment was to create a custom default profile. This was done by creating a temporary user account on the base image and customizing it such as removing edge, store and windows mail from task bar and removing modern apps from start menu tiles. The profile of this temporary user would then be used to create a new "Default profile" under C:\Users and the old profile would generally be renamed to something like Default.old or deleted entirely.
In Windows 10 Enterprise Edition 1703 however, customizing the default profile results in Sysprep failing with an error. This error results in an infinite loop of restarts after the first boot with the following text:
Why did my PC restart?
There's a problem that's keeping us from getting your PC ready to use, but we think an update will help get things working again.
Here's how to update:

As a result we must perform all modifications to the image without modifying the default profile on the base image as a work around. After leasing with Microsoft, we also do not want the Windows 10 1703 image to ever touch the Internet as it will download additional bloatware and updates during the installation process which can also cause Sysprep to fail.
Below is the documented steps for creating an Enterprise Ready Windows 10 Enterprise 1703 build with the bloatware stripped out and Internet Explorer as standard browser so your legacy Enterprise web applications continue to function.
Step 1 - Create a new Virtual Machine with no Internet
You want to create your image on a virtual machine, not a physical workstation. Do not install VMware Tools or HyperV Integration Services as we want to keep the image clean. The image will eventually be deployed to physical hardware and as a result we do not want such software on the Windows 10 Enterprise build.
Make sure you use all generic virtual hardware, for example on VMware make sure you use E1000E Virtual NIC, not VMXNET3 as this requires custom drivers from VMware Tools.
Install Windows 10 from the latest Windows 10 Enterprise 1703 ISO. Make sure the VM is disconnected from the Internet during the build process to ensure it cannot download updates.
Step 2 - Enable Sysprep Audit Mode
Immediately after the install finishes, enable Sysprep in Audit Mode. You use audit mode to setup the default profile which will affect all users that log into the computer.
Do not generalize the image and simply select reboot.

Step 3 - Unpin Applications from Start Menu and Taskbar
Whilst in Audit mode, go through and unpin all the modern apps from the Start Menu. Also unpin anything you want from the task bar such as store, windows mail etc.

Step 4 - Remove Bloatware
Next we want to go through and remove all bloatware from the image. In Windows 10 Enterprise 1607 we could simply achieve this with the following command:
Get-AppxPackage -AllUsers | Remove-AppxPackage
On Windows 10 Enterprise 1703 however we cannot do this or it will break sysprep. As a result we need to specify the individual bloatware applications we wish to remove. Here is the list I used on my image, tailor it for your needs.
Get-AppxPackage -allusers *Adobe*
Get-AppxPackage -allusers *EclipseManager*
Get-AppxPackage -allusers *WindowsFeedbackHub*
Get-AppxPackage -allusers *MicrosoftOfficeHub*
Get-AppxPackage -allusers *GetStarted*
Get-AppxPackage -allusers *zune*
Get-AppxPackage -allusers *messaging*
Get-AppxPackage -allusers *solitaire*
Get-AppxPackage -allusers *bingnews*
Get-AppxPackage -allusers *bingweather*
Get-AppxPackage -allusers *skypeapp*
Get-AppxPackage -allusers *stickynotes*
Get-AppxPackage -allusers *xboxapp*
Get-AppxPackage -allusers *windowscommunicationsapps*
Get-AppxPackage -allusers *OneConnect*
Get-AppxPackage -allusers *3DBuilder*
Get-AppxPackage -allusers *3DViewer*
Get-AppxPackage -allusers *Pandora*
Get-AppxPackage -allusers *PowerBI*
Get-AppxPackage -allusers *CandyCrush*
Get-AppxPackage -allusers *speedtest*
Get-AppxPackage -allusers *QuickAssist*
Get-AppxPackage -allusers *Office.Sway*
Get-AppxPackage -allusers *Twitter*
Get-AppxPackage -allusers *bingsports*
Get-AppxPackage -allusers *Duolingo*
Get-AppxPackage -allusers *ActiproSoftwareLLC*
Get-AppxPackage -allusers *RemoteDesktop*
Also run the following commands so the applications are no longer available for the next user:
Get-appxprovisionedpackage –online | where-object {$_.packagename -like "*Adobe*"} | Remove-AppxProvisionedPackage -online
Get-appxprovisionedpackage –online | where-object {$_.packagename -like "*EclipseManager*"} | Remove-AppxProvisionedPackage -online
Get-appxprovisionedpackage –online | where-object {$_.packagename -like "*WindowsFeedbackHub*"} | Remove-AppxProvisionedPackage -online
Get-appxprovisionedpackage –online | where-object {$_.packagename -like "*MicrosoftOfficeHub*"} | Remove-AppxProvisionedPackage -online
Get-appxprovisionedpackage –online | where-object {$_.packagename -like "*GetStarted*"} | Remove-AppxProvisionedPackage -online
Get-appxprovisionedpackage –online | where-object {$_.packagename -like "*zune*"} | Remove-AppxProvisionedPackage -online
Get-appxprovisionedpackage –online | where-object {$_.packagename -like "*messaging*"} | Remove-AppxProvisionedPackage -online
Get-appxprovisionedpackage –online | where-object {$_.packagename -like "*solitaire*"} | Remove-AppxProvisionedPackage -online
Get-appxprovisionedpackage –online | where-object {$_.packagename -like "*bingnews*"} | Remove-AppxProvisionedPackage -online
Get-appxprovisionedpackage –online | where-object {$_.packagename -like "*bingweather*"} | Remove-AppxProvisionedPackage -online
Get-appxprovisionedpackage –online | where-object {$_.packagename -like "*skypeapp*"} | Remove-AppxProvisionedPackage -online
Get-appxprovisionedpackage –online | where-object {$_.packagename -like "*stickynotes*"} | Remove-AppxProvisionedPackage -online
Get-appxprovisionedpackage –online | where-object {$_.packagename -like "*stickynotes*"} | Remove-AppxProvisionedPackage -online
Get-appxprovisionedpackage –online | where-object {$_.packagename -like "*xboxapp*"} | Remove-AppxProvisionedPackage -online
Get-appxprovisionedpackage –online | where-object {$_.packagename -like "*windowscommunicationsapps*"} | Remove-AppxProvisionedPackage -online
Get-appxprovisionedpackage –online | where-object {$_.packagename -like "*OneConnect*"} | Remove-AppxProvisionedPackage -online
Get-appxprovisionedpackage –online | where-object {$_.packagename -like "*3DBuilder*"} | Remove-AppxProvisionedPackage -online
Get-appxprovisionedpackage –online | where-object {$_.packagename -like "*3DViewer*"} | Remove-AppxProvisionedPackage -online
Get-appxprovisionedpackage –online | where-object {$_.packagename -like "*Pandora*"} | Remove-AppxProvisionedPackage -online
Get-appxprovisionedpackage –online | where-object {$_.packagename -like "*PowerBI*"} | Remove-AppxProvisionedPackage -online
Get-appxprovisionedpackage –online | where-object {$_.packagename -like "*CandyCrush*"} | Remove-AppxProvisionedPackage -online
Get-appxprovisionedpackage –online | where-object {$_.packagename -like "*speedtest*"} | Remove-AppxProvisionedPackage -online
Get-appxprovisionedpackage –online | where-object {$_.packagename -like "*QuickAssist*"} | Remove-AppxProvisionedPackage -online
Get-appxprovisionedpackage –online | where-object {$_.packagename -like "*Office.Sway*"} | Remove-AppxProvisionedPackage -online
Get-appxprovisionedpackage –online | where-object {$_.packagename -like "*Twitter*"} | Remove-AppxProvisionedPackage -online
Get-appxprovisionedpackage –online | where-object {$_.packagename -like "*bingsports*"} | Remove-AppxProvisionedPackage -online
Get-appxprovisionedpackage –online | where-object {$_.packagename -like "*Duolingo*"} | Remove-AppxProvisionedPackage -online
Get-appxprovisionedpackage –online | where-object {$_.packagename -like "*ActiproSoftwareLLC*"} | Remove-AppxProvisionedPackage -online
Get-appxprovisionedpackage –online | where-object {$_.packagename -like "*RemoteDesktop*"} | Remove-AppxProvisionedPackage -online
Step 5 - Prevent the Image from downloading more Bloatware
To prevent the image from downloading more bloatware when we connect it to the Internet, we need to add the following registry key. This stops it from downloading additional non essential applications considered by many as "bloatware".
reg add HKLM\Software\Policies\Microsoft\Windows\CloudContent /v DisableWindowsConsumerFeatures /t REG_DWORD /d 1 /f
Step 6 - Create an Unattended xml file
Next create an unattended xml file. I placed this on the image under C:\Windows\System32\Sysprep.
CopyProfile = $true in the XML file instructs to make the changes made in Audit Mode the default profile on the image.
<?xml version="1.0" encoding="utf-8"?><unattend xmlns="urn:schemas-microsoft-com:unattend">
<settings pass="specialize">
<component name="Microsoft-Windows-Shell-Setup" processorArchitecture="amd64" publicKeyToken="31bf3856ad364e35" language="neutral" versionScope="nonSxS" xmlns:wcm="http://schemas.microsoft.com/WMIConfig/2002/State" xmlns:xsi="http://www.w3.org/2001/XMLSchema-instance">
<CopyProfile>true</CopyProfile>
</component>
</settings>
<cpi:offlineImage cpi:source="wim:D:/sources/install.wim#Windows 10 Enterprise" xmlns:cpi="urn:schemas-microsoft-com:cpi" />
</unattend>
Also mount your Windows 10 Enterprise 1703 DVD to your image under D:\ to match the offlineImage path of the unattend XML file.
Name the XML file anything other then unattend.xml as this is the default file Windows 10 uses.
Step 7 - Run Sysprep
Next run Sysprep from an elevated command prompt.
sysprep.exe /generalize /oobe /shutdown /unattend:c:\windows\system32\sysprep\Win10unattendanswer.xml
Snapshot the image after it is shutdown and confirm that it boots correctly and runs sysprep without errors. Once you have confirmed this, roll it back to the snapshot ready to capture the image.
Step 8 - Capture the Image with DISM
Next capture the image with DISM using a command similar to the following:
Dism /Capture-Image /ImageFile:c:\my-windows-partition.wim /CaptureDir:C:\ /Name:"My Windows partition"
For more information on capturing with DISM please refer to the following website:
https://technet.microsoft.com/en-us/library/hh825072.aspx
Step 9 - Removing Edge and Pinning Internet Explorer with SCCM
Despite removing the Edge icon from the image in the default profile, the CopyProfile part of sysprep does not bring the change across. Other start menu changes all stay in place.
Microsoft MVP Jörgen Nilsson has created a script to use in an SCCM task sequence to ensure Edge stays removed. He published this here:
http://ccmexec.com/2015/12/removing-the-edge-icon-from-the-taskbar-during-osd/
This script has also been published to TechNet Gallery under the following location:
https://gallery.technet.microsoft.com/Manage-the-taskbar-remove-c3024e40
This script however whilst it removes Edge, does not pin Internet Explorer in its place. Here is 2.0 of this script which pin's Internet Explorer in the place of Edge. Please download from the following link:
https://sites.google.com/site/cbblogspotfiles/ManageTaskbar%202.0.zip
Step 10 - Create an SCCM Package for the Script
This procedure assumes your using SCCM 1702 to deploy your Windows 10 image.
For this process we want to create a new SCCM Package, not a Application.


Select "Do not create a program" and click Finish.

And as always with SCCM, distribute the package to the distribution points.
 Step 11 - Modify the SCCM Win10 Deployment Task Sequence
Next we want to configure the SCCM task sequence to run the batch script we imported to a package. This batch script simply imports a registry key to the default profile and configures a "runonce" to ensure all new users that login to the image run the PowerShell script to modify the task bar.
To run the batch file we want to add a "Run Command Line" option at the end of the task sequence usually as the last step. Simply select the package and add in the command line area "TaskBar.cmd".
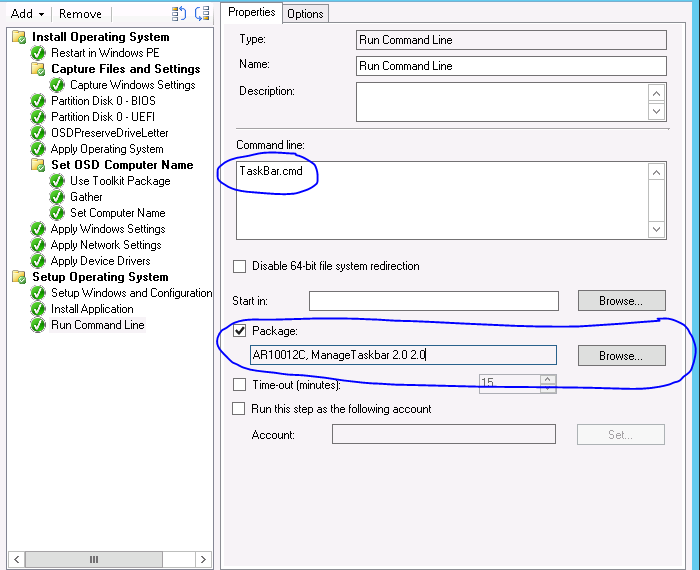
This will ensure after new machines are deployed Edge will be removed and Internet Explorer will be put in their place.
Extra Steps
I recommend considering to deploy the following group policy settings to your Windows 10 computers:
Disable the Windows Store:
Computer Configuration --> Administrative Templates --> Windows Components --> Store --> "Turn of Windows Store"
Disable the OneDrive:
Computer Configuration --> Administrative Templates --> Windows Components --> One Drive--> "Prevent the usage of OneDrive for file storage"
Disable Cortana:
Computer Configuration --> Administrative Templates --> Windows Components --> Search --> "Disable Cortana"
Set the default applications to use IE instead of Edge. This requires you create a xml AppAssoc file with DISM and deploying it with Group Policy. See the following web page:
https://docs.microsoft.com/en-us/internet-explorer/ie11-deploy-guide/set-the-default-browser-using-group-policy
To create the AppAssoc XML file use the following DISM command:
dism /online /export-defaultappassociations:\\server\share\\AppAssoc.xml
Shoutout:
I would like to provide a huge thanks to Amit Anand from Microsoft for working with me and attending numerous skype meetings on creating this solution.
Hopefully this post has been helpful.
In Windows 10 Enterprise Edition 1607, a common practice to prepare the image for deployment was to create a custom default profile. This was done by creating a temporary user account on the base image and customizing it such as removing edge, store and windows mail from task bar and removing modern apps from start menu tiles. The profile of this temporary user would then be used to create a new "Default profile" under C:\Users and the old profile would generally be renamed to something like Default.old or deleted entirely.
In Windows 10 Enterprise Edition 1703 however, customizing the default profile results in Sysprep failing with an error. This error results in an infinite loop of restarts after the first boot with the following text:
Why did my PC restart?
There's a problem that's keeping us from getting your PC ready to use, but we think an update will help get things working again.
Here's how to update:
- Make sure your PC is plugged in
- If this PC uses Wi-Fi, select Next to following instructions to connect to a Wi-Fi network.
- If this PC does not use Wi-Fi, insert a network cable to connect to a wired network, and then select Next.
- Once you're connected, select Next, and the update will install.
As a result we must perform all modifications to the image without modifying the default profile on the base image as a work around. After leasing with Microsoft, we also do not want the Windows 10 1703 image to ever touch the Internet as it will download additional bloatware and updates during the installation process which can also cause Sysprep to fail.
Below is the documented steps for creating an Enterprise Ready Windows 10 Enterprise 1703 build with the bloatware stripped out and Internet Explorer as standard browser so your legacy Enterprise web applications continue to function.
Step 1 - Create a new Virtual Machine with no Internet
You want to create your image on a virtual machine, not a physical workstation. Do not install VMware Tools or HyperV Integration Services as we want to keep the image clean. The image will eventually be deployed to physical hardware and as a result we do not want such software on the Windows 10 Enterprise build.
Make sure you use all generic virtual hardware, for example on VMware make sure you use E1000E Virtual NIC, not VMXNET3 as this requires custom drivers from VMware Tools.
Install Windows 10 from the latest Windows 10 Enterprise 1703 ISO. Make sure the VM is disconnected from the Internet during the build process to ensure it cannot download updates.
Step 2 - Enable Sysprep Audit Mode
Immediately after the install finishes, enable Sysprep in Audit Mode. You use audit mode to setup the default profile which will affect all users that log into the computer.
Do not generalize the image and simply select reboot.
Step 3 - Unpin Applications from Start Menu and Taskbar
Whilst in Audit mode, go through and unpin all the modern apps from the Start Menu. Also unpin anything you want from the task bar such as store, windows mail etc.
Step 4 - Remove Bloatware
Next we want to go through and remove all bloatware from the image. In Windows 10 Enterprise 1607 we could simply achieve this with the following command:
Get-AppxPackage -AllUsers | Remove-AppxPackage
On Windows 10 Enterprise 1703 however we cannot do this or it will break sysprep. As a result we need to specify the individual bloatware applications we wish to remove. Here is the list I used on my image, tailor it for your needs.
Get-AppxPackage -allusers *Adobe*
Get-AppxPackage -allusers *EclipseManager*
Get-AppxPackage -allusers *WindowsFeedbackHub*
Get-AppxPackage -allusers *MicrosoftOfficeHub*
Get-AppxPackage -allusers *GetStarted*
Get-AppxPackage -allusers *zune*
Get-AppxPackage -allusers *messaging*
Get-AppxPackage -allusers *solitaire*
Get-AppxPackage -allusers *bingnews*
Get-AppxPackage -allusers *bingweather*
Get-AppxPackage -allusers *skypeapp*
Get-AppxPackage -allusers *stickynotes*
Get-AppxPackage -allusers *xboxapp*
Get-AppxPackage -allusers *windowscommunicationsapps*
Get-AppxPackage -allusers *OneConnect*
Get-AppxPackage -allusers *3DBuilder*
Get-AppxPackage -allusers *3DViewer*
Get-AppxPackage -allusers *Pandora*
Get-AppxPackage -allusers *PowerBI*
Get-AppxPackage -allusers *CandyCrush*
Get-AppxPackage -allusers *speedtest*
Get-AppxPackage -allusers *QuickAssist*
Get-AppxPackage -allusers *Office.Sway*
Get-AppxPackage -allusers *Twitter*
Get-AppxPackage -allusers *bingsports*
Get-AppxPackage -allusers *Duolingo*
Get-AppxPackage -allusers *ActiproSoftwareLLC*
Get-AppxPackage -allusers *RemoteDesktop*
Also run the following commands so the applications are no longer available for the next user:
Get-appxprovisionedpackage –online | where-object {$_.packagename -like "*Adobe*"} | Remove-AppxProvisionedPackage -online
Get-appxprovisionedpackage –online | where-object {$_.packagename -like "*EclipseManager*"} | Remove-AppxProvisionedPackage -online
Get-appxprovisionedpackage –online | where-object {$_.packagename -like "*WindowsFeedbackHub*"} | Remove-AppxProvisionedPackage -online
Get-appxprovisionedpackage –online | where-object {$_.packagename -like "*MicrosoftOfficeHub*"} | Remove-AppxProvisionedPackage -online
Get-appxprovisionedpackage –online | where-object {$_.packagename -like "*GetStarted*"} | Remove-AppxProvisionedPackage -online
Get-appxprovisionedpackage –online | where-object {$_.packagename -like "*zune*"} | Remove-AppxProvisionedPackage -online
Get-appxprovisionedpackage –online | where-object {$_.packagename -like "*messaging*"} | Remove-AppxProvisionedPackage -online
Get-appxprovisionedpackage –online | where-object {$_.packagename -like "*solitaire*"} | Remove-AppxProvisionedPackage -online
Get-appxprovisionedpackage –online | where-object {$_.packagename -like "*bingnews*"} | Remove-AppxProvisionedPackage -online
Get-appxprovisionedpackage –online | where-object {$_.packagename -like "*bingweather*"} | Remove-AppxProvisionedPackage -online
Get-appxprovisionedpackage –online | where-object {$_.packagename -like "*skypeapp*"} | Remove-AppxProvisionedPackage -online
Get-appxprovisionedpackage –online | where-object {$_.packagename -like "*stickynotes*"} | Remove-AppxProvisionedPackage -online
Get-appxprovisionedpackage –online | where-object {$_.packagename -like "*stickynotes*"} | Remove-AppxProvisionedPackage -online
Get-appxprovisionedpackage –online | where-object {$_.packagename -like "*xboxapp*"} | Remove-AppxProvisionedPackage -online
Get-appxprovisionedpackage –online | where-object {$_.packagename -like "*windowscommunicationsapps*"} | Remove-AppxProvisionedPackage -online
Get-appxprovisionedpackage –online | where-object {$_.packagename -like "*OneConnect*"} | Remove-AppxProvisionedPackage -online
Get-appxprovisionedpackage –online | where-object {$_.packagename -like "*3DBuilder*"} | Remove-AppxProvisionedPackage -online
Get-appxprovisionedpackage –online | where-object {$_.packagename -like "*3DViewer*"} | Remove-AppxProvisionedPackage -online
Get-appxprovisionedpackage –online | where-object {$_.packagename -like "*Pandora*"} | Remove-AppxProvisionedPackage -online
Get-appxprovisionedpackage –online | where-object {$_.packagename -like "*PowerBI*"} | Remove-AppxProvisionedPackage -online
Get-appxprovisionedpackage –online | where-object {$_.packagename -like "*CandyCrush*"} | Remove-AppxProvisionedPackage -online
Get-appxprovisionedpackage –online | where-object {$_.packagename -like "*speedtest*"} | Remove-AppxProvisionedPackage -online
Get-appxprovisionedpackage –online | where-object {$_.packagename -like "*QuickAssist*"} | Remove-AppxProvisionedPackage -online
Get-appxprovisionedpackage –online | where-object {$_.packagename -like "*Office.Sway*"} | Remove-AppxProvisionedPackage -online
Get-appxprovisionedpackage –online | where-object {$_.packagename -like "*Twitter*"} | Remove-AppxProvisionedPackage -online
Get-appxprovisionedpackage –online | where-object {$_.packagename -like "*bingsports*"} | Remove-AppxProvisionedPackage -online
Get-appxprovisionedpackage –online | where-object {$_.packagename -like "*Duolingo*"} | Remove-AppxProvisionedPackage -online
Get-appxprovisionedpackage –online | where-object {$_.packagename -like "*ActiproSoftwareLLC*"} | Remove-AppxProvisionedPackage -online
Get-appxprovisionedpackage –online | where-object {$_.packagename -like "*RemoteDesktop*"} | Remove-AppxProvisionedPackage -online
Step 5 - Prevent the Image from downloading more Bloatware
To prevent the image from downloading more bloatware when we connect it to the Internet, we need to add the following registry key. This stops it from downloading additional non essential applications considered by many as "bloatware".
reg add HKLM\Software\Policies\Microsoft\Windows\CloudContent /v DisableWindowsConsumerFeatures /t REG_DWORD /d 1 /f
Step 6 - Create an Unattended xml file
Next create an unattended xml file. I placed this on the image under C:\Windows\System32\Sysprep.
CopyProfile = $true in the XML file instructs to make the changes made in Audit Mode the default profile on the image.
<?xml version="1.0" encoding="utf-8"?><unattend xmlns="urn:schemas-microsoft-com:unattend">
<settings pass="specialize">
<component name="Microsoft-Windows-Shell-Setup" processorArchitecture="amd64" publicKeyToken="31bf3856ad364e35" language="neutral" versionScope="nonSxS" xmlns:wcm="http://schemas.microsoft.com/WMIConfig/2002/State" xmlns:xsi="http://www.w3.org/2001/XMLSchema-instance">
<CopyProfile>true</CopyProfile>
</component>
</settings>
<cpi:offlineImage cpi:source="wim:D:/sources/install.wim#Windows 10 Enterprise" xmlns:cpi="urn:schemas-microsoft-com:cpi" />
</unattend>
Also mount your Windows 10 Enterprise 1703 DVD to your image under D:\ to match the offlineImage path of the unattend XML file.
Name the XML file anything other then unattend.xml as this is the default file Windows 10 uses.
Step 7 - Run Sysprep
Next run Sysprep from an elevated command prompt.
sysprep.exe /generalize /oobe /shutdown /unattend:c:\windows\system32\sysprep\Win10unattendanswer.xml
Snapshot the image after it is shutdown and confirm that it boots correctly and runs sysprep without errors. Once you have confirmed this, roll it back to the snapshot ready to capture the image.
Step 8 - Capture the Image with DISM
Next capture the image with DISM using a command similar to the following:
Dism /Capture-Image /ImageFile:c:\my-windows-partition.wim /CaptureDir:C:\ /Name:"My Windows partition"
For more information on capturing with DISM please refer to the following website:
https://technet.microsoft.com/en-us/library/hh825072.aspx
Step 9 - Removing Edge and Pinning Internet Explorer with SCCM
Despite removing the Edge icon from the image in the default profile, the CopyProfile part of sysprep does not bring the change across. Other start menu changes all stay in place.
Microsoft MVP Jörgen Nilsson has created a script to use in an SCCM task sequence to ensure Edge stays removed. He published this here:
http://ccmexec.com/2015/12/removing-the-edge-icon-from-the-taskbar-during-osd/
This script has also been published to TechNet Gallery under the following location:
https://gallery.technet.microsoft.com/Manage-the-taskbar-remove-c3024e40
This script however whilst it removes Edge, does not pin Internet Explorer in its place. Here is 2.0 of this script which pin's Internet Explorer in the place of Edge. Please download from the following link:
https://sites.google.com/site/cbblogspotfiles/ManageTaskbar%202.0.zip
Step 10 - Create an SCCM Package for the Script
This procedure assumes your using SCCM 1702 to deploy your Windows 10 image.
For this process we want to create a new SCCM Package, not a Application.
Navigate to the path on the network to where the Zip file was extracted. If you didn't see the link above, you can download it from:
Select "Do not create a program" and click Finish.
And as always with SCCM, distribute the package to the distribution points.
Next we want to configure the SCCM task sequence to run the batch script we imported to a package. This batch script simply imports a registry key to the default profile and configures a "runonce" to ensure all new users that login to the image run the PowerShell script to modify the task bar.
To run the batch file we want to add a "Run Command Line" option at the end of the task sequence usually as the last step. Simply select the package and add in the command line area "TaskBar.cmd".
This will ensure after new machines are deployed Edge will be removed and Internet Explorer will be put in their place.
Extra Steps
I recommend considering to deploy the following group policy settings to your Windows 10 computers:
Disable the Windows Store:
Computer Configuration --> Administrative Templates --> Windows Components --> Store --> "Turn of Windows Store"
Disable the OneDrive:
Computer Configuration --> Administrative Templates --> Windows Components --> One Drive--> "Prevent the usage of OneDrive for file storage"
Disable Cortana:
Computer Configuration --> Administrative Templates --> Windows Components --> Search --> "Disable Cortana"
Set the default applications to use IE instead of Edge. This requires you create a xml AppAssoc file with DISM and deploying it with Group Policy. See the following web page:
https://docs.microsoft.com/en-us/internet-explorer/ie11-deploy-guide/set-the-default-browser-using-group-policy
To create the AppAssoc XML file use the following DISM command:
dism /online /export-defaultappassociations:\\server\share\\AppAssoc.xml
Shoutout:
I would like to provide a huge thanks to Amit Anand from Microsoft for working with me and attending numerous skype meetings on creating this solution.
Hopefully this post has been helpful.


No comments:
Post a Comment