Tuesday, July 17, 2012

Diagnosing Performance Issues in Exchange

This blog post looks into diagnosing performance issues with Exchange 2010.  Like most applications, Exchange performance can be effected by numerous bottlenecks within a system including:
  • Storage bottlenecks
  • CPU Utilisation
  • Anti-Virus applications
  • Memory shortage
  • Rouge applications installed on the Exchange server
  • Global Catalog whether the Global Catalog servers are to busy or Exchange is using a Global Catalog server in a remote site due to AD sites and services being configured incorrectly.
  • An individual user causing high amounts of load on the Exchange infrastructure, not so common now days due to Exchange Throttling Policies, however if the default Throttling Policy is modified always a possibility.
  • Network traffic, who knows a broadcast storm may be occurring on your network?
  • Internet Spam or Denial of Service (DOS) attacks, your Exchange environment may be trying to process large quantities of inbound SMTP email is known as junk email.  As a result the SMTP queues may be building up.
  • Backup applications running through the day causing significant server load.
  • Monitoring applications with to many data collector sets causing significant server load.
Exchange Server User Monitor (ExMon)

The Exchange Server User Monitor also known as ExMon amongst Exchange professionals has been a great tool from Microsoft for tracking user session based utilisation of an Exchange server.  For a summary of ExMon along with a screenshot please visit the following blog post:

http://clintboessen.blogspot.com/2009/07/exchange-user-monitor.html

Unfortunately with the introduction of the RPC Client Access Service, ExMon now experiences difficulties in an Exchange 2010 environment.  If you have an Exchange 2010 mailbox server not running the Client Access Role, ExMon should work without problems.  However if the Client Access and Mailbox server roles are installed on the Exchange server, your going to experience:


Log Name:      Application
Source:        Application Error
Date:          16/07/2012 11:21:51 AM
Event ID:      1000
Task Category: (100)
Level:         Error
Keywords:      Classic
User:          N/A
Computer:      Troy-Exch-2010
Description:
Faulting application name: ExMon.exe, version: 14.2.247.0, time stamp: 0x4e929c00
Faulting module name: ntdll.dll, version: 6.1.7601.17725, time stamp: 0x4ec49b8f
Exception code: 0xc0000005
Fault offset: 0x00033ab5
Faulting process id: 0x216c
Faulting application start time: 0x01cd63021e952eca
Faulting application path: C:\Program Files (x86)\Exchange User Monitor\ExMon.exe
Faulting module path: C:\Windows\SysWOW64\ntdll.dll
Report Id: 61f27c3a-cef5-11e1-acb2-005056880002


According to Xiu Zhang from Microsoft, this bug is by design when running ExMon on an Exchange 2010 server that has Client Access and Mailbox on the same server.

http://social.technet.microsoft.com/Forums/en-US/exchangesvrgeneral/thread/4ebba22b-d280-44dd-af06-c8e40257ad7c/

Exchange Trouble Shooting Assistant

Exchange Troubleshooting Assistant known as ExTRA can identify potential performance issues on an Exchange server such as mail flow and database mounting issues on computers running Microsoft Exchange Server. The tool automates specialized troubleshooting steps for identified symptoms.

Network Monitor

To examine potential performance issues related to high network utilization, Microsoft Network Monitor can be utilised to view the traffic on the network interface.  Network Monitor will allow Administrators to view the following information:
  • The source address of the computer that sent a frame to the network (this address is a unique hexadecimal (or base-16) number that identifies that computer on the network).
  • The destination address of the computer that received the frame.
  • The protocols used to send the frame.
  • The data or a portion of the message being sent.
Performance Monitor

Performance Monitor is one of the best tools monitoring performance issues as it provides an insight into potential storage bottlenecks, CPU utilisation, memory shortages, RPC MAPI latency, Exchange Queues, Global Catalog traffic and much more.  For ease of configuration, Microsoft have created a PowerShell script known as ExPerfwiz which can be downloaded from the following site:


This script automatically creates a Data Collector Set which captures all the important information required for diagnosing Exchange performance issues.  

To run the Script you must first digitally sign the script or set the ExecutionPolicy to Unrestricted.  This can be down using the following powershell command:

Set-ExecutionPolicy Unrestricted


Run the script by navigating to the script directory and executing the following powershell command.

.\ExPerfwiz.ps1


This creates a data collector set called Exchange_perfwiz and samples the data every 30 seconds.  This data can be generated to a report which can be viewed either in a graph or in a report.  To get to the Data Collector Set run perfmon.msc from Start --> Run.  Create a report from the Data Collector Set by right clicking on it and selecting Create Report.


Your also able to view components from the data collector set through line and bar graphs.

Microsoft Whitepaper

Microsoft has put together a whitepaper for diagnosing Exchange performance issues.  Whilst written for Exchange 2003 many components are still relevant today.  I encourage you to have a read, it can be downloaded from the following link.

http://www.microsoft.com/en-us/download/confirmation.aspx?id=19125

Directory Services Performance

To troubleshoot performance issues related to Global Catalog two performance counters are of relevance:

MSExchange ADAccess
  • LDAP Read Time
  • LDAP Search Time
Both of these counters should never exceed 100ms and for normal activity should remain under 50ms.


Another blog post which is very helpful for additional information is the one below by Dougg Owans:

http://blogs.msdn.com/b/douggowans/archive/2007/01/02/a-very-quick-guide-to-monitoring-the-performance-of-your-exchange-server.aspx

Tuesday, July 10, 2012

Removing a NIC which no longer exists in Ubuntu Linux

Today at a customer site I had a Linux server running Ubuntu with two network interfaces, ETH0 and ETH1.  The NIC ETH1 failed and needed to be replaced.

After I replaced the network interface, when I ran an ifconfig -a the new network card was showing up as ETH2.  This is a problem as all my firewall scripts in IPTables was written to reference ETH1.


The physical NIC referencing such as ETH1, ETH2 and ETH3 in Ubuntu linux is stored in a file called 70-persistent-net.rules which is located under /etc/udev/rules.d/70-persistent-net.rules


After cracking open 70-persistent-net.rules we see the 3 network interfaces.  The first two were setup when I installed Ubuntu.  The last interface, ETH2 was setup when I installed the new network interface in the PCI slot.


I simply added the MAC address from ETH2 which in my case was 90:F6:52:00:51:65 to the already existing entry for ETH1 and removed the ETH2 entry from the configuration file.


After making these configuration changes a reboot to the server was required.  After the server rebooted, the new network card took over the old ETH1 interface and all my firewall scripts worked correctly.


Windows Time Sync Changes in 2008 Server

There has been changes in the way you configure the Windows Time Hierarchy in Windows Vista, Windows 7, Windows Server 2008 and Windows Server 2008 R2.  In previous versions of the Windows Operating system such as XP and 2003 you configured your computers Windows Time Service to synchronise with a Simple Network Time Protocol (SNTP) service by using the following command:

net time \\computername /setsntp:sntpserveraddress

In the later versions of Windows starting from Windows Vista onwards, you configure your Windows Time Service to synchronise from a simple network time protocol using the following command:

w32tm /config /update /manualpeerlist:ntpservername /reliable /syncfromflags:all

For example I utilise the free NTP time service which is redundant and accessible from anywhere in the world, pool.ntp.org.  To configure a computer to synchronise with the internet time source pool.ntp.org you would run the following command:

w32tm /config /update /manualpeerlist:pool.ntp.org /reliable /syncfromflags:all

Note: Microsoft also has a NTP server running under time.windows.com which you can synchronise with for free.
Once you have configured your computer to synchronise with an SNTP server, your computer will synchronise time with that server by default every week at 1am on Sunday.  This is controlled by a scheduled task built into Windows Task Scheduler.

It is possible to manually change this schedule by modifying the SynchronizeTime scheduled task.

If you want to perform a manual time sync, this can be done by executing the following command:

w32tm /resync

After executing this command from a command prompt running with elevated rights "Run as administrator" you can verify that it synchronised successfully by checking the windows system logs in Event Viewer.  The source of the log entry is from Kernel-General.


For those of you whos computer/server is a member of an Active Directory domain, do not manually configure your computer to synchronise from an external time source.  The only computer that should be configured to synchronise to an external time source in an Active Directory environment is the server running the PDC emulator role in the forest root domain.  All other domain controllers including those in child domains synchronise up the Windows Time Hierarchy.

The following diagram taken from TechNet provides a high level illistration of how time synchronisation works in an Active Directory environment.


Time synchronisation is critical in an Active Directory environment due to the Kerberos authentication time offset of 5 minutes.

If you are a Windows Administrator and are responsible for maintaining an Active Directory environment, it is very important to understand how the Windows Time Hierarchy works.  If you are new to this I recommend you read the following TechNet article for additional information.

http://technet.microsoft.com/en-us/library/cc773013.aspx

Sunday, July 8, 2012

How to enable SSH to an ESXi 5 Host

To enable the ESXi Shell from the Direct Console

1
Access the direct console of the ESXi host, press F2, and provide credentials when prompted.

2
Scroll to Troubleshooting Options, and press Enter.

3
Select Enable ESXi Shell and press Enter.

On the left, Enable ESXi Shell changes to Disable ESXi Shell. On the right, ESXi Shell is Disabled changes to ESXi Shell is Enabled.

4
(Optional) Configure the time-out for the ESXi Shell

a
Select Modify ESXi Shell timeout and press Enter.

b
Enter the time-out value in minutes and press Enter.

5
Press Esc until you return to the main direct console screen.

You can enable the ESXi Shell from the vSphere Client.

To enable the local or remote ESXi Shell from the vSphere Client

1
Select the host, click the Configuration tab, and click Security Profile in the Software panel.

2
In the Services section, click Properties.

3
Select ESXi Shell and click Options.

4
Change the ESXi Shell options.

To temporarily start or stop the service, click the Start or Stop button.

To enable access permanently, click Start and stop with host. The change will take effect the next time you reboot the host.

5
Click OK.

6
(Optional) Configure the time-out for the ESXi Shell from the vSphere Client.

a
In the Configuration tab’s Software panel, click Advanced Settings.

b
In the left panel, click UserVars.

c
Locate UserVars.ESXiShellTimeOut and enter the timeout value in minutes.

d
Click OK.

After you have enabled the ESXi Shell, you can use it from that monitor or through an out-of-band network connection.

Thursday, June 14, 2012

Unable to relay outbound email - DNS query failed

One of my clients this morning had an issue sending outbound email from their Exchange server. The exchange server was relaying email between tenants however external emails were building up in the SMTP queue.

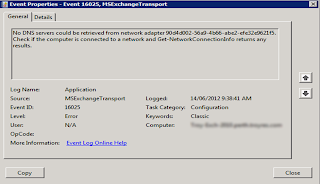
MSExchangeTransport was logging the following error in the event logs.

MSExchangeTransport - EventID 16025

The DNS servers could not be retrieved from network adapter GUID.  Check if the computer is connected to a network and Get-NetworkConnectionInfo returns any results.


Messagesin the transport queues were providing the following error message:

451 4.4.0 DNS query failed


After diagnosing the issue we noticed the network adapter to the server had changed and hence a different GUID.  The network adapter GUID being displayed in the event logs no longer matched a network interface on the server.  To view a list of all network interface GUID's on the server look at the following registry key:

HKEY_LOCAL_MACHINE\SYSTEM\CurrentControlSet\Services\Tcpip\Parameters\Interfaces

To restore outbound email to the Internet, we needed to update the GUID on the TransportServer to match the GUID of the new network adapter.  We updated Transport Server with the new GUID obtained from the registry key above using the Set-TransportServer powershell command.  This resolved the issue.


Also please look at this post, a related problem for the 451 4.4.0 DNS query failed:

http://clintboessen.blogspot.com.au/2010/12/451-440-dns-query-failed.html

Monday, June 11, 2012

Compare the Difference between two Group Policy Objects

There’s no built-in functionality in Windows for comparing two GPOs to see how their settings differ.  Back in 2005 a company named DesktopStandard Corp made a tool called GPOVault which extended the functionality of GPMC providing administrators the ability to compare two group policy objects.

DesktopStandard Corp however was brought out by Microsoft and navigating to their website http://www.desktopstandard.com/ simply redirects to the Microsoft Group Policy webpage.
GPOVault does not only provide the ability to compare group policy objects within Group Policy Management Console but also provides other much needed functionality such as change control, notification, approval, rollback, offline editing, templates, and difference reporting directly into the GPMC.

Since the acquisition of DesktopStandard Corp, finding GPOVault on the Internet has become a difficult task.  As a result I have uploaded a copy of GPOVault.msi to this blog which can be downloaded from the following link:

https://sites.google.com/site/cbblogspotfiles/gpovault.msi

To compare two group policy objects perform the following steps:

1. Expand the Forest - Domains and the domain and select the "Change Control" leaf.

2. In the details pane, select the Contents tab, which will display a list of GPOs. At this point, you probably need to select the "Uncontrolled" child tab to see your normal GPOs.

3. Select the GPOs for which you want to see the differences (hold down the Ctrl key as you select each GPO), then right-click and select Differences - HTML Report. (You can also select to output to XML format as the figure shows.)

4. A report will display the differences between the selected GPOs, as the figureshows.

Wednesday, June 6, 2012

Microsoft SCM - Export Only Critical Severity

Microsoft SCM is a great tool for quickly deploying security baselines to your organisation.  Microsoft SCM version 2 and higher provides security policies which fall into 4 severity categories:
  • Critical
  • Important
  • Optional
  • None
For the average enterprise organisation, they want to implement all policies stipulated under the Critical severity category as most settings in the critical category are in alignment with the former Enterprise Client (EC) baseline.

When you export a Microsoft baseline however to a GPO, it exports policies in all categories - something you want to be very caucious doing as it will significantely reduce functionality.  The "Important" category aligns with the older Specialized Security-Limited Functionality (SSLF), a model that "looks at disabling everything then allowing what is required". 

So how do you go about exporting just policies in the Critical category?

To export all policies in the Critical category, perform the following steps:

Create a custom baseline, for example select one of the Microsoft baselines and then click Duplicate in the Actions pane. Now select your custom baseline, then change to "simple view" by clicking the button to the left  of Advanced View above the middle pane, click the drop-down menu labeled Group View and select Simple View. Now sort the settings by severity by clicking the top of column labeled Severity. Next, you can use shift-click to click multiple settings, then click Delete in the Actions pane to remove them from the baseline. Use this method to remove the settings with a severity other than critical. Now you can export the baseline with only the desired severity.

Thursday, May 17, 2012

Call-ClusterExe: cluster.exe did not succeed, but 5058 was not a retry-able error code

You attempt to stop maintenance mode on an Exchange 2010 server using the StopDagServerMaintenance.ps1 script however you receive the following error.

WARNING: [02:57:24.640 UTC] Call-ClusterExe: cluster.exe did not succeed, but 5058 was not a retry-able error code. Not attempting any other servers. This may be an expected error by the caller.

The problem?

UAC.  Run Exchange managemnet console as Administrator.

Thursday, May 10, 2012

Exchange 2007 Uninstall hangs on Remove Exchange Files

Today I was decomissioning an Exchange 2007 server for a customer.  The uninstall process got down to "Remove Exchange Files" where it just hanged and did not proceed.  The environment was running Exchange 2007 SP2 on Windows Server 2008 Standard SP2.

After a quick search I found that I ran into a known uninstall issue. The hanging in removing the Exchange files is caused by a final Powershell script that won't run so instead of ending in failure it just hangs and gives the appearance that it is still processing the removal.

All you need to do is open task manager and kill powershell.exe.  Doing this will automatically spawn a new Powershell and allow the removal to complete.  In my situation, the removal completed within 10 seconds of the new Powershell launching.

Caution with Remove-PublicFolder cmdlet

Today I had ran into some trouble at a client with the Remove-PublicFolder cmdlet in Exchange 2010.  The Remove-PublicFolder cmdlet by default removes a public folder from all public folder databases within an Exchange organisation.

This example removes a public folder called "My Public Folder" from all public folder databases in an Exchange environment.

 Remove-PublicFolder -Identity "\My Public Folder"

If you want to remove "My Public Folder" on a specific Exchange server, you can do this with the following command:

Remove-PublicFolder -Identity "\My Public Folder" -Server Server01

If I want to list all public folders on a particular server I can do this with the following command:

Get-PublicFolder -Server Server01 -Recurse

Easy stuff right?  The problem I found however was with the following command:

Get-PublicFolder -Server Server01 -Recurse | Remove-PublicFolder

Here I piped the output of the Get-PublicFolder command to the Remove-PublicFolder command.

Get-PublicFolder -Server Server01 -Recurse displays a list of all public folders on Server01.  When piped into the Remove-PublicFolder command the Remove-PublicFolder command removes the public folders on all servers even though I only specified Server01.  The pipe between the commands does not have the logic to pipe through the server I selected in the Get command, something which other Exchange cmdlets do.  Definately a gotcha and something to watch out for.

To ensure this problem does not happen, you must specify which server you are removing public folders for on the Remove-PublicFolder cmdlet.  For example:

Remove-PublicFolder -Identity "\My Public Folder" -Server "My Server"

Hopefully this will avoid you restoring from backup as I found myself doing today.

Thursday, May 3, 2012

Unable to Delete Email from Outlook Web App 2010

A customer of mine cannot delete emails from Outlook Web App (OWA) 2010.  The customer is running Exchange 2010 SP2 with UR1.  When deleting an email the following error is experianced in OWA:

An unexpected error occured and your request couldn't be handled.


Also whenever the error occurs in Outlook Web App the following errors are logged to the Application Log of the server.

Outlook Web App couldn't connect Exchange Web Services due to a configuration error. Response code = "500".


WebHost failed to process a request.
 Sender Information: System.ServiceModel.ServiceHostingEnvironment+HostingManager/20974680
 Exception: System.ServiceModel.ServiceActivationException: The service '/EWS/exchange.asmx' cannot be activated due to an exception during compilation.  The exception message is: A binding instance has already been associated to listen URI 'http://tst-dc1-cas-1.tsthosting.local/EWS/Exchange.asmx'. If two endpoints want to share the same ListenUri, they must also share the same binding object instance. The two conflicting endpoints were either specified in AddServiceEndpoint() calls, in a config file, or a combination of AddServiceEndpoint() and config. . ---> System.InvalidOperationException: A binding instance has already been associated to listen URI 'http://tst-dc1-cas-1.tsthosting.local/EWS/Exchange.asmx'. If two endpoints want to share the same ListenUri, they must also share the same binding object instance. The two conflicting endpoints were either specified in AddServiceEndpoint() calls, in a config file, or a combination of AddServiceEndpoint() and config.
   at System.ServiceModel.Description.DispatcherBuilder.InitializeServiceHost(ServiceDescription description, ServiceHostBase serviceHost)
   at System.ServiceModel.ServiceHostBase.InitializeRuntime()
   at System.ServiceModel.ServiceHostBase.OnOpen(TimeSpan timeout)
   at System.ServiceModel.Channels.CommunicationObject.Open(TimeSpan timeout)
   at System.ServiceModel.ServiceHostingEnvironment.HostingManager.ActivateService(String normalizedVirtualPath)
   at System.ServiceModel.ServiceHostingEnvironment.HostingManager.EnsureServiceAvailable(String normalizedVirtualPath)
   --- End of inner exception stack trace ---
   at System.ServiceModel.ServiceHostingEnvironment.HostingManager.EnsureServiceAvailable(String normalizedVirtualPath)
   at System.ServiceModel.ServiceHostingEnvironment.EnsureServiceAvailableFast(String relativeVirtualPath)
 Process Name: w3wp
 Process ID: 4516


After investigating I found the problem was with Exchange Web Services in the web.config file located under:

C:\Program Files\Microsoft\Exchange Server\V14\ClientAccess\exchweb\ews

This particular client had an F5 Load Balancer and required that SSL Offloading was configured in the Exchange environment.  We had followed Microsoft's instructions for configuring SSL offloading on Exchange 2010 which are documented here:

http://social.technet.microsoft.com/wiki/contents/articles/1267.how-to-configure-ssl-offloading-in-exchange-2010-en-us.aspx

This article instructs customers to do a find and replace on the EWS web.config file to replace all instances of "httpsTransport" with "httpTransport".  However as of Exchange 2010 SP1 the web.config file contains both the httpTransport and httpsTransport settings in the XML configuration file so this is no longer required.

I went back and changed the httpTransport occurances to httpsTransport to ensure the config file accomodated both HTTP and HTTPS.

Tuesday, May 1, 2012

Postfix and Exchange Intergration

A client of mine decided to use Postfix as a SmartHost for Exchange 2010.  This Exchange environment is to be setup as a multi-tenant Exchange environment and as a result the Postfix servers need to understand which SMTP domain namespaces are authoritative within the Exchange environment.  As a result we needed to configure the Linux Postfix server to query Active Directory to determine a list of "Accepted Domains" within Exchange 2010 which are located under the following location within the Active Directory schema.

CN=Accepted Domains,CN=Transport Settings,CN=TSTHOSTING,CN=Microsoft Exchange,CN=Services,CN=Configuration,DC=domain,DC=local

The linux distribution used for this config is Ubuntu.

Software packages required:
  • postfix
  • postfix-ldap
  • ldap-utils
  • libldap-2.4-2
apt-get install postfix-ldap will automatically install all required packages.

A seperate configuration file was put together called ad_relay_domains.cf which we placed under /etc/postfix/ad_relay_domains.cf

server_host = 192.168.1.2
server_port = 389
version = 3
bind = yes
start_tls = no
bind_dn = Administrator
bind_pw = MyPassw0rd (__mailto:MyPassw0rd)
search_base = cn=Accepted Domains,cn=Transport Settings,cn=TSTHOSTING,cn=Microsoft Exchange,cn=Services,cn=Configuration,dc=domain,dc=local
scope = sub
query_filter = (msExchAcceptedDomainName=%s)
result_attribute= msExchAcceptedDomainName

  • Server_Host enter the IP address of an AD Domain Controller
  • Server_Port needs to be the standard port for LDAP
  • version must be 3
  • Bind, yes we are creating an LDAP bind.
  • Start_TLS, we are not using a digital certificate on Active Directory (pretty standard).  TLS is more common with AD LDS/ADAM Instances as they are not protected using Kerberos v5.
  • bind_dn enter the user account you wish to bind to Active Directory with.
  • bind_pw is the password that goes with the user account specified under bind_dn.  You must enter it in "password (__mailto:password)" format.
  • search_base is the location in Active Directory where Exchange 2010 stores its accepted domains.
  • scope specifies all sub objects
  • query_filter is the attribute on the accepted domain objects we wish to query.
  • result_attribute is the attribute we are interested in the query result.
This file that contains the above config /etc/postfix/ad_relay_domains.cf must be called from the main Postfix configuration file main.cf.  To call the config we simply need to enter the following symtax into the main.cf file:

relay_domains = _ldap:/etc/postfix/ad_relay_domains.cf

Credits for this solution go to Daniel Borg.

Monday, April 30, 2012

Where are Accepted Domains stored in Active Directory?

Today we needed to make OpenLDAP query a list of all Accepted Domains in Active Directory to ensure the Postfix understands which SMTP Namespaces Exchange is authoratative for.  After digging through the Active Directory configuration partition we found that Accepted Domains are stored under the following location:

CN=Accepted Domains,CN=Transport Settings,CN=TSTHOSTING,CN=Microsoft Exchange,CN=Services,CN=Configuration,DC=domain,DC=local

Sunday, April 29, 2012

Exchange POP Your e-mail Server Rejected Your User Name

By default Microsoft Exchange 2010 requires you to use TLS Encryption "Secure POP" for authentication to work.  If your organisation does not require Secure POP then by default your users will not be able to login.  They will receive the following error when attempting to access POP3 services through Outlook.

Log onto incoming mail server (POP3): Your e-mail server rejected your user name.  Verify your user name for this account in Account Settings.  The server responded: -ERR Command is not valid in this state.


To allow POP3 to authenticate using standard POP3 you must change teh authentication level as per:


The default setting is "SecureLogon".  Below are the various settings:

This example allows Basic authentication on an unsecured port if you won't be using TLS encryption.

Set-PopSettings -LoginType PlainTextLogin
This example restricts Basic authentication to use only secured ports if you won't be using TLS encryption.

Set-PopSettings -LoginType PlainTextAuthentication
This example allows authentication after you use TLS encryption.

Set-PopSettings -LoginType SecureLogin

If you configure use PlainTextLogin users can send their Active Directory password over the internet unencrypted.

If you plan on not using TLS, I always recommend using PlainTextAuthentication which allows users to send the password over the internet without using TLS.  This however does require your users configuring "Require logon using Secure Password Authentication (SPA)" under Outlook.


After you change your Pop settings your users will now be able to authenticate over TCP110.


Important: If you have a user account that is an Administrator in your Exchange environment they will NOT be able to login.  This is due to security, POP3 authentication is not deemed as Secure by Microsoft and as a result Microsoft have prevented Administrative users from authenticating over the internet using POP to avoid administrative credentials leeking.

Important: You must restart the POP3 service for configuration changes to take effect.

Friday, April 27, 2012

Windows 7 Slow Access to Network Shares

One of my clients recently deployed Windows 7 across their network and are experiancing performance issues when accessing network resources involving MS-RPC calls such as network shares through the SMB protocol.  Windows Vista/2008/7 has a new TCP network stack to Windows XP/2003 and has a number of new technologies designed to increase network performance.

Windows XP/2003 clients are not receiving performance problems.

Issue

When a Windows 7 PC attempts to accesss file shares on any Windows XP/2003 servers, browsing performance of mapped network shares is aporling.  It feels simlar to accessing the file server over a VPN connection with poor bandwidth and high latency, however in this scenario we are accessing the file server over LAN.  We tested a Windows 7 client on the same 24bit subnet as a number of Windows 2003 file servers on a 1gbps network.  Slow access to network shares also occured over the same subnet.

What I did notice however was slow performance did not occur when a Windows Vista/2008/7 computer accesses file shares on another Windows Vista/2008/7.  The issue only occured when Windows Vista/2008/7 accessed Windows XP/2003.

This issue is not driver related, I ensured to test workstations of different driver architecture including Intel and Broadcom network drivers.

Workaround

After researching into this issue we came identified two Windows components contributing to the performance issues.
  • TCP Auto-Tuning
  • Remote Differential Compression
Do not disable these components unless you understand what they are and their purpose.

TCP Auto-Tuning

As mentioned above, a new TCP stack was implemented as of Windows Vista that aims to take full advantage of hardware advances such as gigabit networking. Among the new feature in the new TCP stack is Receive Window Auto-Tuning Level for TCP connections. TCP AutoTuning enables TCP window scaling by default and automatically tunes the TCP receive window size for each individual connection based on the bandwidth delay product (BDP) and the rate at which the application reads data from the connection, and no longer need to manually change TcpWindowSize registry key value which applies to all connection. Theoretically, with TCP auto-tuning, network connection throughput in Windows Vista should be improved for best performance and efficiency, without registry tweak or hack. However, this is not always the case, and may cause some performance related issues such as in our case.

The default auto-tuning level is "normal", and the possible settings for the above command are:
disabled: uses a fixed value for the tcp receive window. Limits it to 64KB (limited at 65535).
highlyrestricted: allows the receive window to grow beyond its default value, very conservatively
restricted: somewhat restricted growth of the tcp receive window beyond its default value
normal: default value, allows the receive window to grow to accommodate most conditions
experimental: allows the receive window to grow to accommodate extreme scenarios (not recommended, it can degrade performance in common scenarios, only intended for research purposes. It enables RWIN values of over 16 MB)
In my environment changing this from the default value of normal to restricted resolved my performance issues.

netsh int tcp set global autotuninglevel=restricted

Remote Differential Compression

Remote Differential Compression (RDC) is a client–server synchronization algorithm that allows the contents of two files to be synchronized by communicating only the differences between them. It was introduced with Windows Server 2003 R2 and is included with later Windows client and server operating systems.  As of Vista onwards Remote Differential Compression is enabled by default.

Microsoft does not recommend ever disabling Remote Differential Compression (RDC) unless there is an absolute need to.  Diane from Microsoft wrote a blog post entitled "Debunking Myths about Remote Differential Compression and System Performance" where she states:

A number of third-party blogs are telling people they can speed up Windows Update downloads, and file copy operations, by turning off the Remote Differential Compression (RDC) feature on Windows Vista. This is 100% false. Neither Windows Update or file copy operations use RDC at all.

The RDC feature is simply a DLL that does not consume any system resources, except when you run an application that uses RDC specifically. If you disable RDC, any application that uses it will either not be able to take advantage of RDC or will simply fail. For more information on RDC see this link http://msdn.microsoft.com/en-us/library/aa373254(VS.85).aspx.

As a result I do not recommend disabling RDC unless you have an absolute need to.  In my environemnt I tested my Windows 7 PC's with RDC turned on and RDC turned off.  When turned on I noticed my performance to Windows 2003/XP file shares diminished.  Please disable with care.

You can disable RDC through Windows Features in control panel:


You can also disable RDC through command line using the following command:


ocsetup MSRDC-Infrastructure /uninstall


Deploying the Workaround

I wrote a batch script to deploy this workaround to all Windows 7 computers on my network.  The batch script first identifies IS the computer running Windows 7, if so THEN set TCP Autotuning to Restricted and disable Remote Differential Compression.

Here is a copy of my script:

@echo off
systeminfo | find "OS Name" > %TEMP%\osname.txt
set /p vers=<%TEMP%\osname.txt

echo %vers% | find "Windows 7" > nul
if %ERRORLEVEL% == 0 goto ver_7

goto warnthenexit

:ver_7
ocsetup MSRDC-Infrastructure /uninstall
netsh interface tcp set global autotuning=restricted
goto exit

:warnthenexit
echo Machine undetermined.

:exit


Deploy this script to your workstations through a Group Policy Startup Script.

Note: Due to the Windows 7 performance issues I also needed to configure "Always wait for the network at computer startup and logon" under "Computer -- Administrative Templates -- System -- Logon"

Sunday, April 22, 2012

Why isn't my Outlook spam filter working?

The Outlook Spam filter or "Junk E-mail Filter DLL" works only against messages in the local store, i.e. the offline OST file.  For Outlook to filter emails on a workstation using the Outlook Anti-Spam engine you must have "Cached Exchange Mode" enabled.

You configure this on the users Outlook Profile.

Sunday, April 15, 2012

DAG Node lost access to File Witness Share

Today on my own companies network 4Logic IT Solutions we had an issue when trying to activate a database copy inside a database availability group (DAG) cluster.

When attempting to move the active mailbox database to another node using Exchange Management Console (EMC) or Exchange Management Shell (EMS) the following error was experianced.

--------------------------------------------------------
Microsoft Exchange Error
--------------------------------------------------------
Cannot activate database copy 'Activate Database Copy...'.

Activate Database Copy...
Failed
Error:
An Active Manager operation failed. Error The database action failed. Error: An error occurred while trying to validate the specified database copy for possible activation. Error: Server 'QV1-EXC1.4logic.lan' is not up according to the Windows Failover Cluster service.. [Database: QV1-EXC1-Database-01, Server: OP-SRV1.4logic.lan]

An Active Manager operation failed. Error An error occurred while trying to validate the specified database copy for possible activation. Error: Server 'QV1-EXC1.4logic.lan' is not up according to the Windows Failover Cluster service.


The error stated that Windows cluster services reported the node as being down. So I fired up Failover Cluster Management MMC snapin to investigate further. The following errors were being generated:

File share witness resource 'File Share Witness (\\qv1-utl1.4logic.lan\DAG01.4logic.lan)' failed to arbitrate for the file share '\\qv1-utl1.4logic.lan\DAG01.4logic.lan'. Please ensure that file share '\\qv1-utl1.4logic.lan\DAG01.4logic.lan' exists and is accessible by the cluster.


Node 'QV1-EXC1' failed to form a cluster. This was because the witness was not accessible. Please ensure that the witness resource is online and available.


I went over to my server hosting the File Witness Share QV1-UTL1.4logic.lan. DAG01$ was the only trusted object added to the Share permissions. I added Exchange Trusted Subsystem and my Administrator account (for testing purposes) to the Share Permissions.


I then restarted the Cluster Services service on QV1-EXC1. After the permission change the cluster service came online again.

Unable to update Mailbox SD in the DS. Mailbox Guid: 33fcbcfe-5c36-4204-91f1-6108fc5b86f6. Error Code 0x8004010f

I had a client who was receiving Application Error 9554 from MSExchangeIS.

Unable to update Mailbox SD in the DS. Mailbox Guid: 33fcbcfe-5c36-4204-91f1-6108fc5b86f6. Error Code 0x8004010f


First thing I did was attempted to search for the user in Active Directory by converting the 32bit GUID to a searchable format using KB322308. I was unable to find the user account matching the mailbox guid.


Using the ADFind utility created by MVP Joe Richards also did not find any results.

adfind -gc -b "" -binenc -f " msExchMailboxGUID={{GUID:33fcbcfe-5c36-4204-91f1-6108fc5b86f6}}" -dn

After further investigation I found that the GUID on the Exchange Mailbox did not match the msExchMailboxGUID on the AD User Account. I determined this by running the following powershell command:

Get-MailboxStatistics -Server troy-exch-2010 fl mailboxguid,displayname > output.txt

MailboxGuid : 33fcbcfe-5c36-4204-91f1-6108fc5b86f6
DisplayName : User Name

The user account in AD had a different GUID not matching the GUID of our Exchange mailbox.


In this instance the user no longer worked at the company so we simply deleted both the user account and the Exchange mailbox.

Tuesday, April 10, 2012

How to Configure SSL Offloading in Exchange 2010

The following article explains in detail how to configure SSL Offloading in Exchange 2010 RTM, SP1 and SP2. If you require SSL Offloading for any reason on an Exchange deployment, please refer the following article:

http://social.technet.microsoft.com/wiki/contents/articles/1267.how-to-configure-ssl-offloading-in-exchange-2010-en-us.aspx

Thursday, April 5, 2012

The HTTP authentication test failed - Connection was closed unexpectedly.

Today I had a problem with Outlook Anywhere at a customer site - everything was configured correctly however Outlook Anywhere would still not work! The server was Exchange 2007 SP2 running on Windows Server 2003 R2 Standard Edition x64.

When using the Exchange Remote Connectivity Analyzer the following error was experianced.

Testing HTTP Authentication Methods for URL https://webmail.example.com/rpc/rpcproxy.dll.
The HTTP authentication test failed.
Additional Details
Exception details:
Message: The underlying connection was closed: The connection was closed unexpectedly.
Type: System.Net.WebException
Stack trace:
at System.Net.HttpWebRequest.GetResponse()
at Microsoft.Exchange.Tools.ExRca.Extensions.RcaHttpRequest.GetResponse()


1. Disable outlook anywhere via EMC

2. Remove RPC proxy component via PowerShell, Server Manager or Add and Remove Programs (Windows Components) depending on your version of windows. You can also use this command: servermanagercmd -r rpc-over-http-proxy

3. Reboot the server

4. Install RPC proxy component via PowerShell

5. Command: servermanagercmd -i rpc-over-http-proxy

6. Enable outlook anywhere

7. Restart Microsoft active directory Topology service


This should resolve your problem, did for me.

Autodiscover settings for Outlook Anywhere are being validated

If you run the Exchange 2010 Remote Connectivity Analyzer (ExRCA) and you get the following message it means the Server attribute is set on the EXPR provider incorrectly.

Autodiscover settings for Outlook Anywhere are being validated.
ExRCA wasn't able to validate Outlook Anywhere Autodiscover settings.
The AuthPackage wasn't specified in the EXPR section of the Autodiscover response.


Simply remove the Server attribute and set it to Null.

Set-OutlookProvider EXPR -Server $null


This will resolve your problem.

IISReset loosing settings in IIS6

People do not know but the IISReset command can cause some settings to be lost.

The IISReset command line tool waits for a normal shutdown of the services before it starts them again. Because of the number of services that are dependent on the IISAdmin service, the shutdown may not occur in a timely manner. When this happens, IISReset forces the shutdown of the services. This can result in metabase changes that are not saved properly.

Today at a customer site when I ran the Remote Conectivity Analyzer (ExRCA) Exchange 2007 server it was complaining about Annonymous authentication being enabled.

The Initial Anonymous HTTPS request didn't fail, but Anonymous isn't a supported authentication method for this scenario.


To fix this we simply need to disable annonymous authentication on the RPC web application in IIS.


When disabling annonymouse authentication and running the IISRESET command it simply re-enables annonymous authentication.

To commit changes while still restarting IIS6 run the following commands:

net stop iisadmin /y
net start iisadmin /y


If you notice now, the changes has been permanently committed to the IIS6 metabase.

For more information about this problem please see the following knowledge base article:

http://support.microsoft.com/kb/286196

Tuesday, April 3, 2012

Error installing Hub Transport Server "Failed to read directory object with distinguished"

Today I had an issue installing Exchange 2010 with SP1 in a new Active Directory forest. The installation was failing during installation of the Hub Transport role. The following error was experienced:

Hub Transport Role
Failed

Error:
The following error was generated when "$error.Clear();
Add-DelegatedGroupsToLocalAdminGroup -DomainController

$RoleDomainController

" was run: "Failed to read directory object with distinguished name TST-DC2-EXC-1-4.".

Failed to read directory object with distinguished name TST-DC2-EXC-1-4.


After looking at the error "Failed to read directory object with distinguished name" I first checked the SPN for the computer object TST-DC2-EXC-1-4. This checked out fine.

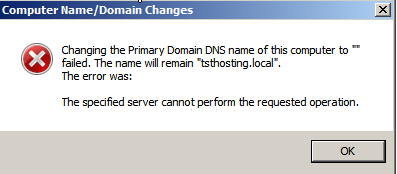
I then removed the computer TST-DC2-EXC-1-4 from the Active Directory domain, deleted the computer object then rejoined it. When rejoining the domain I experienced the following error:

Changing the Primary Domain DNS name of this computer to "" failed. The name will retain "tsthosting.local". The error was:

This specified server cannot perform the requested operation.


I removed the PC from the domain setting it back to workgroup. Before joining it to the domain again I manually set the primary DNS suffix for the computer account by clicking More in the domain settings window.


I then unticked change primary DNS suffix when domain membership changes and manually typed in my domains DNS suffix.


This resolved my problem allowing my setup to complete successfully.


While this procedure fixed the issue, it is not the root cause. I did not have enough time to diagnose and determine the root cause.

Wednesday, March 28, 2012

Blank Screen in VMware vCloud

I kept getting a black screen when trying to console a virutal machine in a vCloud environment. It would just hang saying Connecting...


To fix it I simply added the vcloud HTTPS address as a trusted site in Internet Options.

Wednesday, March 21, 2012

Remove Office 365 AD/FS 2.0

When setting up a Hybrid Exchange deployment, AD FS 2.0 is required for single signon (SSO) to ensure the on-premises Active Directory credentials can be used on both Office 365 and on-premises Exchange. The AD FS 2.0 deployment required for Office 365 Hybrid deployments is different to the AD FS 2.0 build that comes with Windows Server 2008 R2.

As a result, after installing AD FS 2.0 it does not appear as enabled in Server Manager roles in Windows Server 2008 R2.


Also it does not appear in remove programs under control panel.


So how do you remove it?

Under programs and features click view installed updates.


It will now appear int he list for you to remove it.


After you uninstall it, you also need to clean up the IIS Web Server role. Ensure IIS is not doing anything else before uninstalling it from Server Manager.

Lastly you have some additional cleanup tasks to perform as documented under http://support.microsoft.com/kb/982813

How to make RDC / MSTSC open on the secondary monitor when it connects

An annoying problem you may have is getting the Remote Desktop Client or mstsc.exe opening on a secondary monitor when it connects. We have validated the following procedure works:

1. Run the client and get it set up the way you prefer, or Open your saved RDP file
2. On the Display tab, choose a non-fullscreen resolution.
3. On the General tab, click "delete these credentials", if possible.
4. Click Connect .
5. You will immediately get a local login dialog. Leave it blank and click OK .
6. When you are connected and the remote login dialog appears, drag the window to the desired monitor.
7. On the remote login dialog, click Cancel . The settings dialog should reappear locally.
8. On the Display tab, you can now choose fullscreen.
You can now save your session with the Save button on the General tab, as well as save your login credentials.

Tuesday, March 20, 2012

Changing the RPCClientAccessServer - How Outlook Behaves

When an Outlook client goes to connect to an Exchange 2010 database, it looks at an attribute associated with the mailbox database called RPCClientAccess to determine which client access server/client access server array to use for connectivity.

There may be a time in where you need to change which RPCClientAccess server your clients use for connectivity on the Exchange mailbox database. The problem is, if you change the RPCClientAccess on a mailbox database to a different Exchange 2010 client access server/client access server array without "moving" the mailbox, Outlook 2007 and Outlook 2010 clients do not pickup this change automatically.

Further more, if you perform an Outlook Profile repair process, it will update with the new RPC endpoint for the users mailbox database defined under the RPCClientAccess attribute. But guess what, Outlook reverts to a Working Offline mode. Creating a new outlook profile will resolve the issue, however if you remove the Host A record for the old client access server in DNS, Outlook will resume working as normal again.

Outlook only updates to a new RPCClientAccess value smoothly when moving users to the mailbox database. If you want to transition users smoothly to another client access server or client access server array, you can create another database, set the RPCClientAccess as desired, then move users to the database. This will allow the outlook profiles to update without issues.

Other then moving mailboxes there is one other thing you can do to get Outlook to update to the new RPCClientAccess value. If you remove the "Host A" record from the old client access server in DNS, this will cause Outlook to forcefully repair itself and update its profile.

Lets hope Microsoft makes it easier in the next release of Microsoft Outlook.

For additional reading about this problem, please look at the following links:

http://www.outlookforums.com/threads/84315-Outlook-goes-offline-after-changing-RPCClientAccessServer-parameter-on-mailbox-database

http://www.shudnow.net/2010/04/18/creating-databases-and-the-rpcclientaccessserver-database-parameter/

http://www.scottfeltmann.com/blog/2010/06/28/outlook-profile-not-updating-after-creating-cas-array/

http://technet.microsoft.com/en-us/magazine/ff626260.aspx