Showing posts with label Linux. Show all posts

Tuesday, October 8, 2013

Changing a Forgotton Root Password in Linux

I built a Linux server a few months ago for monitoring purposes for a customer, however I failed to write the root password down - doh!  In this post I will be showing you how to change the root password for Linux systems using GRUB boot loader.  If your running LILO (LInux LOader), this how to will not work for you.

The Linux distribution used in this demonstration is CentOS release 5.9 which can be viewed using the "cat /etc/*-release" command, a quick way of finding the distribution of a unix/Linux operating system.

Now to recover a lost root password, you must enter a operating mode known as "single user mode".  This is an environment which does not require login details to logon to the system which hence enables us to change the password of the root account.

Now the first ting you need to do to enter single user mode is at the grub boot screen, press "a" to enter "append" mode.  The grub boot screen in later versions can be graphic interfaces, however on older distributions of Linux it is generally text based.  In my version of CentOS server, my grub screen is a GUI and has a pretty pattern in the background.

This is where you press "a" to get into that append mode.  Be quick as this screen moves pretty fast.


Next pick select the Kernel you wish to boot, there can be multiple here especially if you have done Kernel upgrades in the past.  If you are not sure, select the latest version by highlighting it using the up and down arrows.

Once you have selected the version you want, press "e" to enter "edit mode".


Now in edit mode, you want to select the entry that has "kernel" in front of it.

You will have ro root=something, depending on your Linux distribution/installation this can look different.  For example in another installation this reads:

ro root=/dev/sda1

In this installation it reads:

ro root=/dev/VolGroup00/LogVol00

What you need to do is append the word "single" at the end, all lowercase to instruct Grub to boot "single user mode".  I will type the entire thing out:

kernel /vmlinuz-2.6.18-348.1.1.e15 ro root=/dev/VolGroup00/LogVol00

needs to become

kernel /vmlinuz-2.6.18-348.1.1.e15 ro root=/dev/VolGroup00/LogVol00 single

To make the change to the kernel boot line hit "e" to "edit" the entry.


Now in the screenshot you see I have appended the word single a the end of the line.  Sorry you cant see the entire command, it has gone onto another screen due to my screen resolution being so small.  The full path looks like this:

kernel /vmlinuz-2.6.18-348.1.1.e15 ro root=/dev/VolGroup00/LogVol00 single

After making the change press ENTER.


In the screenshot below you can see that I have appended the word "single".  Again it cuts out due to the screen resolution being so small but you can see the "s".

To boot the new kernel boot command, press "b" for "boot".


The system will now boot straight to single user mode and you will be presented straight away with a command prompt.

To change the root password at the command prompt, type:

passwd root

Enter the new password for your system.  After you have changed the password type "reboot" and hit enter to reboot the system.


I hope this post has been helpful.

Tuesday, March 5, 2013

NSClient++ Clients Report Arguments not Enabled

I am currently in the process of deploying the open source Nagios monitoring platform for a customer to provide them the ability to monitor their Windows machines, network infrastructure and virtual environment.

There are a couple of Nagios agents for Windows out there such as NSClient++NC_Net and WINRPE which all do a great job of extracting Event Logs, Disk Utilization, Process Status, Service Status, Schedule Tasks, Windows Update Status, Anti Virus protection and much more.

In my deployment I chose to implement the NSClient++ on my Windows Server infrastructure.  The copy of NSClient++ I'm using is NSCP-0.4.1.90-x64.msi which I downloaded from the downloads page:


When installing the application I chose to enable both Check_NT and Check_NRPE.

Check_NT is the legacy method for monitoring Windows hosts which only provides basic reporting functionality.

Check_NRPE is the more advanced reporting functionality which provides endless functionality including the ability to execute bat, vbs and powershell scripts on hosts monitored.

After NSClient++ was installed on my servers I tested it using the following command from my Nagios server:

[root@Nagios objects]# /usr/lib/nagios/plugins/check_nrpe -H 10.1.1.40
I (0,4,1,90 2013-02-04) seem to be doing fine...


Great all is well.

Now I went to shoot a test command to check my drive size on C:\ however when running this command I got the following error:

Exception processing request: Request contained arguments (not currently allowed, check the allow arguments option).


To Resolve this problem I needed to allow arguments in the nsclient.ini file on my Windows workstation by adding the following code:

[/settings/NRPE/server]
allow arguments=1

I added this configuration just below the allowed_hosts section of the default nsclient.ini file as shown in the following screenshot:


After making this change and restarting the NSClient++ Service all was well, I was able to successfully run Check_NRPE commands against my Nagios server.


Hope this blog post helps someone.

Tuesday, July 10, 2012

Removing a NIC which no longer exists in Ubuntu Linux

Today at a customer site I had a Linux server running Ubuntu with two network interfaces, ETH0 and ETH1.  The NIC ETH1 failed and needed to be replaced.

After I replaced the network interface, when I ran an ifconfig -a the new network card was showing up as ETH2.  This is a problem as all my firewall scripts in IPTables was written to reference ETH1.


The physical NIC referencing such as ETH1, ETH2 and ETH3 in Ubuntu linux is stored in a file called 70-persistent-net.rules which is located under /etc/udev/rules.d/70-persistent-net.rules


After cracking open 70-persistent-net.rules we see the 3 network interfaces.  The first two were setup when I installed Ubuntu.  The last interface, ETH2 was setup when I installed the new network interface in the PCI slot.


I simply added the MAC address from ETH2 which in my case was 90:F6:52:00:51:65 to the already existing entry for ETH1 and removed the ETH2 entry from the configuration file.


After making these configuration changes a reboot to the server was required.  After the server rebooted, the new network card took over the old ETH1 interface and all my firewall scripts worked correctly.


Tuesday, May 1, 2012

Postfix and Exchange Intergration

A client of mine decided to use Postfix as a SmartHost for Exchange 2010.  This Exchange environment is to be setup as a multi-tenant Exchange environment and as a result the Postfix servers need to understand which SMTP domain namespaces are authoritative within the Exchange environment.  As a result we needed to configure the Linux Postfix server to query Active Directory to determine a list of "Accepted Domains" within Exchange 2010 which are located under the following location within the Active Directory schema.

CN=Accepted Domains,CN=Transport Settings,CN=TSTHOSTING,CN=Microsoft Exchange,CN=Services,CN=Configuration,DC=domain,DC=local

The linux distribution used for this config is Ubuntu.

Software packages required:
  • postfix
  • postfix-ldap
  • ldap-utils
  • libldap-2.4-2
apt-get install postfix-ldap will automatically install all required packages.

A seperate configuration file was put together called ad_relay_domains.cf which we placed under /etc/postfix/ad_relay_domains.cf

server_host = 192.168.1.2
server_port = 389
version = 3
bind = yes
start_tls = no
bind_dn = Administrator
bind_pw = MyPassw0rd (__mailto:MyPassw0rd)
search_base = cn=Accepted Domains,cn=Transport Settings,cn=TSTHOSTING,cn=Microsoft Exchange,cn=Services,cn=Configuration,dc=domain,dc=local
scope = sub
query_filter = (msExchAcceptedDomainName=%s)
result_attribute= msExchAcceptedDomainName

  • Server_Host enter the IP address of an AD Domain Controller
  • Server_Port needs to be the standard port for LDAP
  • version must be 3
  • Bind, yes we are creating an LDAP bind.
  • Start_TLS, we are not using a digital certificate on Active Directory (pretty standard).  TLS is more common with AD LDS/ADAM Instances as they are not protected using Kerberos v5.
  • bind_dn enter the user account you wish to bind to Active Directory with.
  • bind_pw is the password that goes with the user account specified under bind_dn.  You must enter it in "password (__mailto:password)" format.
  • search_base is the location in Active Directory where Exchange 2010 stores its accepted domains.
  • scope specifies all sub objects
  • query_filter is the attribute on the accepted domain objects we wish to query.
  • result_attribute is the attribute we are interested in the query result.
This file that contains the above config /etc/postfix/ad_relay_domains.cf must be called from the main Postfix configuration file main.cf.  To call the config we simply need to enter the following symtax into the main.cf file:

relay_domains = _ldap:/etc/postfix/ad_relay_domains.cf

Credits for this solution go to Daniel Borg.

Saturday, March 6, 2010

!! Invalid loop location/gparted.dat

I was trying to resize a partition using gparted however when booting up gparted live 0.3.4-11 I was recieving the following error.

!! Invalid loop location/gparted.dat
!! Please export loop with a valid location or reboot and pass a proper loop=...
!! kernel command line!

I had an ASUS P5QL-E motherboard. In the BIOS under Storage Configuration I changed SATA Configuration from:

Enhanced IDE to Compatible IDE

I then rebooted my system and GParted loaded fine...

Thursday, December 17, 2009

View System Hardware Information in Linux

You want to be able to view information about a system from a linux shell in terms of what disks it has, what processor, the system model the vendor etc.

There is a program in linux called dmidecode which pulls this information straight from the systems BIOS.

You can run dmidecode by simply typing "dmidecode" in a linux shell. However it spits out a lot of information so I recommend running it through "more" or "less".

Run:

dmidecode | more

or

dmidecode | less


You can then scroll through this information and find out all kinds of cool information about the system such as what model it is!

hpacucli Create Hot Spare

I have a ProLiant DL360 G5 running Red Hat 4.1.2-14.

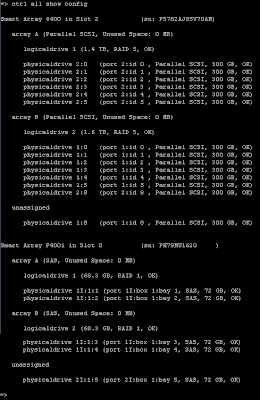
This server has a Smart Array 6400 with 13 300GB SCSI disks allocated in two arrays and 1 disk unallocated.

This server also has a Smart Array P400i with 4 disks allocated in 2 arrays and 1 disk unallocated.

My goal is to add the unallocated disk as a spare to both arrays on each controller. This server does not have a GUI so I must use the HP Array Configuration Utility CLI called "hpacucli".

To run the HP Array Configuration Utility CLI simply type "hpacucli" in the shell.

Next lets look at all our arrays using the following command:

ctrl all show config


We can see that Smart Array 6400 is in Slot 2 and Smart Array P400i is in Slot 0. We can also see the unassigned disks are physicaldrive 1:8 and physicaldrive 2I:1:5.

To assign the drives as hot spares run the following commands:

ctrl slot=2 array all add spares=1:8


ctrl slot=0 array all add spares=2I:1:5


We specify "array all" as we want to make the disk available to all disks on the controller. We could go "array A" if we wanted to make the spare available to just onje array... I don't know why you would though!

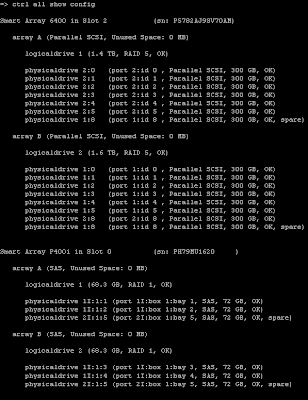
Now if we run the "ctrl all show config" command again we see it's added it in as a spare:


If you want more information about performing other tasks using hpacucli the following link is the best documentation I could find:

http://people.freebsd.org/~jcagle/hpacucli-readme

Tuesday, November 3, 2009

Bind9 Error on Ubuntu

I noticed an error on all my secondary bind9 servers running on ubuntu linux. This error was appearing in the daemon.log file in /var/log

zone 4playgames.local/IN: refresh: unexpected rcode (SERVFAIL) from master 192.168.10.2#53 (source 0.0.0.0#0)

On the primary DNS server I was recieving this error message in daemon.log:

zone 4playgames.local/IN: loading from master file 4playgames.local.zone failed: CNAME and other data

The primary DNS server was still functioning correctly, however this one zone file was no longer functioning. What caused the problem was there were 2 records that had the same name. A "CNAME" and an "A" record both had the same name in the zone file, which caused the entire zone file not to load anymore.

Tuesday, October 27, 2009

Ubuntu Jaunty 9.04 ppp connect on boot problem

I'm running Ubuntu Jaunty 9.04 and I noticed a bug with it.

cat /etc/lsb-release
DISTRIB_ID=Ubuntu
DISTRIB_RELEASE=9.04
DISTRIB_CODENAME=jaunty
DISTRIB_DESCRIPTION="Ubuntu 9.04"

I setup my adsl connection with pppoeconf... in the pppoeconf wizard I specify to connect automatically on boot. This adds the following to my /etc/network/interfaces file:

auto dsl-provider
iface dsl-provider inet ppp
provider dsl-provider
# please do not modify the following line
pre-up /sbin/ifconfig eth0 up # line maintained by pppoeconf

This ususally automatically connects the adsl connection on boot however for some reason in jaunty it doesnt work. To get around this I just added it to the bottom of my rc.local file in /etc/init.d. I told it to sleep for 10 seconds before trying to connect:


If anyone knows the proper fix please let me know... this is just a handy work around.

Sunday, October 25, 2009

OpenVPN Issue on Ubuntu Jaunty 9.04

I have a bunch of linux routers all meshed together running Ubuntu 8.04.3 with OpenVPN. I added a new Ubuntu Jaunty 9.04 router into the mix today, copied my generated private key via scp to the new box and setup a new connector back to another site. When I the VPN using my firewall script I wrote I was getting the following error:

/usr/sbin/openvpn-vulnkey:22: DeprecationWarning: the md5 module is deprecated; use hashlib instead
import md5


In the daemon.log file under /var/log I was getting the following:

Oct 25 19:52:42 bunbline1 ovpn-bunbury-dunsborough[8871]: Expected Remote Options String: 'V4,dev-type tun,link-mtu 1545,tun-mtu 1500,proto UDPv4,ifconfig 10.5.15.1 10.5.15.2,comp-lzo,cipher BF-CBC,auth SHA1,keysize 128,secret'
Oct 25 19:52:42 bunbline1 ovpn-bunbury-dunsborough[8871]: Local Options hash (VER=V4): 'bd07f87b'
Oct 25 19:52:42 bunbline1 ovpn-bunbury-dunsborough[8871]: Expected Remote Options hash (VER=V4): '47793853'
Oct 25 19:52:42 bunbline1 ovpn-bunbury-dunsborough[8871]: failed to find GID for group nobody
Oct 25 19:52:42 bunbline1 ovpn-bunbury-dunsborough[8871]: Exiting


In previous versions of ubuntu there was a group called nobody, now in ubuntu 9 there is just a group called nogroup with a GID of 65534. In previous versions of ubuntu the group nobody had a GID of 1002 so I recreated it with the same GID.

groupadd -g 1002 nobody

OpenVPN failed again, this time I got the following error in the daemon.log file upon restarting it:

Oct 25 20:04:10 bunbline1 ovpn-bunbury-dunsborough[9176]: chroot to '/var/empty' failed: No such file or directory (errno=2)

In previous versions of ubuntu yes you may have guessed their was a directory called /var/empty. Make this directory with

mkdir /var/empty

Now when I start the VPN I get the following:


However its no longer saying failed... it is coming up as OK and data is passing through the VPN perfectly fine. However it is not liking the key I generated on ubuntu 8 by the looks of it... however it is accepting it. I got it working but if anyone has more information on this, please do leave a comment.

Monday, March 30, 2009

Apache2 Virtual Hosts Not Working - NameVirtualHost

I encountered this problem while setting up this website. I created 2 virtual hosts in:

/etc/apache2/sites-available/
- kbomb
- phpmyadmin

kbomb Virtual Host:
DocumentRoot /var/www/kbomb/public_html
ServerName kbomb.com.au
ServerAlias http://www.kbomb.com.au/
ErrorLog /var/log/apache2/kbomb.com.au-erro­r.log
CustomLog /var/log/apache2/kbomb.com.au-acce­ ss.log combined

phpmyadmin Virtual Host:
DocumentRoot /usr/share/phpmyadmin
ServerName phpmyadmin.kbomb.com.au
ErrorLog /var/log/apache2/phpmyadmin.kbomb.­ com.au-error.log
CustomLog /var/log/apache2/phpmyadmin.kbomb.­ com.au.log combined

Whenever i went to kbomb.com.au, http://www.kbomb.com.au/ or phpmyadmin.kbomb.com.au i would get the same website.

With a bit of research here is my findings...

Because my debian server has 3 static IP addresses and does routing, Apache2 doesnt know which interface the Virtual Hosts are to work on. You need to define them in /etc/apache2/apache2.conf.

If you want your Virtual Hosts working on just 1 IP Address you would want to enter:

NameVirtualHost 202.89.160.16:80

If you would like your Virtual Hosts working on all network interfaces you want to define a wildcard. This is the most practical method unless you want to lock certain network interfaces from viewing your websites.

NameVirtualHost *

I wacked this line at the end of my apache2.conf file just before Include /etc/apache2/sites-enabled/.

So the end of my file looks like:

NameVirtualHost *

# Include the virtual host configurations:
Include /etc/apache2/sites-enabled/

This fixed my problem