Wednesday, September 30, 2009

Outlook 2010 NK2 File Gone

With the release of outlook 2010 them nasty NK2 files are now gone. Outlook now stores these inside the users mailbox as "suggested contacts"


Because this data is stored in the users mailbox, if a user moves to another computer, the suggested contacts will follow them. With NK2 files the only way to ensure that this data followed the user around was to implement roaming profiles.

From testing I have verified that Outlook 2010 extends the attributes of a users mailbox on the exchange server adding in these extra required attributes. With exchange the attributes of a mailbox are controlled by the email client, not the exchange server. This is why when you create a mailbox on the server, the mailbox is never actually created unless an email client connects to the mailbox using MAPI. You can view these additional attributes using a MAPI editing program such as MFCMAPI.

I have verified on both Exchange 2007 and 2010 this data stores perfectly in the exchange mailbox and follows the user around regardless which computer they log into. I have not tested Exchange 2000/2003. If anyone could validate this for me please leave a comment.

Forcefully Remove Trend OfficeScan Client 10.0

You have a corrupt trend install and when you try and reinstall it you get:

The OfficeScan client is already installed on this computer.


To resolve this problem manually remove trend by performing the following process:

1. Stop the following services:
• Officescan NT Realtimescan
• Officescan NT Listener
• Officescan NT Firewall (if enabled)
• Officescan NT Proxy Service

2. Run regedit.exe
Locate and then delete the following keys belonging to the following: (Always create a backup before modifying the registry) HKLM\System\CurrentControlSet\Services:
• Ntrtscan
• Tmcfw
• TmFilter
• Tmlisten
• TmPfw
• TmPrefilter (for Windows 2003)
• TmProxy
• VsapiNt

3. HKLM\Software\TrendMicro (or HKLM\Software\Wow6432Node\TrendMicro for 64-bit clients):
• OfcWatchDog
• Pc-cillinNT Corp or OfficescanCorp (depending on client)
• Remote agent

4. HKLM\Software\Microsoft\Windows\CurrentVersion\Run:
• Officescan NT Monitor

5. HKLM\Software\Microsoft\Windows\CurrentVersion\Uninstall
Officescan NT

6. Right-click My Computer, click Manage.
Go to Device Manager then Show Hidden Devices Right-click each of these devices and click Uninstall (Note: Do not reboot at this point)
• tmcomm
• Trend Micro Filter
• Trend Micro PreFilter (for Windows 2003)
• Trend Micro TDI Driver
• Trend Micro VSAPI NT

7. Delete the Officescan Program group in the Programs’ Start Menu
Then restart the computer Go to \Program Files\Trend Micro and delete the Officescan client folder

Once uninstalled reboot then try installing trend again.

Also see my post for forcefully unintalling Trend ServerProtect:

http://clintboessen.blogspot.com/2010/01/forcefully-uninstall-trend.html

Related Posts:

http://clintboessen.blogspot.com/2009/09/trend-micro-find-trend-server.html

http://clintboessen.blogspot.com/2010/01/trend-micro-client-packager.html

Thursday, September 24, 2009

Exchange 2007 OWA Error

I had a client that had a single user get the following error whenever they logged into OWA. The company was running Exchange 2007 SP1. The bold below is what gave it away. The mailbox was not a legacy mailbox, it so it should of read version 8.0.

Request
Url: https://exchangeserver/owa
User host address: 10.13.121.112

Exception
Exception type: Microsoft.Exchange.Data.Storage.StoragePermanentException
Exception message: There was a problem accessing Active Directory.

Call stack
Microsoft.Exchange.Data.Storage.ExchangePrincipal.Save()
Microsoft.Exchange.Clients.Owa.Core.RequestDispatcher.DispatchLanguagePostLocally(OwaContext owaContext, OwaIdentity logonIdentity, CultureInfo culture, String timeZoneKeyName, Boolean isOptimized)
Microsoft.Exchange.Clients.Owa.Core.RequestDispatcher.DispatchLanguagePostRequest(OwaContext owaContext)
Microsoft.Exchange.Clients.Owa.Core.RequestDispatcher.PrepareRequestWithoutSession(OwaContext owaContext, UserContextCookie userContextCookie)
Microsoft.Exchange.Clients.Owa.Core.RequestDispatcher.InternalDispatchRequest(OwaContext owaContext)
Microsoft.Exchange.Clients.Owa.Core.RequestDispatcher.DispatchRequest(OwaContext owaContext)
System.Web.HttpApplication.SyncEventExecutionStep.System.Web.HttpApplication.IExecutionStep.Execute()
System.Web.HttpApplication.ExecuteStep(IExecutionStep step, Boolean& completedSynchronously)

Inner Exception
Exception type: Microsoft.Exchange.Data.Directory.InvalidADObjectOperationException
Exception message: Property Languages cannot be set on this object because it requires the object to have version 0.1 (8.0.535.0) or later. Current version of the object is 0.0 (6.5.6500.0).

Call stack
Microsoft.Exchange.Data.Directory.PropertyBag.set_Item(PropertyDefinition key, Object value)
Microsoft.Exchange.Data.Directory.ADObject.set_Item(PropertyDefinition propertyDefinition, Object value)
Microsoft.Exchange.Data.Directory.ADObject.StampCachedCaculatedProperties(Boolean retireCachedValue)
Microsoft.Exchange.Data.Directory.ADObject.ValidateWrite(List`1 errors)
Microsoft.Exchange.Data.Directory.Recipient.ADRecipient.ValidateWrite(List`1 errors)
Microsoft.Exchange.Data.Directory.Recipient.ADUser.ValidateWrite(List`1 errors)
Microsoft.Exchange.Data.Directory.ADSession.Save(ADObject instanceToSave, IEnumerable`1 properties)
Microsoft.Exchange.Data.Storage.ExchangePrincipal.Save()

In ADSI edit on the users account the msExchVersion was not set to anything ie it read <Not Set>. I compared the attribute with another user account which read 4535486012416. Updating this attribute fixed the problem. Please note future updates may change this attribute on peoples accounts so it is important you align the attribute up with someone elses account in your oganisation and not simply use 4535486012416.


My mate Blake just pointed out to me there is another way of doing this as documented on:
http://technet.microsoft.com/en-us/library/bb218696.aspx

Set-Mailbox -Identity -ApplyMandatoryProperties

He also pointed out that this issue is caused when a mailbox is created using Exchange 2003 system tools in a 2007 environment.

Trend Micro - Find the Trend Server

You're out at a new site for the first time. You need to log into the trend micro server to install deploy trend to a new workstation. How do you find out what server is the trend server?

Open up the office scan console on a trend client on a workstation that already has trend installed, then go to help and about.


Once you have the trend server, you can then install trend on other PC's. To do this navigate to \\trendserver\ofscan

Run "AutoPcc.exe" as administrator and it will install trend on your PC/server.

Related Posts:

http://clintboessen.blogspot.com/2009/09/forcefully-remove-trend-officescan.html

http://clintboessen.blogspot.com/2010/01/trend-micro-client-packager.html

Sunday, September 20, 2009

Windows 7 Manageability and Performance Enhancements

In this blog post we are going to look at some additional Manageability and Performance Enhancements that are new in Windows 7.

Windows PowerShell 2.0

Windows 7 includes version 2.0 of Windows PowerShell, which has advanced features such as:
- An integrated scripting environment
- Remoting capabilities
- Support for script internationalization
- Support for creating restricted shells

VPN Reconnect

VPN Reconnect is a new feature of Windows 7 that maintains your virtual private networking connection even when you temporarily lose the connection to the Internet. For example, if you roam from one wireless hot spot to another, Windows 7 can automatically reestablish your connection to the Internet.

Direct Access

DirectAccess is a new feature of Windows 7 and Windows Server 2008 R2 that lets you securely connect to your corporate network without the need for using a VPN connection. With DirectAccess, your computer can be always connected to the corporate network even when you are at home or travelling. This also helps the organization’s IT department in managing your computer even when it is not connected to the corporate network. DirectAccess uses Internet Protocol version 6 (IPv6) and Internet Protocol Security (IPSec) to accomplish this.

Branch Cache

BranchCache is a feature of Windows 7 and Windows Server 2008 R2 that caches content from remote Web servers and file servers in a branch location. The cached content can be stored either on servers at the branch location or it can be distributed across client computers at the branch location. BranchCache allows users to quickly access cached files instead of having to download them repeatedly over slow wide area network (WAN) links.

Saturday, September 19, 2009

Windows 7 Federated Search

Windows 7 has a new federated search feature that queries remote data stores through Web servers, via the OpenSearch protocol, and enumerates the results as RSS or Atom XML feeds. Everything you need to know about extending the Windows 7 search index can be found on this MSDN article.

To add Federated Searches to your computer you need to run .osdx files. Below is a osdx for flicker search.

<?xml version="1.0" encoding="UTF-8"?>
<OpenSearchDescription xmlns="http://a9.com/-/spec/opensearch/1.1/" xmlns:ms-ose="http://schemas.microsoft.com/opensearchext/2009/">
<ShortName>Flickr</ShortName>
<Description>Flickr OpenSearch via Windows 7 Search Federation.</Description>
<Url type="application/rss+xml" template="http://www.istartedsomething.com/flickrsearch/?search={searchTerms}&count={count}&page={startPage}&sort=interestingness-desc"/>
<Url type="text/html" template="http://www.flickr.com/search/?w=all&q={searchTerms}&m=text"/>
</OpenSearchDescription>


If you head over to this site there is lots of Federated Searches already made that you can just download and use:

http://www.sevenforums.com/tutorials/742-windows-7-search-federation-providers.html

Deployment Methods

There are two ways to deploy search connectors, pull deployment and push deployment.

Pull Deployment

Pull deployment describes any type of deployment in which the end user takes the initiative to install the search connectors. Common methods of pull deployment are:
- Attaching the .osdx file in an e-mail.
- Posting the file on a Web page.
- Providing a dynamic link on your intranet site

Push Deployment

Push deployment describes any type of deployment that does not depend on user initiative to install the search connectors. Common methods of push deployment are:
- Group Policy Preferences (GPP)
- Logon script
- Roaming profiles
- Imaging

Demo

Below we are going to go through a quick demo to show you what Federated Search looks like. Here I have a Flickr osdx file sitting on my desktop shown in the above code. Run it.


Click Add:


Now if you go into an explorer window Flickr will appear in your faverotes. In the screenshot below I did a search for the word plants in Flickr.


To delete custom federated searches navigate to the users profile, expand the new Searches folder and just delete the file.

Windows 7 Problem Steps Recorder

Windows Vista introduced the snipping tool making it easy for users to grab screenshots of error messages and sending them to administrators. The snipping tool is also available in Windows 7. However the problem with the snipping tool is it does not give the person on help desk an idea of what the user did to produce that error message. This is now resolved by the problem steps recorder.


Problem steps recorder will allow a user to perform the steps that caused the problem and even leave comments on slides. Files generated by Problem Steps Recorder are in the .mht format that are natively supported by internet explorer. However problem steps recorder automatically zips the .mht file so it is emailed to you in a compressed format.

Below is a screenshot of a report I just generated in problem steps recorder. If you notice it marks in green where I clicked. It has options as well such as view steps as a slide show which goes through step by step in a slide show window in the service desk operator's internet explorer window.


Scrolling down:


In the Additional Details section of the problem report it gives a text description of what occured as a result of the users actions which is also very handy for tracking down problems.


The easiest way to launch Problem Steps Recorder I find is to type "Record Steps" in the Search Programs and Files box in the start menu.


One more thing I would like to add is this tool is also available in Windows Server 2008 R2.

Windows 7 Windows Troubleshooting Platform

Windows Troubleshooting Platform or WTP for short is a new tool included with Windows 7 to allow users to automatically resolve problems with their PC reducing calls to the help desk. To quickly get up to speed with WTP please watch this demo video by Microsoft.

To get to WTP in control panel go to:

System and Security --> Action Center --> Troubleshooting


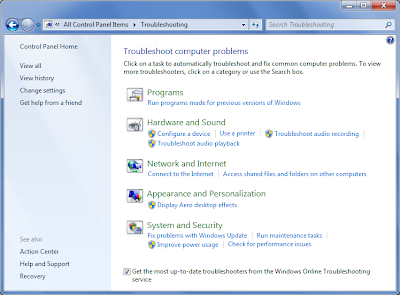
Each catagory in the trouble shooting panel launches different trouble shooting packs. Windows 7 can also automatically download additional trouble shooting packs as released by Microsoft if the tickbox in Trouble shooting is ticked.

Below are the three core components that make WTP work:

Troubleshooting Wizard

The UI component communicates with the troubleshooting engine to walk the user through the steps defined in a troubleshooting pack.

Troubleshooting Packs

These packs each consist of an XML manifest file that specifies the root causes of a condition and Windows PowerShell scripts that detect the condition, resolve the underlying issue, and verify that the issue has been resolved.

WTP is also very extendable, Microsoft released a framework so IT Administrators can develope their own troubleshooting packs for issues that are unique to their environment.

Troubleshooting Engine

This component launches a Windows PowerShell runtime that executes a troubleshooting pack. It also exposes a set of interfaces for controlling the execution of the pack.

Advanced WTP

I'm going to spend a little more time on WTP as I think its a really powerful feature and can service desks life so easy. For example you have software phones and users keep accidently disabling their sound, or muting their microphone. WTP can just allow users to click a fix button and everything magically starts working again. All the information you could ever need about WTP can be found on 
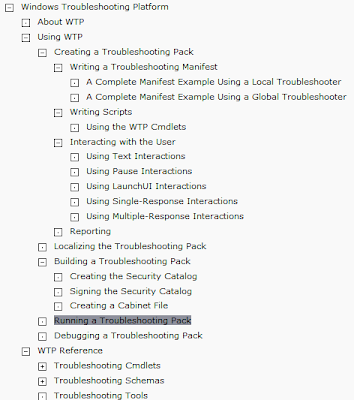
WTP TechNet Home Page. As you can see from the picture below this technet site it goes through the powershell cmdlets around WTP as well as loads of information and example code for making your own troubleshooting packs.


WTP In Powershell

Lastly we are going to go through some of the handy powershell commands in Windows 7.

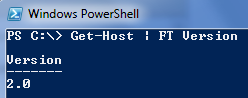
I would like to point out quickly that Windows 7 is the first version of windows to come with powershell built into the operating system. All previous versions like vista, windows 2008 and XP did not come with powershell and you had to either add powershell in as a feature or download it from the internet. Also windows 7 is currently running powershell version 2.0. Version 2.0 is not available for any other operating system apart from 2008 R2 at this stage, but it should be released for the other versions of windows soon. To show you this I will run Get-Host FT Version which wills how you the version of powershell we are currently running:


Before we can use the CmdLets for WTP we need to import the module into the powershell session. This goes with all windows applications that support powershell, to be able to use the cmdlets for that particular application the module needs to be loaded. To list all modules available on a system run:

get-module -listavailable


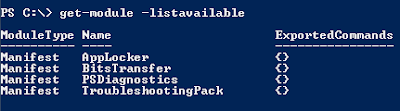
On a platform such as server 2008 there is loads more modules because its a server platform. Theres modules for pretty much every thing you want to control from NLB to cluster services and even other packages you purchase such as exchange 2007/2010, SCOM and SCCM.

It is possible to import all modules by running:

get-module -ListAvailable import-module

However this means you have all the cmdlets at your disposal and many of these you will not need for the operation your performing and it makes everything very confusing! Just import the TroubleShooting Pack module for WTP by running:

Import-Module TroubleshootingPack


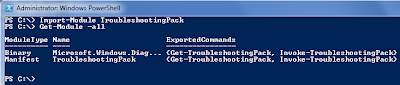
Get-Module -all shows us the module is active.

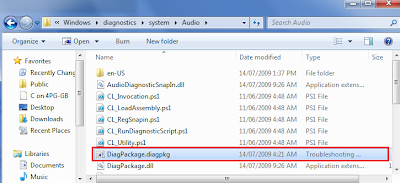
The TroubleshootingPack's that come with windows are located under:

C:\Windows\diagnostics

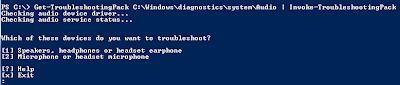
However you can also run troubleshooting packs of network drives handy for when you wish to publish additional trouble shooting packs to workstations you do not need to copy the files to each machine. If you wish to view a troubleshooting pack you would do this with the Get-TroubleshootingPack cmdlet:


This is the pack that fixes audio problems related to windows 7. You can also run the troubleshooting packs from powershell:


While we were talking about powershell modules i'd like to quickly show you how to get all commands for a module. You simply type:

Get-Command -Module "modulename"


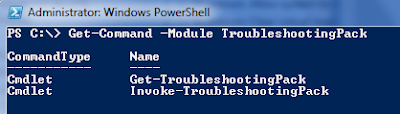
As you can see there are only two powershell cmdlets for WTP making it real easy for us to remember :).

Troubleshooting Pack Deployment

If you have downloaded or created your own troubleshooting pack you will need to deploy it. Troubleshooting packs contain .diagcab files that are created using the Makecab.exe or Cabarc.exe tools located in the %Windir%\System32 folder. They also contain security catalogs created using tools such as makecat.exe from the windows SDK.

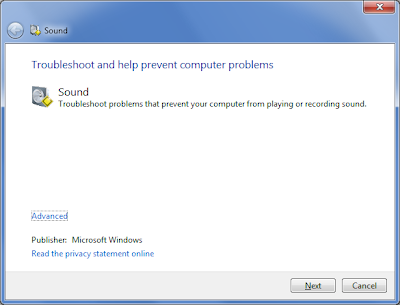
These .diagcab files can be distributed by using Group Policy Preferences, Microsoft System Center Configuration Manager (during or after deployment), or software distribution tools. You can even post the .diagcab files to a internal web site and users can launch them directly of the web server. The user will get presented with a nice GUI the same as going through control panel. For example if I manually double click on the sound troubleshooting .diagcab file I will get presented with a sound trouble shooting wizard:


Windows 7 User Account Control

User Account Control or UAC for short was first introduced in windows vista. The purpose behind UAC was to block virus infections by enabling users to easily run as standard users instead of as administrators. When UAC is enabled on a Windows Vista computer, users are presented with an elevation prompt whenever they need to perform an administrative action such as configuring the operating system settings or installing software on the computer.

I personally thought UAC in Vista was fantastic, I no longer had to Run-As, it would just prompt me automatically for my administrator's password whenever I needed to install something such as a active X control. Previously i'd have to close my iexplorer.exe session, navigate to c:\program files\internet explorer\iexplorer.exe, right click on it, run as, install the active x control for the particular website, close my administrative iexplorer session, then return back to a restricted standard internet explorer session. What a pain! However many users complained and found UAC "annoying" primarily because they didn't understand what it was doing.

As a result from users feedback Microsoft modified UAC in windows 7 giving users more control when UAC prompts are displayed. In addition, fewer operating system tasks now require elevation. There is also more control of UAC via group policy for IT administrators. Below we are going to look at the changes to UAC for both home users and administrators.

Whats changed from a users perspective?

Well in Windows Vista UAC could only be enabled or disabled. Now in Windows 7 there is four levels of of control that can be configured under:

Control Panel --> System and Security --> Action Center --> Change User Account Control.


These four levels are:


What's Changed from an IT Professional's Perspective?

The policies for UAC can in group policy under:

Computer Configuration --> Windows Settings --> Security Settings --> Local Policies --> Security Options

Below is the list of all UAC policies that can be configured for windows 7. I have marked in red the policies that are new to windows 7:


Additionally there was one policy that was available in windows vista but has been removed for windows 7:

User Account Control: Switch to the secure desktop when prompting for elevation

DCOM Error 10016

A client was getting DCOM error 10016 on Server 2003 with the following description:

The machine-default permission settings do not grant Local Activation permission for the COM Server application with CLSID {61738644-F196-11D0-9953-00C04FD919C1} to the user NT AUTHORITY\NETWORK SERVICE SID (S-1-5-20). This security permission can be modified using the Computer Services administrative tool.


I found that IIS WAMREG admin Service is the DCOM service in question by tracing the application ID. Notice it matches the ID in the error above.


To get to these properties you need to go through an MMC console like this through component services:


We know that it’s a permission error as Network Services is getting access denied to the application. Following this line of thought go to the security tab and hit customize on the launch and activation permissions:


Then hit edit:


Give Network Service full access:


Follow this procedure 2 more times to give network service full for both Access Permissions and Configuration Permissions. After giving Network Service the appropriate access the error went away.

Windows 7 Multiple Active Firewall Policies

In windows vista we saw huge changes to the native windows firewall. It was now bidirectional with outbound and inbound rules and could do layer 7 rules such as queries based on active directory security groups, users and computer accounts as well as things like IP Sec rules. In windows vista the firewall was devided into three catagories called profiles:
- Public
- Domain
- Home

Each profile had its own list of ACL's. Only one profile could be active at a time. If a user took her laptop out of the domain and connected to the WiFi at a coffee shop the user may not be able to use software such as VPN clients anymore. This is because in the office the user was using the Domain profile, but now its reverted to using the Public profile which no longer has the ports open the VPN program requires.

How has Windows 7 Resolved This?

Windows 7 has resolved this by having all firewall profiles always active. Applications are then linked to use a particular profile, for example the VPN client is linked to always use the domain profile. Below in control panel we can see that all firewalls profiles are running but only one is the connected profile:


If we click on "Allow a program or feature through Windows Firewall" we can select which profiles an application can go through.

Friday, September 18, 2009

Windows 7 AppLocker

AppLocker is the new version of Software Restriction Policies introduced for the first time in Windows 7. Software Restriction Policies can still be used against windows 7 as you may have a mixed environment of XP, Vista and Windows 7 machines and you want to use SRP's so you dont have to create the rules multiple times for both AppLocker and SRP.

AppLocker can be used to prevent users from accessing:
- Executable (.exe) files
- Windows Installer (.msi) files and Windows Installer Patch (.msp) files
- Script files including PowerShell (.ps1), batch (.bat), command prompt (.cmd), VBScript (.vbs), and JavaScript (.js) files
- Dynamic link library (DLL) files (optional)

To use AppLocker you must be running Windows Server 2008 R2 with Windows 7.

Below is a table comparing AppLocker to Software Restriction Policies:


AppLocker is located in group policy under Application Control Policies directly under Software Restriction Policies:


You can also set wheather AppLocker enforces the rules, audit or allows users to bypass the rule for each respective catagory:


A new built in enhancement of AppLocker is it allows administrators to apply the rules against a user or group set basis instead of just at organisational unit level. Here is a screenshot of the new rule wizard showing you what I mean:


You could get around this though in SRP's by simply creating a GPO and changing the security permissions the group policy object so it would only apply to the users and groups you wanted to set the policies against. However this meant that you could not configure any other policies under the same GPO because the other policies would also get blocked by GPO security settings. With AppLocker you could configure the AppLocker policies on something such as the Default Domain Policy to apply to particular users and groups.

One thing that is really good about AppLocker is it has the ability to scan a PC to find out which applications are installed and allow them. This means you do not have to manually add applications to the allow run list. You can do this by right clicking on the catagory you want and selecting to Automatically Generate the rules:


Another feature that I think is really important to highlight about AppLocker is its ability use files as reference files when creating Publisher rules. For example I can set wordpad.exe as a reference file:


It enters in all the attributes for wordpad. You can even specify custom attributes that are not in the list by default. If I slide the bar up, I have now just configured it so that it allows any applications developed by Microsoft to run.


This can be done just as easily for other vendors as well. AppLocker is a more effective solution then having anti-virus. Anti-virus has signature files that indicate MD5 or SH1 hashs of files that are known to be virual. It can also scan within files for common hash strings to determine if a file has been infected. However anti-virus products only contain information for most viruses out there on the internet, there are many that anti-virus products do not know about or get their anti-virus definitions out there to late! If you lock down your network to only allow application files, scripts, and patches that you know are clean to run on workstations, then files that contain viral code will not be allowed to run as AppLocker will stop them. Think about this, which is easier? To make a list of millions of virual codes out there on the internet and scan files to see if it is in alignment with any of these signatures, or to make a list of all good known peices of code on a network then block the rest?

Windows 7 Bitlocker

In Windows XP you could encrypt files using EFS (Encrypted File System). With the introduction of windows vista you can now encrypt an entire partition. This technology has been developed by Microsoft over the past few years with additional feature being added to Bitlocker technology in Windows 7. Below is a list of when features for Bitlocker became available as it is pretty confusing:

Features introduced in Vista RTM:
- Supports TPM, TPM+USB, TPM+PIN, or USB to unlock a protected drive.
- Provides a unique recovery key for each protected volume
- Supports encrytion of only the Windows Partition
- Supports the backup of BitLocker and TPM recovery information to Active Directory
- Needs an additional partition to be created by the BitLocker Drive Preparation Tool

Features introduced in Vista SP1:
- Introduce support for Unified Extensible Firmware Interface (UEFI) systems
- Supports encryption of any partition on fixed disks
- Supports TPM+USB+PIN to unlock a protected drive

Features introduced in Windows 7 RTM:
- Supports encryption of partitions on fixed and removable disks
- Unlocks an encrypted drive by right-clicking on it in Windows Explorer
- Supports enforcement of minimum PIN length
- Supports association of a unique organizational identifier with each BitLocker volume.
- Supports recovery of all protected volumes by a single Data Recovery Agent (DRA)
- Windows Setup automatically creates system partitions for BitLocker
- Enables BitLocker on a drive by right-clicking it in Windows Explorer
- Has BitLocker Recovery password in Microsoft Remote Server Administration Tools (RSAT)

For bitlocker to work it needs to create a small seperate partition for boot information. The windows boot loader NTLDR (short for NT Loader) cannot exist on an encrypted partition because how will the system read it to load windows? Instead bitlocker puts the enhanced version NTLDR capable of reading the encrypted partitions on a seperate small little boot partition.

When installing windows vista if you wanted to use bitlocker you would have to use the "Bitlocker Drive Preparation Tool" to seperate the NTLDR boot loader from the main system partition to its own little boot partition before enabling bitlocker.

With Windows 7 everytime you install windows it automatically puts NTLDR on a seperate partition. This allows you to easily enable bitlocker by simply right clicking a partition and clicking "Turn on Bitlocker".


Also Windows 7 has a new feature called "Bitlocker To Go" which enables you to bitlock removable devices such as USB flash keys. You can unlock a removable drive by the following methods:
- Password or Passphrase
- Smart card
- Automatic unlocking (basically it remembers the password just for that 1 computer)

Bitlocker can be managed in 2 ways:
- Group Policy (so many policies around bitlocker to go)
- Windows User Interface

If all client workstations in your company are running windows 7, one policy I recommend implementing is "Deny write access to removal drives not protected by bitlocker"


This will force all users to right click the removable drive and "Turn on bitlocker" to continue using it. This means if any USB keys are lost and people outside the company get a hold of them, they will not be able to read company confidential data.

When this policy is enabled when a user puts a key into the computer they will automatically get presented with:

Windows Deployment Services 2008 R2 with Windows 7 New Features

Windows 7 together with Windows Server 2008 R2 provides other deployment enhancements including support for Dynamic Driver Provisioning, support for Multicast Multiple Stream Transfer, and support for VHD management and deployment.

Below I will be going through some of the new features of 2008 R2 WDS and Windows 7 deployment.

Dynamic Driver Provisioning

In previous versions of WDS, if a Windows image required additional device drivers, you had to add these drivers to your image by servicing your image. Ie you had to use the old PkgMgr.exe tool to inject drivers into each image as requird maintaining a bunch of seperate images. If you had many images to maintain, this could involve a lot of work.

With Dynamic Driver Provisioning, however, you can store these drivers directly on your deployment servers in a folder. Drivers can then be dynamically chosen at deployment time. Storing drivers separately from images helps minimize the size of your images and streamline image maintenance.

Multicast Multiple Stream Transfer

Multicast mode was first introduced in Windows Server 2008 to allow a Windows DS server to broadcast images to multiple client computers simultaneously. In Standard Multicast mode, however, the transfer rate was limited by the slowest client connection.

In Windows Server 2008 R2, however, Standard Multicast mode can now automatically remove slower client computers from the multicast group when the connection speed to that client falls below a specified threshold. In Multicast Multiple Stream Transfer mode, administrators can group client computers that have similar bandwidth capabilities into network streams. This ensures that the transfer rate between the Windows DS server and the client computers is as fast as possible.

Virtual Hard Disk (VHD) Image Support

Windows Vista introduced the WIM file format, a file–based disk image format that can contain one or more operating system images. A Windows DS server running Windows Server 2008 could deploy Windows Vista by applying a WIM file to the client computer.

In addition to WIM files, Windows 7 now includes native support for VHD, a file format used for virtual machines. A Windows DS server running Windows Server 2008 R2 can now deploy Windows 7 by applying a VHD file to a client computer.

Administrators can use the new DISM command-line tool to service a VHD image the same way they can service a WIM image. For example, you could use DISM to add a hotfix or package to a VHD image before deploying the image to a client computer.

Windows 7 Automated Installation Kit (AIK) 2.0

In this blog post I will be going through some of the cool deployment stuff for Windows 7.

A few differences between 1.1 (vista) and 2.0 (windows 7)


New Tool DISM.exe

DISM.exe is a command-line tool that can be used to perform offline servicing of Windows–based images. For example, you can use it to install, uninstall, configure, and update features, packages, drivers, and international settings. You can also use it to prepare Windows PE images. DISM.exe replaces PEimg.exe, Intlcfg.exe, and Pkgmgr.exe, which are deprecated in Windows 7.

With Windows Vista to perform offline servicing you had to and the AIK 1.1 you had to:
- Mount the image using ImageX.exe
- Use PkgMgr.exe to install hotfixes, enable windows features, add device drivers, install language packs and perform other image servicing tasks.
- Use Intlcfg.exe if you needed to change the language and local settings.
- Use PEImg.exe if your preparing a windows PE Image
- Once done servicing the image you would unmount the image using image X.

Now in Windows 7 with AIK 2.0 you still need to use ImageX.exe to mount and unmount the images however there is one tool that does does all image modification called DISM.exe.

Also Windows 7 deployment can be done by either WIM files or VHD files. DISM.exe can be used to service either WIM files or VHD files.

ScanState.exe and LoadState.exe

ScanState.exe and LoadState.exe are part of the User State Migration Tool (USMT) 4.0 which comes as part of the Windows AIK 2.0 pack.

The ScanState tool scans the source computer, collects the files and settings, and then creates a store. ScanState does not modify the source computer. By default, it compresses the files and stores them as a migration store. ScanState copies files into a temporary location such as a file server and then into the migration store.

The LoadState tool migrates the files and settings, one at a time, from the store to a temporary location on the destination computer. The files are decompressed, and decrypted if necessary, during this process. Next, LoadState transfers the file to the correct location, deletes the temporary copy, and begins migrating the next file.

There is loads of information about this on TechNet. Here is the home page for USMT 4.0:

http://technet.microsoft.com/en-us/library/dd560801(WS.10).aspx

Also please note that USMT 4.0 can also be used for XP and Vista... not just Windows 7.

USMT 4.0 Hard Link

Hard Link is a new feature of USMT in 4.0. It is designed to speed up migrations of user data. Previously copied the users state to a storage medium, whiped the disk, installed the new operating system then transfered the data back.

Hardlink Migration allows a clean install of Windows 7 to be performed while maintaining the user's settings and data on the computer's hard drive. This is possible because of hard links, a feature of the NTFS file system by which more than one path references a single file.

A network share is no longer required in this scenario. Using hardlink migration can significantly speed the migration of user state information during a Computer Refresh scenario.

Tuesday, September 15, 2009

Exchange 2003 Meeting Request - receiving NDR for non-existent user

Problem

User A sends meeting request to User B and receives NDR - unable to send to User C. User C used to be listed as a delegate in User B's Outlook (Tools/Options/Delegates) but is no longer there in outlook. User C left the company some time ago.

Resolution (Easy Method)

The easy method to resolve this issue is to recreate the User B's mailbox. Do not recreate his account, if you do this he will get a new GUID however the Distinguished Name will remain same. Everyone has in their user profile an NK2 file that aligns DN to GUID. If the GUID changes but the DN remains the same, whenever someone emails that user they will recieve a bounce back saying Recipient Object Not found. Outlook trys to send to the wrong GUID. The only way to fix this is to remove the entry from every users NK2 file in the organisation or tell the users to delete their NK2 file so PLEASE dont delete the user account. Instead disconnect the mailbox and create a new mailbox linked to the account.

Resolution (Hard Method)

This is a bug with the Outlook client not displaying the correct information from what is stored in the exchange mailbox database. The only way to fix such situations is to use an advanced MAPI editing tool to crack open mailbox that contains the calendar and remove the delegate manually using a tool called MFCMAPI. This lets you see the schema inside the exchange information store database and modify attribute values by hand. MFCMAPI can cause irreversible damage to a user’s mailbox and should only be used by advanced exchange administrators that understand the workings of the MAPI protocol and the fields that are used to store information inside a user’s mailbox.

MFCMAPI was originally a Microsoft tool but has now been taken over by a 3rd party however the documentation for MFCMAPI still exists on Microsoft Technet. Download MCFMAPI from:

http://mfcmapi.codeplex.com

Before we make changes to a user mailbox or a resource mailbox such as a calendar back it up using ExMerge to a PST file!

Download ExMerge from here:

http://www.microsoft.com/downloads/details.aspx?FamilyId=429163EC-DCDF-47DC-96DA-1C12D67327D5&displaylang=en

Note: Ex-Merge can only be used for exchange 2000/2003

Now we are ready to start. Follow these steps.

1. Open MCFMAPI on either a client workstation with Outlook installed or on the Exchange server itself and connect to a profile:


2. If your on a client workstation with outlook there, your profile will already be there just select it and hit OK. If your on the Exchange Server there will not be any profiles in place so click New to create one.


3. Choose Microsoft Exchange Server


4. Provide a profile name, I think its a good idea to call the profile the same as the mailbox name to make it easy to reference.


5. Enter the name of your exchange mailbox server and the mailbox your trying to edit.


6. Choose no.


7. Click finish


8. We now have a connection to the Internal Meeting Room mailbox just like outlook does in the backend. We are able to view the public folders available to this user along with the mailbox resource. We are interested in the mailbox as this is where the delegate information is stored. Open the mailbox store by right clicking and hitting Open Store.


9. This is what a mailbox looks like.


10. Expand out Root Container --> Top of Information Store --> Inbox. Note if they have any folders under their inbox they will appear as sub folders in the list here. Right click on the Inbox folder and click Display Rules Table.


The Rules Table on the Inbox is where all outlook rules and alerts as well as delegations get stored. I will show you this on my computer... I have a rule in my outlook client... this is what it looks like in MFCMAPI.


However the list also contains delegates. How do I tell if a rule is a delegate? Well I found on the following technet article http://technet.microsoft.com/en-us/library/bb508857(EXCHG.65).aspx it says:

"If a delegate rule is configured on a mailbox, the PR_RULE_PROVIDER property is Schedule+EMS Interface."

11. Using this information found on Technet locate the delegate rules on the mailboxes that are not displaying the delegates in outlook. We can see that this rule (that has no name) is a delegate for the fact its property is "Schedule+EMS Interface"


12. Delete the rule its the one causing problems!