Showing posts with label SCCM. Show all posts

Saturday, March 24, 2018

SCCM - TS environment is not initialized

I was in a process of upgrading a customer to the latest SCCM 1710 build for rolling out Windows 10 across the companies network.

To upgrade to SCCM 1710 you must first upgrade to SCCM 1702 then do the next upgrade in the SCCM console.

While upgrading a client to SCCM build 1702, we ran into an issue where the following error was generated in the smsts.log file on the SCCM Distirbution Point.  This error was experienced when imaging a client with our existing Windows 7 deployment task sequence via PXE Boot.

"TS environment is not initialized"


On the client being imaged, the following error was experienced:

The Windows Boot Configuration Data (BCD) file from the PXE server does not contain a valid operating system.  Ensure the server has boot images installed for this architecture.

Error Code: 0xc0000098


This issue occured because I installed The Windows Assessment and Deployment Kit (Windows ADK) version 1709 on the server.

SCCM 1702 does not support ADK 1709.

To fix the issue, I simply performed the next step of the upgrade - using the SCCM console to perform an in-place upgrade of SCCM to 1710.

For future reference:

If your running SCCM 1702, make sure you run ADK 1703.

If your running SCCM 1710, use ADK 1709.
\
Hope this post was helpful.

Monday, January 29, 2018

Finding a Device in SCCM for Unknown Computer TS Deployment

1. Currently I have a task sequence deployed to the "All Unknown x86/ x64 Computers" device collection. SCCM will only PXE boot machines it has never seen before in its database.


2. I PXE boot the new client PC and it downloads the policy and completes imaging successfully.

3. At this point SCCM knows about this computer via MAC address but lets say I need to reimage the client computer later on in life or right now as a test.

4. When trying to reimage I get the error that fails on "looking for policy" and then it aborts.


5. The reason why you cannot reimage it is because SCCM can tell that it was already imaged with the same exact MAC address and task sequence name. This is by design.

6.  What do to do reimage it?  You have two options.

a. You could add known device collections to the task sequence.

b. Alternatively you can remove the device from SCCM so it is treated again as an unknown device.

How do you find the device though if you don't know the previous hostname?

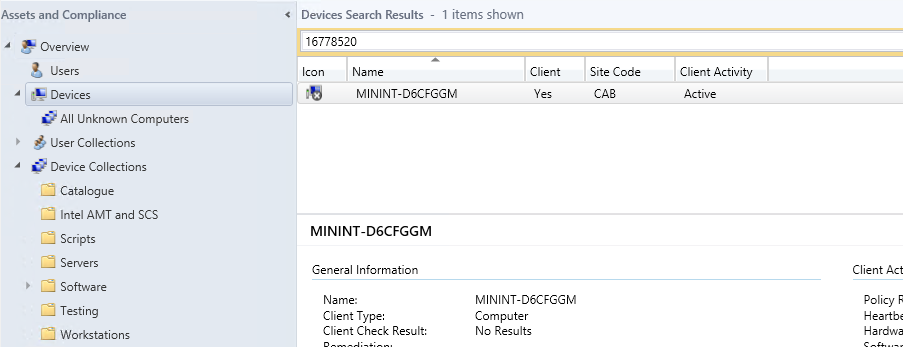
Look at the SMSPXE.log file on the SCCM Distribution Point.  Find the "Client boot action reply" entry in the log file and get the ItemKey number.


Now search for the ItemKey in SCCM "Assets and Compliance" --> Devices.


Deleting the device asset from SCCM will then once again treat the resource as an unknown computer.

Hope this post has been helpful.

Monday, September 18, 2017

Preparing Windows 10 Enterprise Edition 1703 for Enterprise Deployment with SCCM 1702

This blog post goes through what is required to get Windows 10 Enterprise Edition 1703 ready for deployment in an enterprise environment with Internet Explorer.

In Windows 10 Enterprise Edition 1607, a common practice to prepare the image for deployment was to create a custom default profile.  This was done by creating a temporary user account on the base image and customizing it such as removing edge, store and windows mail from task bar and removing modern apps from start menu tiles.   The profile of this temporary user would then be used to create a new "Default profile" under C:\Users and the old profile would generally be renamed to something like Default.old or deleted entirely.

In Windows 10 Enterprise Edition 1703 however, customizing the default profile results in Sysprep failing with an error.  This error results in an infinite loop of restarts after the first boot with the following text:

Why did my PC restart?

There's a problem that's keeping us from getting your PC ready to use, but we think an update will help get things working again.
Here's how to update:
  1. Make sure your PC is plugged in
  2. If this PC uses Wi-Fi, select Next to following instructions to connect to a Wi-Fi network.
  3. If this PC does not use Wi-Fi, insert a network cable to connect to a wired network, and then select Next.
  4. Once you're connected, select Next, and the update will install.

As a result we must perform all modifications to the image without modifying the default profile on the base image as a work around.  After leasing with Microsoft, we also do not want the Windows 10 1703 image to ever touch the Internet as it will download additional bloatware and updates during the installation process which can also cause Sysprep to fail.

Below is the documented steps for creating an Enterprise Ready Windows 10 Enterprise 1703 build with the bloatware stripped out and Internet Explorer as standard browser so your legacy Enterprise web applications continue to function.

Step 1 - Create a new Virtual Machine with no Internet

You want to create your image on a virtual machine, not a physical workstation.  Do not install VMware Tools or HyperV Integration Services as we want to keep the image clean.  The image will eventually be deployed to physical hardware and as a result we do not want such software on the Windows 10 Enterprise build.

Make sure you use all generic virtual hardware, for example on VMware make sure you use E1000E Virtual NIC, not VMXNET3 as this requires custom drivers from VMware Tools.

Install Windows 10 from the latest Windows 10 Enterprise 1703 ISO.  Make sure the VM is disconnected from the Internet during the build process to ensure it cannot download updates.

Step 2 - Enable Sysprep Audit Mode

Immediately after the install finishes, enable Sysprep in Audit Mode.  You use audit mode to setup the default profile which will affect all users that log into the computer.

Do not generalize the image and simply select reboot.


Step 3 - Unpin Applications from Start Menu and Taskbar

Whilst in Audit mode, go through and unpin all the modern apps from the Start Menu.  Also unpin anything you want from the task bar such as store, windows mail etc.


Step 4 - Remove Bloatware

Next we want to go through and remove all bloatware from the image.  In Windows 10 Enterprise 1607 we could simply achieve this with the following command:

Get-AppxPackage -AllUsers | Remove-AppxPackage

On Windows 10 Enterprise 1703 however we cannot do this or it will break sysprep.  As a result we need to specify the individual bloatware applications we wish to remove.  Here is the list I used on my image, tailor it for your needs.

Get-AppxPackage -allusers *Adobe*
Get-AppxPackage -allusers *EclipseManager*
Get-AppxPackage -allusers *WindowsFeedbackHub*
Get-AppxPackage -allusers *MicrosoftOfficeHub*
Get-AppxPackage -allusers *GetStarted*
Get-AppxPackage -allusers *zune*
Get-AppxPackage -allusers *messaging*
Get-AppxPackage -allusers *solitaire*
Get-AppxPackage -allusers *bingnews*
Get-AppxPackage -allusers *bingweather*
Get-AppxPackage -allusers *skypeapp*
Get-AppxPackage -allusers *stickynotes*
Get-AppxPackage -allusers *xboxapp*
Get-AppxPackage -allusers *windowscommunicationsapps*
Get-AppxPackage -allusers *OneConnect*
Get-AppxPackage -allusers *3DBuilder*
Get-AppxPackage -allusers *3DViewer*
Get-AppxPackage -allusers *Pandora*
Get-AppxPackage -allusers *PowerBI*
Get-AppxPackage -allusers *CandyCrush*
Get-AppxPackage -allusers *speedtest*
Get-AppxPackage -allusers *QuickAssist*
Get-AppxPackage -allusers *Office.Sway*
Get-AppxPackage -allusers *Twitter*
Get-AppxPackage -allusers *bingsports*
Get-AppxPackage -allusers *Duolingo*
Get-AppxPackage -allusers *ActiproSoftwareLLC*
Get-AppxPackage -allusers *RemoteDesktop*


Also run the following commands so the applications are no longer available for the next user:

Get-appxprovisionedpackage –online | where-object {$_.packagename -like "*Adobe*"} | Remove-AppxProvisionedPackage -online
Get-appxprovisionedpackage –online | where-object {$_.packagename -like "*EclipseManager*"} | Remove-AppxProvisionedPackage -online
Get-appxprovisionedpackage –online | where-object {$_.packagename -like "*WindowsFeedbackHub*"} | Remove-AppxProvisionedPackage -online
Get-appxprovisionedpackage –online | where-object {$_.packagename -like "*MicrosoftOfficeHub*"} | Remove-AppxProvisionedPackage -online
Get-appxprovisionedpackage –online | where-object {$_.packagename -like "*GetStarted*"} | Remove-AppxProvisionedPackage -online
Get-appxprovisionedpackage –online | where-object {$_.packagename -like "*zune*"} | Remove-AppxProvisionedPackage -online
Get-appxprovisionedpackage –online | where-object {$_.packagename -like "*messaging*"} | Remove-AppxProvisionedPackage -online
Get-appxprovisionedpackage –online | where-object {$_.packagename -like "*solitaire*"} | Remove-AppxProvisionedPackage -online
Get-appxprovisionedpackage –online | where-object {$_.packagename -like "*bingnews*"} | Remove-AppxProvisionedPackage -online
Get-appxprovisionedpackage –online | where-object {$_.packagename -like "*bingweather*"} | Remove-AppxProvisionedPackage -online
Get-appxprovisionedpackage –online | where-object {$_.packagename -like "*skypeapp*"} | Remove-AppxProvisionedPackage -online
Get-appxprovisionedpackage –online | where-object {$_.packagename -like "*stickynotes*"} | Remove-AppxProvisionedPackage -online
Get-appxprovisionedpackage –online | where-object {$_.packagename -like "*xboxapp*"} | Remove-AppxProvisionedPackage -online
Get-appxprovisionedpackage –online | where-object {$_.packagename -like "*windowscommunicationsapps*"} | Remove-AppxProvisionedPackage -online
Get-appxprovisionedpackage –online | where-object {$_.packagename -like "*OneConnect*"} | Remove-AppxProvisionedPackage -online
Get-appxprovisionedpackage –online | where-object {$_.packagename -like "*3DBuilder*"} | Remove-AppxProvisionedPackage -online
Get-appxprovisionedpackage –online | where-object {$_.packagename -like "*3DViewer*"} | Remove-AppxProvisionedPackage -online
Get-appxprovisionedpackage –online | where-object {$_.packagename -like "*Pandora*"} | Remove-AppxProvisionedPackage -online
Get-appxprovisionedpackage –online | where-object {$_.packagename -like "*PowerBI*"} | Remove-AppxProvisionedPackage -online
Get-appxprovisionedpackage –online | where-object {$_.packagename -like "*CandyCrush*"} | Remove-AppxProvisionedPackage -online
Get-appxprovisionedpackage –online | where-object {$_.packagename -like "*speedtest*"} | Remove-AppxProvisionedPackage -online
Get-appxprovisionedpackage –online | where-object {$_.packagename -like "*QuickAssist*"} | Remove-AppxProvisionedPackage -online
Get-appxprovisionedpackage –online | where-object {$_.packagename -like "*Office.Sway*"} | Remove-AppxProvisionedPackage -online
Get-appxprovisionedpackage –online | where-object {$_.packagename -like "*Twitter*"} | Remove-AppxProvisionedPackage -online
Get-appxprovisionedpackage –online | where-object {$_.packagename -like "*bingsports*"} | Remove-AppxProvisionedPackage -online
Get-appxprovisionedpackage –online | where-object {$_.packagename -like "*Duolingo*"} | Remove-AppxProvisionedPackage -online
Get-appxprovisionedpackage –online | where-object {$_.packagename -like "*ActiproSoftwareLLC*"} | Remove-AppxProvisionedPackage -online
Get-appxprovisionedpackage –online | where-object {$_.packagename -like "*RemoteDesktop*"} | Remove-AppxProvisionedPackage -online


Step 5 - Prevent the Image from downloading more Bloatware

To prevent the image from downloading more bloatware when we connect it to the Internet, we need to add the following registry key.  This stops it from downloading additional non essential applications considered by many as "bloatware".

reg add HKLM\Software\Policies\Microsoft\Windows\CloudContent /v DisableWindowsConsumerFeatures /t REG_DWORD /d 1 /f

Step 6 - Create an Unattended xml file

Next create an unattended xml file.  I placed this on the image under C:\Windows\System32\Sysprep.

CopyProfile = $true in the XML file instructs to make the changes made in Audit Mode the default profile on the image.

<?xml version="1.0" encoding="utf-8"?><unattend xmlns="urn:schemas-microsoft-com:unattend">
<settings pass="specialize">
<component name="Microsoft-Windows-Shell-Setup" processorArchitecture="amd64" publicKeyToken="31bf3856ad364e35" language="neutral" versionScope="nonSxS" xmlns:wcm="http://schemas.microsoft.com/WMIConfig/2002/State" xmlns:xsi="http://www.w3.org/2001/XMLSchema-instance"&gt;
<CopyProfile>true</CopyProfile>
</component>
</settings>
<cpi:offlineImage cpi:source="wim:D:/sources/install.wim#Windows 10 Enterprise" xmlns:cpi="urn:schemas-microsoft-com:cpi" />
</unattend>

Also mount your Windows 10 Enterprise 1703 DVD to your image under D:\ to match the offlineImage path of the unattend XML file.

Name the XML file anything other then unattend.xml as this is the default file Windows 10 uses.

Step 7 - Run Sysprep

Next run Sysprep from an elevated command prompt.

sysprep.exe /generalize /oobe /shutdown /unattend:c:\windows\system32\sysprep\Win10unattendanswer.xml

Snapshot the image after it is shutdown and confirm that it boots correctly and runs sysprep without errors.  Once you have confirmed this, roll it back to the snapshot ready to capture the image.

Step 8 - Capture the Image with DISM

Next capture the image with DISM using a command similar to the following:

Dism /Capture-Image /ImageFile:c:\my-windows-partition.wim /CaptureDir:C:\ /Name:"My Windows partition"

For more information on capturing with DISM please refer to the following website:

https://technet.microsoft.com/en-us/library/hh825072.aspx

Step 9 - Removing Edge and Pinning Internet Explorer with SCCM

Despite removing the Edge icon from the image in the default profile, the CopyProfile part of sysprep does not bring the change across.  Other start menu changes all stay in place.

Microsoft MVP Jörgen Nilsson has created a script to use in an SCCM task sequence to ensure Edge stays removed.  He published this here:

http://ccmexec.com/2015/12/removing-the-edge-icon-from-the-taskbar-during-osd/

This script has also been published to TechNet Gallery under the following location:

https://gallery.technet.microsoft.com/Manage-the-taskbar-remove-c3024e40

This script however whilst it removes Edge, does not pin Internet Explorer in its place.  Here is 2.0 of this script which pin's Internet Explorer in the place of Edge.  Please download from the following link:

https://sites.google.com/site/cbblogspotfiles/ManageTaskbar%202.0.zip

Step 10 - Create an SCCM Package for the Script

This procedure assumes your using SCCM 1702 to deploy your Windows 10 image.

For this process we want to create a new SCCM Package, not a Application.

 
Navigate to the path on the network to where the Zip file was extracted.  If you didn't see the link above, you can download it from:


Select "Do not create a program" and click Finish.


And as always with SCCM, distribute the package to the distribution points.

 
Step 11 - Modify the SCCM Win10 Deployment Task Sequence

Next we want to configure the SCCM task sequence to run the batch script we imported to a package.  This batch script simply imports a registry key to the default profile and configures a "runonce" to ensure all new users that login to the image run the PowerShell script to modify the task bar.

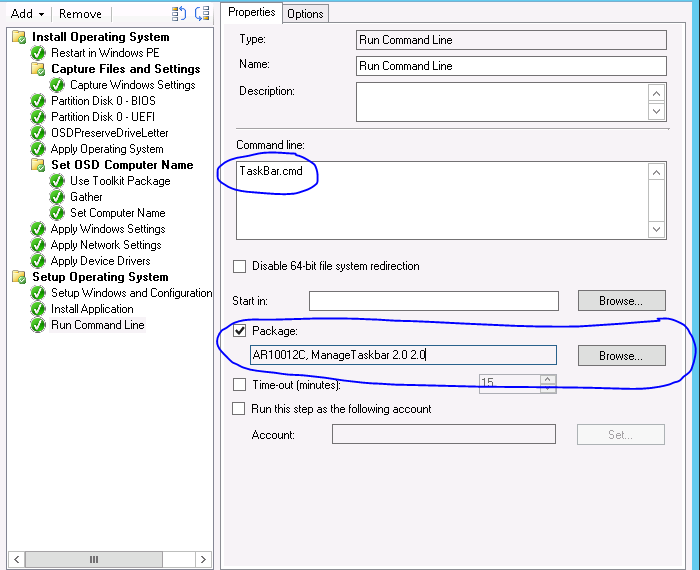
To run the batch file we want to add a "Run Command Line" option at the end of the task sequence usually as the last step.  Simply select the package and add in the command line area "TaskBar.cmd".


This will ensure after new machines are deployed Edge will be removed and Internet Explorer will be put in their place.

Extra Steps

I recommend considering to deploy the following group policy settings to your Windows 10 computers:

Disable the Windows Store:

Computer Configuration --> Administrative Templates --> Windows Components --> Store --> "Turn of Windows Store"

Disable the OneDrive:

Computer Configuration --> Administrative Templates --> Windows Components --> One Drive--> "Prevent the usage of OneDrive for file storage"

Disable Cortana:

Computer Configuration --> Administrative Templates --> Windows Components --> Search --> "Disable Cortana"

Set the default applications to use IE instead of Edge.  This requires you create a xml AppAssoc file with DISM and deploying it with Group Policy.  See the following web page:

https://docs.microsoft.com/en-us/internet-explorer/ie11-deploy-guide/set-the-default-browser-using-group-policy

To create the AppAssoc XML file use the following DISM command:

dism /online /export-defaultappassociations:\\server\share\\AppAssoc.xml

Shoutout:
I would like to provide a huge thanks to Amit Anand from Microsoft for working with me and attending numerous skype meetings on creating this solution.

Hopefully this post has been helpful. 

Monday, July 17, 2017

Software no longer displaying in Software Center - SCCM 1702

I had an issue at a customer where software was no longer appearing in Software Center on the workstations.  Please note - this screenshot was taken after I fixed the issue.


After much troubleshooting, I was able to fix the issue.

For each application not appearing, I needed to do an "Update Content" in SCCM.


To force the SCCM client to update the application after the content was updated, in the Configuration Manager client, under Machine Policy Retrieval & Evaluation click Run Now.


Monitor the C:\Windows\CCM\Logs\AppDiscovery.log on the client and you should see the application which you ran the Update Content for appear in the log file.

 
When the application appears, close and re-open Software Center, you will see the application present.
 
I'm not sure what actions lead up to the many of the applications disappearing in Software Center, however these actions resolved the issue. 

Thursday, October 2, 2014

What is the SCCM Management Point?

A management point is a site system role that provides policy and service location information for clients and it also receives configuration data from clients. When we deploy software to a client, the client sends a content request to a management point.  The management point sends a list of the preferred distribution points to the client, and the client uses one of the preferred distribution points as source location for content. If contents are not available on the preferred distribution point, the management point sends a list to the client with distribution points that have the content available.

Management Point can be defined on client computers when they are installed, or client can get the list of Management points through DNS or WINS.

Clients search for a Management Point by using the below options in the order specified:
  • Management point
  • Active Directory  Domain Services
  • DNS
  • WINS
 

Friday, October 25, 2013

SCCM Deployment Failure 0x80070002

During a new SCCM 2012 SP1 deployment for a customer, when deploying a WIM file to a new workstation the following error was experienced:

Task Sequence "Task Sequence Name" has failed with the error code (0x80070002). For more information, contact your system administrator or helpdesk operator.


This error popped up as soon as the "Apply Operating System" action kicked off within the task sequence.  The "Apply Operating System" task attempts to download the Windows 7 Enterprise WIM file from the closest deployment point, however will experience access issues if no network access account has been configured yet.  The operating system deployment process running of PXE boot requires access back to SCCM to download the operating system WIM file.

To configure the network access account, under Administration, Sites, Configure Site Components, select Software Distribution.


On the Network Access Account tab, supply SCCM with a network access account which has permissions to connect to the distribution point repository.


Hope this post has been helpful.

Thursday, October 24, 2013

Error Starting WDS Service on SCCM 2012 SP1 Server

I ran into an issue where I was unable to start the WDS service on a newly installed SCCM 2012 SP1 server running on Windows Server 2012.  The following errors were experienced in the application log on the SCCM 2012 distribution point server.

Log Name:      Application
Source:        WDSServer
Date:          25/10/2013 12:30:44 PM
Event ID:      257
Task Category: WDSServer
Level:         Error
Keywords:      Classic
User:          N/A
Computer:      sccm2012.domain.internal
Description:
An error occurred while trying to start the Windows Deployment Services server.

 Error Information: 0x906


Log Name:      Application
Source:        WDSMC
Date:          25/10/2013 12:30:45 PM
Event ID:      594
Task Category: WDS Multicast Server
Level:         Error
Keywords:      Classic
User:          N/A
Computer:      sccm2012.domain.internal
Description:
The Content Provider WDSBOOT loaded from C:\Windows\system32\wdsbcp.dll failed to initialize.
 

Error Information: 0x906


Log Name:      Application
Source:        WDSMC
Date:          25/10/2013 12:30:45 PM
Event ID:      603
Task Category: WDS Multicast Server
Level:         Error
Keywords:      Classic
User:          N/A
Computer:      sccm2012.domain.internal
Description:
The Content Provider WDSBOOT failed to initialize. The provider is marked as critical. WDS Multicast server will fail to start.

 Error Information: 0x906


Log Name:      Application
Source:        WDSServer
Date:          25/10/2013 12:30:45 PM
Event ID:      513
Task Category: WDSServer
Level:         Error
Keywords:      Classic
User:          N/A
Computer:      sccm2012.domain.internal
Description:
An error occurred while trying to initialize provider WDSMC from C:\Windows\system32\wdsmc.dll. Windows Deployment Services server will be shutdown.

 Error Information: 0x906


This was resolved by initialising the WDS server using the following command.  Generally WDS automatically initialises itself however for an unknown reason on this SCCM server it did not initialise as expected.


Monday, October 21, 2013

Windows PE cannot start because the actual SYSTEMROOT directory (X:\Windows) is different from the configured one (X:\$windows.~bt\Windows)

I ran into the following error message on a new SCCM 2012 SP1 server using the default boot.wim files which come on the Windows 8 installation media.

Windows PE cannot start because the actual SYSTEMROOT directory (X:\Windows) is different from the configured one (X:\$windows.~bt\Windows).  This can be configured from dism.exe with the /set-targetpath command.  Please consult the documentation for more details.

Press the OK button or close this message to reboot.

 
After doing a little research this is a common problem when using the default boot.wim WinPE 4.0 files from the Windows 8 installation media.  You have two options to correct this, the first is using DISM and using the /set-targetpath command to change the command to X:\WINDOWS as per the error message above.  The second is using the boot.wim files which come with the Deployment and Imaging Tools.  Simply load the Deployment and Imaging Tools Environment shell and run the following commands:
 
copype x86 D:\Sources\OS\BootFiles\x86
copype amd64 D:\Sources\OS\BootFiles\amd64

Here is an example of what it will look like as it extracts:


The boot.wim file will be located under x86\media\sources for the respective operating system architecture you extracted, as shown in the following screenshot:


If you use the boot.wim files from the Deployment and Imaging Tools you will not experience this problem and with any luck, PXE clients should boot straight into the SCCM configuration screen.

Make sure you don't forget to Distribute the boot images and update the distribution points.

Note: Make sure you restart the Windows Deployment Services Server service after changing boot files.


PXE Boot aborted. Booting to next device...

The following error was experienced when performing a PXE boot from a newly installed SCCM 2012 SP1 server.

Architecture: x64

The details below show the information relating to the PXE boot request for this computer.  Please provide these details to your Windows Deployment Services Administrator so that this request can be approved.

Pending Request ID: 2

Message from Administrator:
Please wait.  SMS is looking for policy.

PXE Boot aborted.  Booting to next device...


To resolve this problem you need to distribute the boot image to the deployment point.  First distribute the content then update the distribution points.


SCCM 2012 sp1 0xc000000f PXE Error

I was having an issue with SCCM 2012 SP1 with a PXE boot problem.  When workstations attempt to boot from my SCCM 2012 deployment point they receive the following error:

Recovery

Your PC needs to be repaired.
The Boot Configuration Data for your PC is missing or contains errors.


File: \boot\bcd
Error code: 0xc000000f


In the SMSPXE.log file on the SCCM Deployment point server the following error is being experienced which is spammed over and over.

&lt![LOG[Warning: Matching Processor Architecture Boot Image (0) not found]LOG]!&gt&lttime="16:59:32.682-660" date="10-21-2013" component="SMSPXE" context="" type="2" thread="2612" file="pxehandler.cpp:1542"&gt

Now I only have a x64 boot.wim file which I have deployed to my deployment point.  This boot.wim is the default x64 one taken of a Windows 8 DVD Media.  From my reading on the following forum thread, apparently this is a known problem with SCCM 2012 SP1.  What I have leant from the following forum thread is you MUST HAVE both a x64 and a x86 boot image deployed to your deployment point servers, even if your only using x64 like in my case.  This is also in alignment with the error which I am receiving in the SMSPXE.log file "Matching Processor Architecture Boot Image (0) not found" which would hint there is no x86 boot image deployed.

Please see this forum thread:

http://social.technet.microsoft.com/Forums/en-US/5b0db982-42fa-4ac3-b617-27d5b2ac24fa/sccm-2012-sp1-upgrade-pxe-boot-error-0xc000000f-bootbcd?forum=configmanagerosd

Now I went to upload a 32bit boot image from a Windows 8 32bit edition media however when ever I upload a 32bit media, I receive the following error:

"You can not import this boot image.  Only finalized boot images are supported.  For more information press F1."


It is important to note that 64bit Windows 8 boot media adds without a problem.
Also important, I received the following error when attempting to add a Windows 7 x64 boot media.  From my research I found that SCCM 2012 no longer supports the old WinPE 3.0 (which comes with Windows 7) and as a result you need to use a Windows 8 boot.wim file.  I blogged these findings here:

http://clintboessen.blogspot.com.au/2013/10/you-can-not-import-this-boot-image-only.html

The Resolution

To resolve this issue, the latest cumulative update must be installed on the SCCM 2012 SP1 server.  As of this writing the latest cumulative update is CU3 which is available from the following website:

http://support.microsoft.com/kb/2882125

This hotfix as of this writing must be requested from Microsoft in which they email you a link to download the hotfix.  Apply this update to SCCM servers in your central administration site, primary site, secondary site, providers and configuration manager consoles.

After installing this update rollup, I was able to successfully add the Windows 8 32bit boot image from a Windows 8 32bit media.


Sunday, October 20, 2013

You can not import this boot image. Only finalized boot images are supported. For more information press F1.

Using System Centre Configuration Manager with SP1 when attempting to add the Windows 7 with SP1 boot image "boot.wim" from the sources folder on a Windows 7 media which was copied to my SCCM server, I received the following error:

You can not import this boot image. Only finalized boot images are supported. For more information press F1.

When researching the error, this error is usually experienced when a custom boot image is made with custom drivers usually using third party tools other then the Windows Automated Installation Kit (WAIK) DISM.exe tool provided by Microsoft.  However this was not the case, I was just trying to upload the default boot.wim from a Windows 7 media.


After a good 10 minutes of digging I found a post on the Windows Noob forums by bennettjd which mentions System Centre Configuration Manager with SP1 does not support Windows 7 boot images - only Windows 8.

http://www.windows-noob.com/forums/index.php?/topic/7571-sccm-2012-boot-image/

After trying again with a Windows 8 boot image, it worked successfully.


 Hope this post helps you if you got caught out on this like me!

Monday, October 14, 2013

Where is the System Centre Configuration Manager Console on Windows Server 2012?

You have just installed SCCM 2012 on a new Windows Server 2012 computer having configured SQL, installed various components from the Assessment and Deployment Kit and a few other pre-requisites.  Now you wish to begin configuring SCCM using System Centre 2012 Configuration Manager console.

Problem is where is the console?  It does not get installed by default and there is little documentation online on how to install it.  I had to find the installer myself by manually browsing through program files.

The SCCM Configuration Manager console MSI installer can be found under:

C:\Program Files (x86)\ConfigMgr10\AdminconsoleSetup\{BCB4C126-7BEB-4938-B32F-FC73E17BD41E}\Adminconsole.msi

Note: In the SCCM 2012 Release Candidate the console was automatically installed which makes some online documentation even more confusing.


Simply launch this installer on the SCCM and follow the prompts.


Sunday, October 13, 2013

How to Change SQL Instance Collation

In this post I am going to show you how to change SQL 2012 database collation SQL_Latin1_General_CP1_CI_AS, the requirement for System Centre Configuration Manager (SCCM) 2012.  Changing database collation means all data in the database will be lost - make sure you know what your doing.

I needed to change the database collation for my SCCM instance in relation to an SCCM installation error:

Configuration Manager requires that you configure your SQL Server instance and Configuration Manager site database (if already present) to use the SQL_Latin1_General_CP1_CI_AS collation, unless you are using a Chinese operating system and require GB18030 support.

To change the database collation simply run the setup.exe from the SQL Installation media again but in quite mode.  The command you need to run is:

setup /q /action=rebuilddatabase /instancename=sccm /sapwd=P@ssw0rd /SQLCollation=SQL_Latin1_General_CP1_CI_AS /SQLSYSADMINACCOUNTS=domain\administrator


/q – perform silent installation

/Action – [RebuildDatabase ] Rebuilding the system databases to change the collation name

/INSTANCENAME – Name of the instance the collation has to change
- If Default Instance then “MSSQLSERVER”
- If Named Instance “Named Instance Name”

/SAPWD – Provide new password for SA login
 - Enable SA Account if it Disabled setup with Strong Password.

/SQLCollation – Provide the new collation name of SQL Server

/SQLSYSADMINACCOUNTS – Provide account name which has admin rights in sql server.