Showing posts with label Outlook. Show all posts

Sunday, December 9, 2018

Microsoft causing issues for on-premises Exchange Customers

Microsoft is causing issues for on-premises customers running Exchange to try and push customers to move to their servers in Office 365.  After the release of 16.0.6741.2017, the Click 2 Run (C2R) version of the Outlook client for the PC is prioritising O365 for Autodiscover queries above all other Autodiscover methods (SCP, HTTPS root domain etc).

This causes problems for customers who aren't using O365 for mail service, especially if either of these conditions are true:

1. The user has a mailbox in the O365 service which is not being used. This can occur if the user has inadvertently had an Exchange license assigned.

2. The user has a personal Office subscription but has used their business email address to configure it.

The issue which users experience is they are prompted for Authentication, when the users enter their details the login fails as it's effectively requesting authentication against the O365 service.

This behavior also breaks the experience for existing profiles, not just newly created ones.

The “workaround” we have is to add a registry change to end users PC to bypass the O365 endpoints. From this article:

https://support.microsoft.com/en-gb/help/2212902/unexpected-autodiscover-behavior-when-you-have-registry-settings-under 

This property needs to be set to a DWORD value of 1: ExcludeExplicitO365Endpoint

This needs to be done on each computer running Outlook.  For managed devices on a Corporate Network we can push this out with management tools such as SCCM or Group Policy Preferences but for non-managed devices this is a huge overhead for IT staff dealing with end user support and the issues experienced.

This workaround is hard to manage, client specific, and will need to be reverted if the customer ever does in fact move to O365 so that the Direct Connect method can work again.

The process of how Autodiscover is configured on Exchange Servers is documented on the following link and now even if we have setup Autodiscover correctly, by default Outlook clients will have issues setting up Outlook profiles.

https://docs.microsoft.com/en-us/exchange/client-developer/exchange-web-services/autodiscover-for-exchange

The feedback of removing this feature for Outlook Profiles configured against an on-premises Exchange Server has been provided to Microsoft from numerous frustrated IT Professionals.  Microsoft's response to this was as follows:

We cannot fulfill this request as we will continue to optimize for the Office 365 experience. The supported implementation of Autodiscover is documented here, https://support.microsoft.com/en-us/help/3211279. Any ongoing changes and improvements will be documented in the article. We appreciate your feedback and take every request with consideration, whether we can move forward with it or not.
-Outlook Team

Here are some facts:
  • There are still more on-premises customers running Exchange then customers in Office 365.
  • Customers on-premise pay good money via various Microsoft licensing programs to utilise these products.
  • Not all customers will migrate to the cloud - there will always be customers who want to keep intellectual property on-premises instead of moving to a shared public cloud environment.
  • Making changes such as the above which will cause issues to millions and millions of on-premises customers is not acceptable.
Due to the various complaints coming in from the community, after posting the above statement, Microsoft IMMEDIATELY closed comments preventing their customers from venting further frustration.  For more on this please see:

https://outlook.uservoice.com/forums/322590-outlook-2016-for-windows/suggestions/36052099-stop-prioritizing-o365-for-autodiscover?tracking_code=bcd47b537c1d87aa7fa3220e75bd96a2

One would hope that these on-premises authentication requests hitting Microsoft's O365 servers are just authentication requests, and Microsoft are not keeping these credentials.  If they were, this would be a directory harvesting exercise to the likes we have never seen before.

As a consultant who has specialized in Microsoft technologies for a long time - i'm very disturbed and appalled by the companies actions.  Microsoft get paid good money either way (if the customer is on-premises or in the cloud) and it is up to the customer to make a decision on where they want to store their intellectual property!

Tuesday, February 13, 2018

Outlook 2016 Connects First Time, Prompts for Password Every Other Time

A customer of mine recently deployed Outlook 2016.  The customer had an issue where they could create a new Outlook 2016 Profile, but after the Outlook Profile was created and Outlook was closed, the second time they open Outlook they would be prompted for password in an infinite loop.

Disabling Cached Exchange Mode on the Outlook Profile would fix the issue but we needed Cached Exchange mode to be enabled!

The protocol we were using is MAPI over HTTPs.

Outlook 2010 and 2013 connected fine with MAPI over HTTPs, only Outlook 2016 had this issue.

The issue turned out that the customer had disabled oAUTH on the MAPI over HTTPS virtual directory.

Below is the authentication settings setup on the customers Exchange 2016 server:


This is what the default authentication settings look like:


To fix the issue we needed to set the settings back to default with the following command:

Get-MapiVirtualDirectory | Set-MapiVirtualDireectory -IISAuthenticationMethods NTLM,OAuth,Negotiate -InternalAuthenticationMethods NTLM,OAuth,Negotiate -ExternalAuthenticationMethods NTLM,OAuth,Negotiate

Make sure you reset the correct IIS App Pool or do an iisreset so the change takes effect immediately.

Friday, September 15, 2017

Outlook Error - There is a problem with the proxy server's security certificate (Error Code 80000000)

During an Exchange 2010 SP3 to Exchange 2016 CU5 upgrade, some Outlook clients intermittently received the following certificate error message:

There is a problem with the proxy server's security certificate.
Outlook is unable to connect to the proxy server mail.domain.com (Error Code 80000000).


All Outlook Clients were running 2013 SP1.

The error was only experienced after moving a mailbox from Exchange 2010 to Exchange 2016.  The issue was also intermittent, not all workstations received the error message.

On the Exchange 2016 server the following was configured:
  • A valid digital certificate from RapidSSL was installed on the Exchange 2016 server along with the intermediate certificate and root certificate.
  • All names for Internal and External URLs were set to a name that matched the digital certificate for Outlook Anywhere, MAPI over HTTPS, Exchange Web Services, OAB Distribution and Autodiscover.
  • DNS was configured to direct all connections to the new Exchange 2016 servers.
  • We had a proxy exclusion in place on all workstations to ensure data to the Exchange server "mail.domain.com" was sent direct, not through the proxy.
This error was a bogus error and had nothing to do with a proxy server!

The server was configured with MAPI over HTTPS enabled on the organization configuration and all Outlook clients were creating MAPI over HTTPS connections to the server.

After much troubleshooting, we set the InternalClientsRequireSSL to $true and did an "iisreset" on the servers Outlook Anywhere configuration.

After changing InternalClientsRequreSsl to $true the issue did not occur.

 
What is interesting about this, I set InternalClientsRequireSSL to $false in my Exchange environment running Exchange 2016 CU4 and restarted IIS, I was not able to reproduce the issue with Outlook 2016.
 
I also have other clients that have InternalClientsRequireSSL set to $false that are doing SSL Offloading via a load balancer running Exchange 2016 that do not experience this issue.
 
It is an interesting issue as it was intermittently occurring across workstations at my client site.
 
The issue was definitely related to InternalClientsRequireSSL as I tested setting it back to $false, as soon as changing it back to $false the issue immediately reoccurred.
 
Perhaps a bug between Outlook 2013 SP1 and Exchange 2016 CU5?  InternalClientsRequreSsl is a valid setting and there are many cases where this must be set to $false.
 
Hope this post has been helpful.

Thursday, August 31, 2017

Outlook is unable to connect to the proxy server. (Error Code 0)

I'm currently in the process of performing another Exchange 2010 to Exchange 2016 migration for a customer.  When moving the first mailbox to Exchange 2016, the following error occurred:

There is a problem with the proxy server's security certificate.
The name on the security certificate is invalid or does not match the name of the target site mail.domain.com

Outlook is unable to connect to the proxy server. (Error Code 0)

 
Most information on the internet regarding this error points at either a certificate issue as per https://support.microsoft.com/kb/923575 or the Exchange System Attendant Service not running which no longer exists in later versions past Exchange 2010.
 
The Microsoft Remote Connectivity analyzer passed fine with no certificate areas and I validated that the certificate was correct:
  • The Root certificate is installed correctly on the server with the correct thumbprint.
  • The intermediate certificate is installed correctly on the server with the correct thumbprint.
  • Awildcard certificate is installed on the server with private key and the certificate chain is healthy.
  • The certificate is valid expiry date and has a valid subject name.
  • All names on the virtual directories for Exchange match a valid name trusted by the wildcard certificate.
After hours of troubleshooting I isolated the issue down to Group Policy and then finally down to this specific policy setting applied to the User Account:

"RPC/HTTP Connection Flags"

This is located under User Configuration --> Administrative Templates --> Microsoft Office 2013 --> Account Settings --> Exchange

Provided you have the Exchange 2013 ADMX installed in the Group Policy Central Store.


After setting this policy back to "Not Configured" and refreshing policy on the users, the error was resolved.

Wednesday, June 28, 2017

Exchange 2016 or Office 365 Shared Mailbox Not Updating

I was addressing an interesting issue for a customer today where a user with a shared mailbox would not automatically update.  Their primary mailbox updated correctly, only the shared mailbox did not update.

All other shared mailboxes for other users worked correctly.

All users are running Outlook 2013 32bit with all latest patches at the time of this writing.

When a user navigates to the shared mailbox and clicks Send/Receive All Folders or Update Folder, it will not update.


The only way the user can update the shared mailbox is by closing and reopening Microsoft Outlook.

All other users in the environment do not have issues with shared mailboxes.

After doing some research, it appears to be an issue with Microsoft Outlook when dealing with shared mailboxes over 2GB in size.  This shared mailbox having the issue was indeed over 2GB in size.

There are numerous forum threads on the Internet with people experiencing this Outlook issue:
This issue only occurs when shared mailboxes are being cached locally.

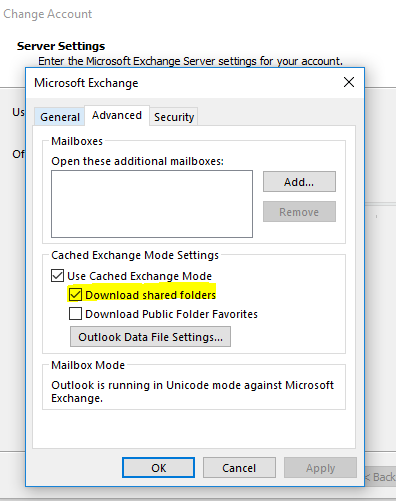
As a workaround, simply prevent the shared mailboxes from being cached locally by disabling "Download shared folders" on the users Outlook profile.  This is a confirmed workaround to the issue.

Wednesday, December 14, 2016

Manual Outlook Configuration with Outlook 2016

With the release of Microsoft Outlook 2016, it is now no longer possible to manually add an Exchange account.  Exchange accounts can only be added to Outlook 2016 using Autodiscover.  If Autodiscover records aren't published, your administrator will need to publish them so Outlook can find the account.

In Outlook 2010 and 2013, users were able to manually add Exchange accounts to the Outlook client by selecting "Manual Setup".


Outlook 2016 manual setup now only supports Exchange Active Sync (EAS), a protocol which Outlook does not support with Microsoft Exchange as per https://support.microsoft.com/en-au/kb/2859522

Outlook only supports "RPC", "RPC over HTTPS" and "MAPI over HTTPS" connections to Exchange server.

The Microsoft "Outlook.com" cloud service however does support EAS connections hence why the option is available in Outlook 2016.

If you try and complete a manual configuration for Outlook 2016, you will receive the following error.

"Log onto Exchange ActiveSync mail server (EAS): The server cannot be found"


Make sure you add the Autodiscover record to your public DNS or alternatively modify the hosts file with an Autodiscover record so the Outlook client can resolve the correct Exchange communication settings.

It is disappointing that you cannot select what method you wish to connect in Outlook 2016 when attempting to perform a manual setup.

Monday, December 14, 2015

Outloook 2010 Starting in Safe Mode?

Microsoft recently released a bad Windows Update (KB3114409) which caused Outlook 2010 to start loading in safe mode for multiple clients of mine.  This update has recently been recalled by Microsoft due to the number of issues it caused.

In the event your company installed it across multiple workstations, you can quietly uninstall it across all computers.

One of the easiest ways to do this is creating a Startup Script with Group Policy and create a batch script with the following command:


C:\Windows\System32\wusa.exe /uninstall /kb:3114409 /quiet /norestart


Make sure the batch file is launched via a Startup Script and not a logon script.  Logon Scripts in Group Policy require users to have local administration rights to make system wide changes (something which is not best practice).  Startup Scripts will run under the SYSTEM account with administrative rights.

Thursday, October 9, 2014

Windows XP clients must match the Certificate Common Name in Outlook for RPC over HTTP

Back in 2009 I wrote an article called "Configuring Outlook Anywhere Settings via Autodiscover" which can be found at the following URL:

http://clintboessen.blogspot.com.au/2009/06/configuring-outlook-anywhere-settings.html

Also in 2009 I wrote an article called "Outlook Anywhere keeps prompting for Password" which can be found at the following URL:

http://clintboessen.blogspot.com.au/2009/06/outlook-anywhere-keeps-prompting-for.html

In this blog post I am going to touch on these two topics a bit further as this issue will impact many organisations moving to Exchange 2013 for those still running Windows XP (despite the fact it is no longer supported) seeming Exchange 2013 only supports RPC over HTTP or MAPI over HTTP (out of scope for this article).  To recap what I wrote about in the previous articles 5 years ago, for RPC over HTTP(s) aka Outlook Anywhere to work on any version of the Outlook Client on the XP, the MSSTD value must match the "Common Name" on the certificate.  What am I talking about?  Well let me show you...

The MSSTD is specified under "Only connect to proxy servers that have this principal name in their certificate" which can be found within Outlook under Account Settings, Open the Account, More Settings, Connection Tab and finally Exchange Proxy Settings.

 
This value must match the "Common Name" of the certificate which in this example is mail.example.com as shown below next to "Issued to:"
 
 
From Windows Vista onwards the MSSTD can match any name in the Certificate which includes the Certificate Common Name as shown above and any Subject Alternative Names (SAN) which may exist on the certificate.  These are often used and can be easily located on the details tab of a certificate in Microsoft Windows as shown below:
 
 
For Windows XP the "Only connect to proxy servers that have this principal name in their certificate" value MUST MATCH the common name on the Certificate.  The symptom for having this not matching is the user continuously being prompted for credentials in an infinite loop as I addressed under the article Outlook Anywhere keeps prompting for Password.
 
 Note: This also applies to Windows Server 2003 for people with legacy Terminal Server / Citrix environments.
 
What about for Wild Card certificates, how do I set the "Only connect to proxy servers that have this principal name in their certificate" MSSTD value for these for legacy Windows XP clients?
 
For Wild Card certificates the MSSTD value must be set to:
 
msstd:*.domain.com
 
You must actually put the astricts in the DNS name instead of the name the client is connecting to in order for Windows XP to be happy so it matches the exact name of the Wildcard certificate.
 
What about Autodiscover?
 
Now that we understand that the MSSTD must match the common name of the certificate for our legacy Windows XP clients, how do we automatically push this out to our clients via Autodiscover?
 
Exchange 2013 no longer directly uses EXPR/EXCH Outlook Providers which we configured in Exchange 2007/2010, it has two different dynamically generated EXHTTP providers. Users with mailboxes on 2013 will get one set of EXHTTP settings for internal usage and one set of EXHTTP settings for external usage.  You will see this returned to the Outlook client in the Autodiscover response via what looks like a new provider, ExHTTP.
 
However ExHTTP isn’t an actual provider, it is a calculated set of values from the EXCH (internal Outlook Anywhere) and EXPR (External Outlook Anywhere) settings.  The concept of internal Outlook Anywhere and External Outlook Anywhere is new in Exchange 2013 as we
got rid of direct RPC to the Exchange server.  We want the ability to set NTLM authentication for internal and Basic authentication for External as well as different connection URLs.
 
To change the internal MSSTD returned value from Autodiscover use the following command:
 
Internal Outlook Anywhere:
 
Get-OutlookProvider "EXCH" | Set-OutlookProvider -CertPrincipalName "msstd:mail.domain.com"
 
External Outlook Anywhere:
 
Get-OutlookProvider "EXPR" | Set-OutlookProvider -CertPrincipalName "msstd:mail.domain.com"
 
If you have a private internal namespace such as .local, .lan or .internal you may also need to setup split horizon DNS so that you can make the Certificate Common Name match the MSSTD!
 
Hope this article has been helpful.

Monday, September 22, 2014

Outlook 2010 and Exchange 2013 Users Prompted for Authentication

Over the past months I have had customers complain about Outlook 2010 users getting prompted for username/password when moving to Exchange 2013.  In previous versions of Exchange server such as 2003, 2007 and 2010, users connected to the Exchange server using RPC or Outlook Anywhere.  Exchange connectivity for clients has changed significantly in Exchange 2013 and now only Outlook Anywhere is supported, with the Exception of MAPI over HTTP for Exchange 2013 SP1 only when using Outlook 2013 SP1 clients.

The following table summaries the connection methods available for the various versions of Outlook and Exchange Server.


The default method of Outlook connecting to the Exchange server has always been to use RPC for
internal connections and Outlook Anywhere for external connections.  As Outlook Anywhere was originally only designed to be used for external connections, the Autodiscover service in Exchange 2007 and 2010 only provided Outlook clients with one set of configuration parameters used for external connectivity.

The screenshot below displays the configuration output from Outlook Anywhere on a Exchange 2010 client access server.  Notice there is only one External Hostname for connectivity and one Client Authentication Method you can specify.


In Exchange 2013 we now have the ability to specify different hostnames and authentication methods based on if the client is internal or external.


The authentication type is very important:
  • NTLM Authentication will leverage the credentials you used when signing into Windows and result in the Outlook client automatically signing in without prompting for authentication.
  • Basic Authentication is clear text authentication which does not use your Windows credentials.  As long as the Basic Authentication is encapsulated within Secure Socket Layer will it be secure.
As a general rule of thumb you want to use Basic Authentication for external connections and NTLM Authentication for internal connections.  You can use NTLM externally as well however I have had issues with it passing through some firewalls and proxy servers on remote networks so I advise my customers to always use Basic Authentication for maximum supportability for remote connections.

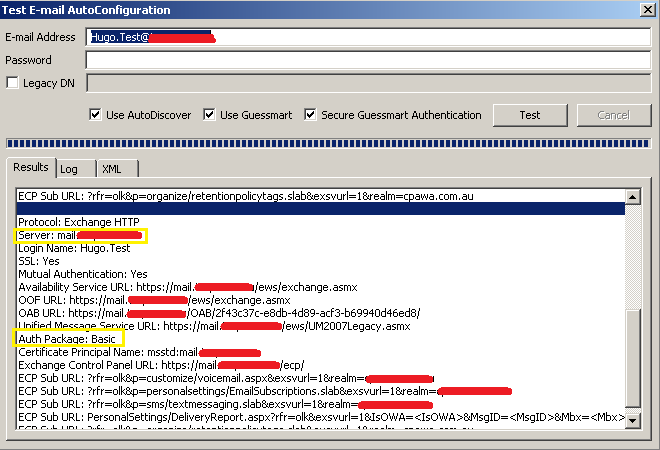
Here is where things get a little tricky.  Outlook 2010 RTM only understands the External Autodiscover response for Outlook Anywhere, not the Internal response.  This is shown in the screenshot below, notice the Server address is my ExternalURL and the Authentication is Basic.

This means provided you have split DNS in place for the External FQDN used for connectivity "mail.company.com", your clients will connect but with Basic Authentication.  This will result in the Outlook clients being prompted for authentication.


As of Outlook 2010 SP1 and higher it supports the Internal and External Autodiscover response for Outlook Anywhere which I have displayed below in two screenshots as I needed to scroll down in the Test E-mail AutoConfiguration screen:

Note: I went straight to Outlook 2010 SP2 in the screenshot below.


To ensure Outlook clients are not prompted for Authentication, ensure they are set to use NTLM authentication.  If Outlook 2010 clients have not been service packed, they will always receive the External authentication method.

In summary make sure you have done the following:
  • Configured your External and Internal Authentication types correctly using the information provided above.
  • Upgraded your Outlook clients to the latest service pack
 I hope this post has been helpful.

Thursday, July 31, 2014

Outlook - Changes to the distribution list membership cannot be saved. You do not have sufficient permission to perform this operation on this object.

In legacy versions of Exchange such as 2003 and 2007, when assigning a user "Managed By" permissions to an Active Directory security group, this allowed the users to manage the groups membership through Microsoft Outlook.  However in later reversions of Microsoft Exchange such as 2010 and 2013, simply providing the Managed By permission by default will not provide the user the ability to manage memberships of distribution groups.  This behaviour is by design in Exchange Server 2010 and Exchange Server 2013. Role Based Access Control (RBAC) and the associated self-service roles that accompany it were introduced in Exchange Server 2010. To prevent customers from unexpectedly causing problems with group management, the group management self-service role is now set to off by default.

When migrating to Exchange 2010 or Exchange 2013, when a user attempts change group membership for a group they are the owner of using Outlook 2010 or Outlook 2013, they will receive the following error message.

Changes to the distribution list membership cannot be saved. You do not have sufficient permission to perform this operation on this object.


You can turn this feature back on in Exchange 2010 or Exchange 2013 for all users by simply enabling the MyDistributionGroups setting on the Default Role Assignment Policy.


The Default Role Assignment Policy by default is applied to all mailboxes in an Exchange Organisation unless companies have created custom Role Assignment Policies and linked default or custom Management Roles to the custom Role Assignment Policy.  To demonstrate this, I have included a screenshot of my Mailbox below showing the Default Role Assignment Policy linked, this should be the same in most organisations unless you have custom RBAC requirements.

Note: The screenshot below is from Exchange 2013 SP1 but this also applies to Exchange 2010 which you will find by navigating through Exchange Management Console.


Now adding the option "MyDistributionGroups" to the Default Role Assignment Policy will provide all users with this policy linked to perform the following tasks:
  • Join existing groups (provided the Group allows it)
  • Manage some of the properties of groups they own
  • Change membership of groups they own
  • Create and Remove Groups
For majority of customers I work with, the first three meet requirements however the last point "Create and Remove Groups" raises concerns.  The default solution in Exchange 2010/2013 needs to be modified so that it meets the needs of the average customers - this means creating a custom Management Role with custom ManagementRoleEntries for the cmdlets we want the users to have permissions to.  Now if you are familiar with the Role Based Access Control (RBAC) model which Microsoft Exchange uses, you can go off and create your own which just has the cmdlets required which include:
  • Add-DistributionGroupMember
  • Get-DistributionGroup
  • Get-DistributionGroupMember
  • Get-Group
  • Get-Recipient
  • Remove-DistributionGroupMember
  • Set-DistributionGroup
  • Set-DynamicDistributionGroup
  • Set-Group
  • Update-DistributionGroupMember
Notice we left out the Add-DistributionGroup and Remove-DistributionGroup cmdlets hence allowing users to customise existing distribution groups but not add or delete distribution groups.

Introducing Manage-GroupManagementRole.ps1

Microsoft heard the pain customers were having with the default option made available in the RBAC Default Role Assignment Policy and as a result created a script called "Manage-GroupManagementRole.ps1" - written by Matthew Byrd from Microsoft.  This script is for a default deployment of Exchange 2010 or 2013 where all users have the Default Role Assignment policy and just want to be able to add/remove users from distribution groups through Microsoft Outlook for which they are owners of - just like they did before!  A copy of the script can be found here:

http://gallery.technet.microsoft.com/scriptcenter/8c22734a-b237-4bba-ada5-74a49321f159

This script does what I explained above for you automatically including:
  • Creates a new Management Role which you can specify with the -name switch otherwise by default it will call it "MyDistributionGroupsManagement"
  • Adds Management Role Entry's to the Management Role Group for all the PowerShell Commands listed above.  A Management Role Entry is simply a PowerShell cmdlet the Management Role is allowed to execute.
  • Assigns the Management Role to a Role Assignment Policy which can be specified with the -policy parameter.  If you do not specify a Role Assignment Policy it will use the default one, "Default Role Assignment Policy" which is by default assigned to all mailboxes in an Exchange environment.
When you have downloaded the script to run it with the Defaults simply type:

.\Manage-GroupManagementRole.ps1 -CreateGroup -RemoveGroup

This will create the management role called "MyDistrubtionGroupsManagement" and assign it to the "Default Role Assignment Policy" to apply to all users in the domain.


After running the script, people will be able to change Group Membership of distribution lists using Microsoft Outlook for only groups for which they are under the "Managed By" / "Ownership" attribute - just like how it was in previous versions of Exchange!

Some Gotcha's

For this functionality the Mail Enabled Group must be set as a Universal Group Scope.  Domain Local or Global Groups do not support this functionality.

In Exchange 2010 or Exchange 2013, you can only set User accounts to the Managed By / Ownership field.  No longer can you set Security Groups as ownership of another group - a limitation of RBAC.  You can however set multiple people to manage/own a distribution group.

There are a couple of other Gotcha's which can generate the "Changes to the distribution list membership cannot be saved" which are documented on Microsoft KB2586832 that can generate this error.  If your still having problems I recommend you have a read of the following article:

http://support.microsoft.com/kb/2586832

Thursday, April 3, 2014

Outlook Error - Your server administrator has limited the number of items you can open simultaneously.

One of my customers running a custom line of business application called Office Automator by Office Automation which integrates with Microsoft Outlook experienced problems were experienced when sending emails.  The Outlook client was configured to use a direct RPC to the Exchange server.  The error users were experiencing was as follows:

Error No: -2147220731

Your server administrator has limited the number of items you can open simultaneously. Try closing messages you have opened or removing attachments and images from unsent messages you are composing.


The customer was running a single Exchange Server 2010 SP1 multi role in the backend. It is important to note that the user had multiple Outlook sessions open having Outlook running locally on their desktop computer and a second session initiated as a RemoteApp from a remote desktop session host server.

In addition to the error being generated on the Outlook client, the following error was also being generated in the Exchange 2010 application logs on the mailbox server role.

Event ID: 9646
Source: MSExchangeIS

Mapi session 'GUID' exceeded the maximum of 250 objects of type "objtMessage".


This error was resolved by increasing the amount of maximum objtMessage calls a single MAPI session for a mailbox can create from 250 to 500.  This was done by making the following registry key changes:
  1. On the Microsoft Exchange Mailbox Server exhibiting the error, open the Registry Editor.
  2. Go to HKEY_LOCAL_MACHINE\System\CurrentControlSet\Services\MSExchangeIS\ParametersSystem
  3. Right-click ParametersSystem, point to New, and then click Key.
  4. Type MaxObjsPerMapiSession, and then press ENTER to name the new subkey.
  5. Right-click MaxObjsPerMapiSession, click New, and then click DWORD Value.
  6. Type objtMessage, and then press ENTER to name the object.
  7. Right-click objtMessage, and then click Modify.
  8. In the Value data box, type the number of objects to limit this entry to, and then click OK.
  9. Close the Registry Editor.
As you see below I increased the limit to 500.


For more information on tweaking Exchange Store Limits in Exchange 2010 please review the following TechNet article:

http://technet.microsoft.com/en-us/library/ff477612(v=exchg.141).aspx

Hope this post has been helpful!

Tuesday, April 1, 2014

Cannot Delegate Control - Only Shows Contacts!

I had a problem at a customer where users could not delegate other users access to their Exchange mailbox.  When a user opens up their delegates and clicks Add they cannot see the Global Address List, and hence cannot delegate access.

 
It only showed the All Contacts list, and of course contacts are not accounts and do not have access to network resources so they cannot be used for permission delegation.
 
 
This Exchange environment had just undergone cross-forest migration from an Exchange resource forest so there are a number of quirks which are popping up needing resolution.

After investigating I saw on the Default Offline Address Book that it included the Global Address List and the following "All Contacts" address list.

 
I removed the All Contacts Address List:
 
 
Then forced the OAB to regenerate with:
 
Get-OfflineAddressBook | Update-OfflineAddressBook
 
Then redistributed it to the Client Access Servers with:
 
Update-FileDistributionService CASNAME
 
For more information on this process refer to:
 http://clintboessen.blogspot.com.au/2009/05/how-oab-distribution-works.html

Then re-downloaded the OAB with Outlook

 
The issue was then fixed:
 
 
Having an address list defined on the Offline Address Book does not generally cause problems in Outlook with the ability to see the GAL.  I'm not sure what happened in this environment as when I re-added the All Contacts address list I could not reproduce the problem.

Tuesday, November 12, 2013

Autodiscover 0x800710DD

A customer of mine was having problems downloading the Offline Address Book and performing test Autodiscover attempts using "Test E-mail AutoConfiguration" through Microsoft Outlook.

When attempting to test Autodiscover using their user account credentials from an Exchange Management Shell using the Test-WebServicesConnectivity command, the autodiscover test completed successfully.  This brought it down to an issue with the end workstation, not the server, user account or mailbox.

The error which was experienced when performing an Autodiscover attempt in "Test E-mail AutoConfiguration" was:

GetLastError=0;httpStatus=407

Autodiscover to https://EXCHANGESERVER.DOMAIN/Autodiscover/Autodiscover.xml Failed (0x800710DD)

This is shown in the following screenshot:


After diagnosing the problem it turns out that this issue was caused by a proxy server configured on the end workstation.  Disabling the proxy server resolved the issue.

As a permanent solution, the proxy server must remain enabled.  To ensure the Exchange server is not used via the proxy, you can add the Exchange server as an exception.

 
This can be done through Group Policy for all users using Internet Explorer Maintenance.  Please note moving forward with Internet Explorer 10 and onwards, you need to make these changes from a Windows 8 or Windows Server 2012 machine.  For more information about this please see my following blog post:
 

Wednesday, October 23, 2013

Removing a Corrupt Folder from a Mailbox in Exchange

Today a customer had a corrupt folder in their accounts mailbox called "Contractors and Payments" which they were unable to delete.  When attempting to delete the folder in Outlook, they received the following error message:

Cannot delete this folder. Right-click the folder, and then click Properties to check your permissions for this folder. See the folder owner or your administrator to change your permissions. Outlook is synchronizing local changes made to items in this folder. You cannot remove this folder until the synchronization with the server is complete.


When attempting to delete this folder using MFCMAPI using a hard delete or soft delete, the following error was experienced:

Error:
MAPI_E_INVALID_ENTRYID==0x80040107
Function IpParentFolder->DeleteFolder(IpItemEID->cb, (LPENTRYID) (IpItemEID->lpb, lpProgress ? (ULONG_PTR)m_hWnd : NULL, lpProgress, ulFlags)
File MsgStoreDIg.cpp
Line 950


The folder also could not be removed using Outlook Web App.

To remove the corrupt folder, the New-MailboxRepairRequest was executed against the accounts mailbox with the corruption types set as ProvisionedFolder, SearchFolder, AggregateCounts and FolderView.

New-MailboxRepairRequest -Mailbox accounts -CorruptionType ProvisionedFolder,SearchFolder,AggregateCounts,Folderview


As this Exchange Server is running Exchange 2010, the Get-MailboxRepairRequest command does not exist.  This command was introduced in Exchange 2013 for viewing the status of a mailbox repair task.  However in Exchange 2010 we can still view the repair request using Windows Event Viewer.

We can see here the mailbox repair request started with the corruption types specified above.


The next event log shows the repair completing successfully.

 
Next verify that the corrupt folder has been successfully removed using Outlook Web App.  It should be gone.  For it to disappear in Outlook you need to delete the local cache "OST file" or recreate the users Outlook profile.  This is because the corrupt folder is still cached on the local workstation.
 
After recreating the Outlook profile we can now see that the corrupt folder is gone for good!


Wednesday, July 31, 2013

How to install PST Capture Agent on Windows XP

This post shows you how to get the Microsoft Exchange PST Capture Agent running on Windows XP.  It is important to note that Microsoft does not officially support the PST Capture Agent v2.0 on Windows XP clients.  This article shows you how to do it anyway - and it works!

Before we go any further you must have the following prerequisites installed on the Windows XP machine:
  • Visual C++ Redistributable
  • Windows Installer 4.5
  • .NET framework 3.5
After you install these prerequisites when you run the Agent setup you will most likely receive the following error message:

Microsoft Exchange PST Capture Agent Setup Wizard ended prematurely because of an error.  Your system has not been modified.  To install this program at a later time, run Setup Wizard again.  Click the Finish button to exit the Setup Wizard.


There is no way to get around this error message with version 2 of the PST Capture Agent.  However version 1 of the PST Capture Agent works great on Windows XP and also has no issues talking to a version 2 PST Capture server - we have tested this!  Unfortunately Microsoft has removed the download links for the old version of the PST Capture Agent however I have put this file back online to be used only in this scenario with legacy Windows XP machines.  Please download the old version of the client from the following URL:

https://sites.google.com/site/cbblogspotfiles/PSTCaptureAgent_x86.zip

Sunday, March 24, 2013

An Insight into Stellar Phoenix Outlook PST Repair tool

In this article we are going to look at how to repair a corrupt PST file using the Outlook PST Repair tool created by Stellar Phoenix.

Before we dive into Outlook PST Repair lets quickly cover Scanpst.exe.  Scanpst.exe is a free tool shipped with Microsoft Outlook 2003/2007/2010 which lets you repair corrupt PST files.

On my Office 2010 installation, ScanPST can be found in the following path:

C:\Program Files\Microsoft Office\Office14


Below is a screenshot of ScanPST.


Stellar Phoenix labs performed testing with ScanPST and from their testing they discovered that the free PST repair tool is capable of repairing PST files with only minor structural errors.  PST files with severe correction or PST files where the indexing table is completely removed, ScanPST will not repair the file.

Stellar Phoenix claim that their tool Outlook PST Repair v4.5 can repair a corrupt PST file and bring it back to a consistent state regardless how severe.  I questioned this with Stellar Phoenix as 100% of corruption is a big claim however the company was confident to back it.  All content within the corrupt the PST file which is in its valid state can be recovered.  Data which has been lost due to corruption is gone, no tool will be able to recover this.

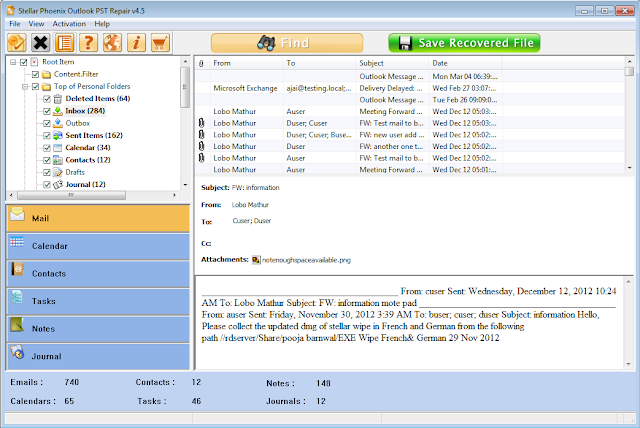
Outlook PST Repair v4.5 has been designed to look like Microsoft Outlook to provide users and administrators with a familiar user experience.  When a corrupt PST loaded, all content which is still readable inside the corrupt PST file will be displayed.  Companies have the flexibility of recovering individual emails, attachments, sub folders or entire PST files.

Below is a screenshot of the the Outlook PST Repair tool:


To begin using the tool simply the Open an Outlook File to Repair.


Select the location of the PST file which is corrupt.  In my case I have a corrupt PST file called test.pst.


Hit the Start button and Outlook PST Repair will go through and scan for all recoverable content.


The tool displays all data which is now recoverable.  The user is able to browse mail items, calendars, contacts, tasks, notes everything which can be displayed in Outlook using the Outlook PST Repair tool.


The user is able to do the following things once a corrupt PST file has been loaded in Outlook PST Repair v4.5:

  • Export all content which is readable within the corrupt PST into a new PST file.
  • Export select content from a corrupt PST file by selecting what content they wish to export.
  • Extract attachments from emails
  • Export individual emails to MSG or EML format

Outlook PST Repair v4.5 comes in a demo version and a full version.  What is the difference between the demo version and the full version?

The demo version allows you to see all items which can be discovered, read email and look at calendar items however it does not allow you to extract any information out of the corrupt PST file including attachments, individual items or folders.

The full version allows you to browse a corrupt PST file and export content from a corrupt PST file to a new PST.

There are two licencing versions for purchasing the full version of Outlook PST Repair 4.5.  Both licences come are lifetime and come with 24/5 technical support free with the purchase.
  • Single User Licence ($129 USD).  Users receive a key which they use to activate the Outlook PST Repair tool.  Once activated the key will only ever work on the Windows instance in which Outlook PST Repair tool was activated.  In the event the user purchases a new computer or re-installs Windows, the user must contact support to transfer the licence.
  • Technician Licence (299 USD).  The technician licence can be used unlimited times on different workstations.  However a USB key must be connected to the machine to activate the licence and perform the recovery.  Only one recovery can be performed at a time.  One technician licence must be purchased per office.  Stellar Phoenix ship the USB key to the customer upon purchase.
Note: All pricing is subject to change, to get the latest pricing please visit www.stellarinfo.com

Summary

The Outlook PST Repair 4.5 tool is a fantastic tool for fixing corrupt PST files.  If Scanpst.exe fails to recover a corrupt PST file or you need to perform granular recovery from a corrupt PST file I encourage you to give Stellar Phoenix Outlook PST Repair a shot.

For more information or to obtain a copy of Stellar Phoenix Outlook PST Repair please visit the following website:

http://www.stellaroutlooktools.com/scan/pst-repair.php

Sunday, November 11, 2012

Identify number of items in folder Outlook Cached Exchange Mode and Exchange

This blog post shows you how to identify if a folder within your Outlook OST file has become out of sync with your Exchange server for Outlook clients which are running under cached Exchange mode.  To do this we will look at the item count both of the cached outlook client and the Exchange server.

To get the item count of a folder in Outlook, this can be done in two ways.  The first method is by using a VBS script such as the one from David Lee's blog:

http://techniclee.wordpress.com/2012/02/29/exporting-outlook-message-counts-to-excel/

A copy of this script can be found below.

'Declare some variables
Dim olkApp, olkSes

'Connect to Outlook
Set olkApp = CreateObject("Outlook.Application")
Set olkSes = olkApp.GetNamespace("MAPI")
olkSes.Logon olkApp.DefaultProfileName

'Call the export process once for each folder count to be exported
'Format is ExportMessageCountToExcel <Path to Outlook Folder>, <Path and filename of the Excel file to export to>, <Number of the sheet the count goes on>
'The following lines are examples.  Edit them as needed.  Add additional lines as desired.
ExportMessageCountToExcel "Mailbox - Doe, John\Inbox", "C:\Message_Counts.xlsx", 1
ExportMessageCountToExcel "Personal Folders\Projects", "C:\Message_Counts.xlsx", 2

'Disconnect from Outlook
olkSes.Logoff
Set olkSes = Nothing
Set olkApp = Nothing
WScript.Quit

Sub ExportMessageCountToExcel(strFolder, strWorkbook, intSheet)
    Const EXCEL_COL = 1
    Dim olkFld, excApp, excWkb, excWks, lngRow
    Set olkFld = OpenOutlookFolder(strFolder)
    Set excApp = CreateObject("Excel.Application")
    Set excWkb = excApp.Workbooks.Open(strWorkbook)
    Set excWks = excWkb.Worksheets(intSheet)
    lngRow = excWks.UsedRange.Rows.Count
    If lngRow = 1 Then 
        If excWks.Cells(lngRow,1) <> "" Then
            lngRow = lngRow + 1
        End If
    Else
        lngRow = lngRow + 1
    End If
    excWks.Cells(lngRow, EXCEL_COL) = olkFld.Items.Count
    Set excWks = Nothing
    excWkb.Close True
    Set excWkb = Nothing
    excApp.Quit
    Set excApp = Nothing
    Set olkFld = Nothing
End Sub

Function OpenOutlookFolder(strFolderPath)
    Dim arrFolders, varFolder, bolBeyondRoot
    On Error Resume Next
    If strFolderPath = "" Then
        Set OpenOutlookFolder = Nothing
    Else
        Do While Left(strFolderPath, 1) = "\"
            strFolderPath = Right(strFolderPath, Len(strFolderPath) - 1)
        Loop
        arrFolders = Split(strFolderPath, "\")
        For Each varFolder In arrFolders
            Select Case bolBeyondRoot
                Case False
                    Set OpenOutlookFolder = olkApp.Session.Folders(varFolder)
                    bolBeyondRoot = True
                Case True
                    Set OpenOutlookFolder = OpenOutlookFolder.Folders(varFolder)
            End Select
            If Err.Number <> 0 Then
                Set OpenOutlookFolder = Nothing
                Exit For
            End If
        Next
    End If
    On Error GoTo 0
End Function

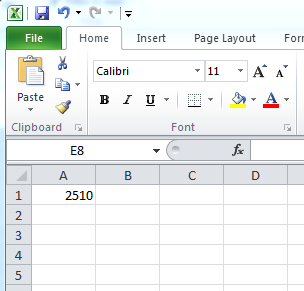
This script will output the results to an Excel spreadsheet as shown in the following screenshot:


The second method is by selecting all items within the Outlook folder by pressing "CTRL + A" then pressing "ENTER".  Make sure you select NO!


Now to check the number of items in my Sent Items on the Exchange server.  This is done with the following PowerShell command:

Get-MailboxFolderStatistics -Identity "clint" -FolderScope "SentItems"

This shows the number of items on my Exchange server matches my Outlook client meaning my Outlook Cached Copy is indeed in sync!